
Adapted with permission from the Bucket Brigade Manual: Take Back Your Air! and resources generously shared by Global Community Monitor
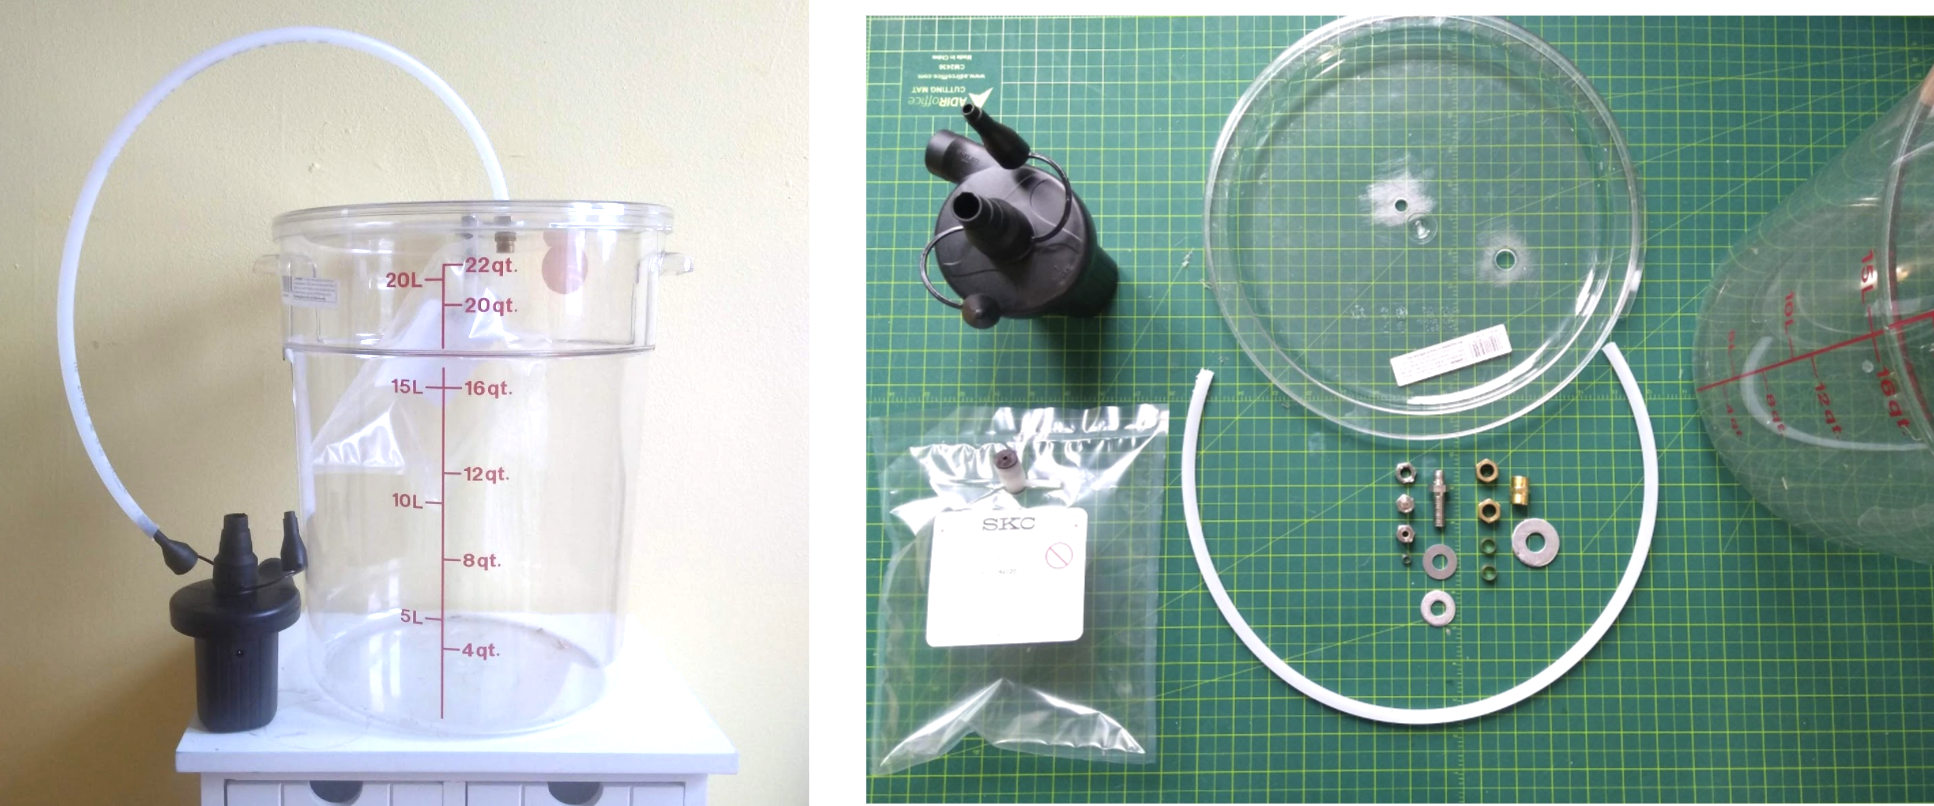
Materials needed
- 3/16" stainless steel bulkhead
- 3/16" stainless steel plug
- Extra 3/16" ferrules
- 1 1/2" washers
- 2 3/8" washers
- 3/8" brass compression coupling
- 18-20L clear food storage bucket + lid
- 3/8" polyethylene tube (2 feet)
- Battery-powered camping vacuum
- 5L-10L Tedlar bag

.jpg")
.jpg")
##Tool List
- Power drill
- Two adjustable wrenches
- 3/8" drill bit
- 9/16" spade bit
- Sandpaper
- Dynaflex sealant

Step 1: Set up the Tedlar bag
Before you start assembling the bucket, you'll need to set up the 3/16" stainless steel bulkhead so you can make an airtight seal when you attach the Tedlar bag. You'll need the bulkhead, the Tedlar bag, and two adjustable wrenches. Start by taking apart the bulkhead and setting aside everything but the end nut and ferrule.


##Step 2: Attach the nut and ferrule to the Tedlar bag Slide the end nut and ferrule over the polypropylene tube on the Tedlar bag. The front and back ferrule should fit loosely to start. You'll need to tighten it to get it to catch and hold.


##Step 3: Attach the bulkhead and tighten against the fixed nut Now that the nut and ferrule are attached to the Tedlar bag, hand tighten it to the bulkhead. Use the adjustable wrenches to tighten it an additional half-turn, or until the ferrule catches. Tightly slightly, just a tick! As the ferrule is crushed, it "bites" into the soft tubing, attaching firmly. This makes an airtight seal with the bag. You want it tight enough so that it doesn't slide, but not so tight you can't get the bag off once you're done!


Having trouble? This type of joint is called a compression coupling and is common in plumbing fixtures. Check out How a Compression Coupling Works to watch a short video and get a better understanding of how this joint works.
What if I overtighten it? If you "overcrush" your ferrule and have problems getting the nut off, no worries! You can just cut the end of the polyproplylene tube off once you've taken your sample and use a new ferrule on your next bag.
The nut and ferrule are not designed to be reusable. We're tightening it lightly so we can reuse the joint, but it's not a big deal if you accidentally overtighten. That's why you have extra ferrules.

##Step 4: Drill two holes in the bucket lid
The first hole needs to be set 2-3" away from the edge of the lid. Use the 3/8" bit.
The second hole is drilled with the 9/16" spade bit and can go anywhere.


Step 5: Gather parts for the intake port
You'll need the 3/16" stainless steel bulkhead, two 3/8" washers and the bucket lid.

##Step 6: Scuff the holes with sandpaper
Scuff the area around the holes on the top and underside of the lid. This will help the sealant stick.

##Step 7: Take apart the 3/16" stainless steel bulkhead
Set aside the plug but keep the nut handy, we'll need this part shortly. Right now we just need the solid bulkhead fitting, the washers, and the lid.

##Step 8: Attach the bulkhead to the lid
The bulkhead is designed to mount to a solid surface like the bucket lid. You'll need the 3/16" stainless steel bulkhead, two 3/8" washers, the bucket lid, and a tube of Dynaflex sealant.
Apply a small amount of sealant to the scuffed edges of the 3/8" hole. Lay the bottom washer in place. It should sit flush with the underside of lid. Slide the bulkhead up through the hole and press firmly against the washer. Lay the top washer in place in the same way. Connect the loose nut to the top of the lid and screw into place. Tighten the nuts


##Step 9: Take apart the 3/8" brass coupling
Like the bulkhead, the coupling has a tiny sleeve that fits inside each nut.
The coupling is designed to attach a tube to either side.
We only have one tube, so we're only using one nut and sleeve.
Set the second set aside for now.


##Step 10: Attach the tube
Slide the tube through the nut and sleeve. It should be flush but not tight. Don't worry if it slides around. We'll tighten it down with our adjustable wrenches to catch and hold the tube. The sleeve should fit snugly inside the nut. Leave 1/2" of tube on the other side.
Screw the coupling so the nut fits tightly. It's OK if the tube still slides a little. Use your adjustable wrenches to tighten the nuts. This will crush the sleeve down onto the tube. Once it's tight, remove the compression coupling. Once it's on it's on for good. You won't be able to remove the nut. Remove the coupling and set the tube aside.


##Step 11: Attach the brass coupling to the bucket lid
Like the bulkhead, the coupling is designed to mount to a fixed surface. For this part, you'll need the brass coupling, the 1/2" washer, the bucket lid, and a tube of Dynaflex sealant.
Apply a small amount of sealant to the scuffed edges of the 9/16" hole. Lay the top washer in place. It should sit flush against the lid. Slide the bulkhead up through the hole. Notice that the fixed nut is much smaller on this fitting! Press down to make a firm seal.


##Step 12: Attach the tube to the outtake port
Attach the tube directly to the top. There is no loose nut for the outtake port, only the end nut and tube.


##Step 13: Let the bucket lid dry Don't skip this step! Set the lid out overnight and give your sealant time to cure. Prop it with supports (like two bricks or two chairs) so you're not putting pressure on the joints.

##Step 14: Attach the Tedlar bag and pump
Put the cap on the intake port when not in use to prevent contamination.


##Congratulations! You're ready to take a sample.
Many thanks to Bongani Mthembu and Desmond D'Sa, South Durban Community Environmental Alliance, Rico Euripidou, groundWork, Friends of the Earth South Africa, Jackie James Creedon, Citizen Science Community Resources, and Fair Tech Collective, and the 11th Hour Foundation for supporting creation of this digital guide.
4 Comments
Extraordinary documentation!!! What a huge job!!
Thanks!
Reply to this comment...
Log in to comment
@imvec awards a barnstar to kgradow1 for their awesome contribution!
Reply to this comment...
Log in to comment
Great work Katie! Just wanted to add the PDF version of these build instructions. Here is a link to the document that the Public Lab Kits team includes in buckets purchased from store.publiclab.org
Reply to this comment...
Log in to comment
Login to comment.