This research note is in progress, I'll update keep updating it.
What I want to do
I am preparing a spectrometer demo session for the Bilbao MakerFaire (Spain) in November 18-20, 2016. I have the old Desktop Spectrometer Kit 2.0 and I want to try to upgrade it to the 3.0 version.
I've seen the possibility to upgrade my 2.0 to 3.0 (http://store.publiclab.org/products/dsk-3-0-upgrade), but it is not clear to me what it exactly contains or if it is an upgrade form 2.0 or 2.5 version. Maybe I can try to build it and test how feasible is to reproduce:
Are there instructions to upgrade from 2.0 to 3.0 spectrometer?
My worries are how to insert the old webcam in the new version. The no velcro-no wood version is a good starting point to make the camera from v2.0 fit the 3.0 box.
In fact the only thing that I am going to use from v2.0 is the webcam. More than an update, it is more a reuse of the webcam in the v3.0 box.
My attempt and results
Are there files for laser cut the paper available?
Yes, they are at https://publiclab.org/wiki/desktop-spectrometry-kit-3-0#Design+files While preparing the files for the laser cut I detected a duplicated cut path.
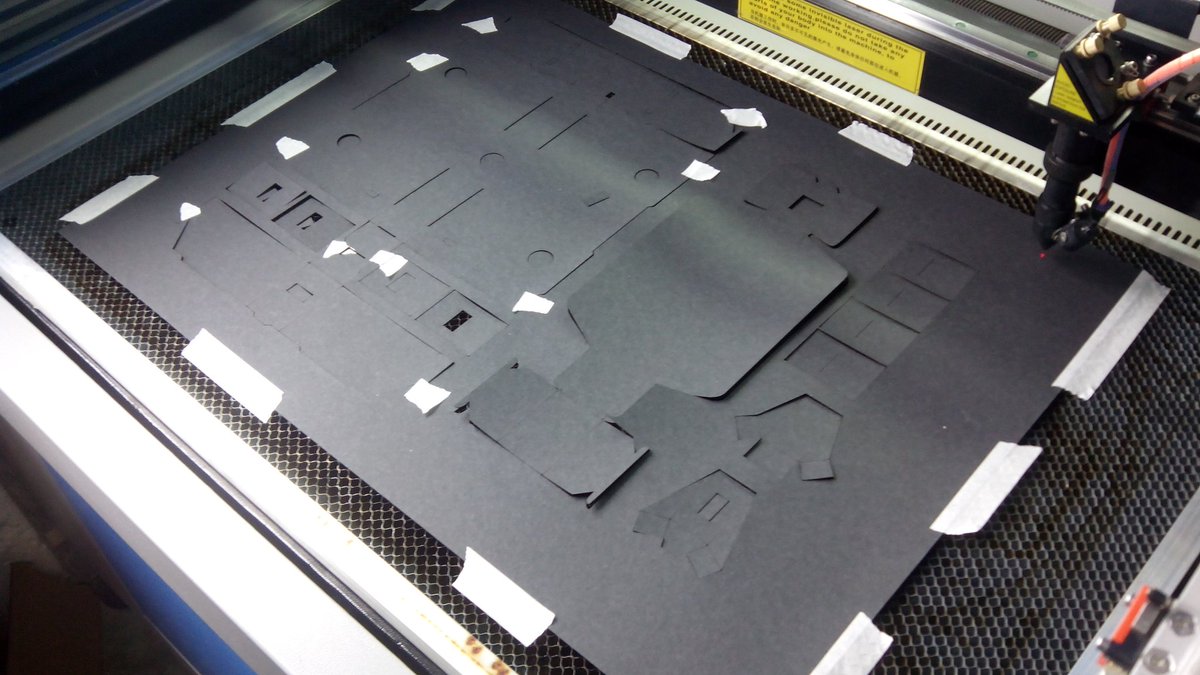
Here is the file I used in the laser cut and the settings I used [pending] for this specific black cardboard:
__ spec-cut-clean-plainF_archivo-final-corte.ai
I (my colleague tuni who cut it) had to convert it to .ai to make it work in the laser cutting machine. The only difference from the original file are the extra cardboard slits. You can download the original .svg file (that has no slits): spec-cut-clean-plain.svg
The cardboard was bent (it was stored in a tube) so I had to put scotch tape (thanks Tunipanea!) to prevent pieces from moving. That's why you see those white pieces on top of the black cardboard.

We've made some slits testing different widths with the cardboard. Let's see if they are good enough.
Questions and next steps
0. Construct the box with the cardboard pieces.
1. Remove webcam from desktop version 2.0, measure it and prepare it to install it in the v3.0.
This is the old webcam:

Is the webcam from spectrometer v2.0 suitable (and as good as the one included in v3.0) for this upgrade?I've posted the question.
I'll keep the camera with the DVD attached. Thanks for the answers!
Without changing the focus it works: https://spectralworkbench.org/spectrums/91439 but I think it should focus be readjusted: to which distance?
2. Decide if I'll be using a wooden block and velcro or I'll go with the woodenless version.

I went for the wooden version. As the cable of the USB camera was in the back I had to use a different 45 degree wooden camera block. I made two pieces out of discarded wood:
- Two pieces of 45 degree wooden camera block. 25mm x 25mm x 10?mm
- MDF bench as in the 6mm x 40mm x 235mm. I cut part of it to allow the cable go out, but I did it in the corner, and there it is useless.
This is how it looks with only one angled wooden block:

Then I decided to put the other one to enhance stability.
The wooden pieces and the bench were put together with velcro.

And the webcam is attached to the wooden pieces with double sided tape:

3. Make bigger hole to make the USB cable pass.
I had to cut the back of the box to allow the cable to get out. I had to peel the head of the USB to make it smaller and avoid making a bigger hole in the box.

4. Enhacements
Well, I assembled everything and it works.
The problem is that there is too much "blue" noise (see answers to my question).
I made some changes based on @warren and @stoft recommendations:
- a darkened room, 2) CFL at a distance of 3-5 feet, 3) could also block all light from CFL except for a 1-inch hole in a cardboard mask to further restrict the source angle, 4) DVD parallel to camera sensor, mounted very close to the lens, 5) DVD at 45-deg to direction of slit, 6) slit at least 8-10 inches from camera, 7) mechanically stable (sitting on the desk) then 8) focus for best resolution of mid-green double-peak. Under these conditions, I often just use a black cloth to cover the spectrometer parts which usually eliminates nearly all stray light.
DVD was already parallel to the webcam, 45/deg to the direction of the slit and just 1mm to the lens cover.
- Removed (just snip off) the blue LED from the Camera.

- Removed the infrared filter: https://publiclab.org/wiki/dsk#Unscrew+the+lens+and+remove+the+infrared+filter
- Focus the webcam+away) to about 22 cm (9") away. I used "Cheese" program in Ubuntu to make this.
- Mechanically stable (sitting on the desk) then
- A darkened room
- Light source further: I started with 80cm. @stoft suggest longer distance.
- Used a thinner slit. This one was not recommended but I tried it.
- Cloth to cover the spectrometer parts
- Block all light from CFL except for a 1-inch hole in a cardboard mask to further restrict the source angle. This was done at 80cm distance the light source from the slit. Thiner slit [2]. CFL light going through a 4x3cm hole of a cardboard leaning on a white table (reflectance!). Light reflecting in the white walls was not much but it still was there.

Blue has less "hump" but I've also lost information in red and green.
I am going to try with a lees power CFL light source, longer distance.
Conditions: 140cm light source - slit. CFL 9W Blocking light. 2cm diameter hole in cardboard. Spectrometer v3, webcam v2. Slit thinner [2].
With a less powerful bulb it works great for the calibration:
Why I'm interested
I want to upgrade my equipment and test how feasible is to reproduce the spectrometer3 from the information available in the website.)
References and further activities
- Spectrometry activities https://publiclab.org/wiki/spectrometry-activities
- Spectrometry Sampling https://publiclab.org/wiki/spectrometry-sampling
- Oil testing kit https://publiclab.org/wiki/oil-testing-kit
- Spectral Workbench usage (and trouble shooting) https://publiclab.org/wiki/spectral-workbench-usage
1 Comments
Such an excellent, thorough post. Thank you for it.
Reply to this comment...
Log in to comment
Login to comment.