Oil testing kit Blog

Workshop: spec-tacular
Event details
When:
- Sunday, March 16
- 1:30pm - 4:30pm
Where:
- 630 Flushing Avenue -- enter around side via Thompkins Ave
- 8th floor, end of the long corridor (keep going), suite 867 "Public Lab"
Stuff we have:
- lots of equipment to use/borrow!
- foldable specs, desktop specs, smartphone spec, sampling kits
- cute robot toys
- tea/coffee
Nifty things you could bring if you have them:
- Your foldable spectrometer (we'll provide for those who don't)
- Clean glass jars with samples of cooking oils - clearly labeled!
- Clean glass jars with samples of motor oil, heating oil, etc - clearly labeled!
- sterile sticks for stirring samples around. be creative.
Background
"Reading Rainbows" is the coolest thing since balloon aerial mapping. We are beginning this workshop with constructing our spectrometers so that everyone has one of their own. Then, we will learn how to use the website spectralworkbench.org to calibrate it using common fluorescent lights. Then we will but the spectrometers and our samples into a bigger, lightproof box so that we can shine lasers into them.
First up is to get spectra of known substances to begin building our library of environmental chemicals. In the future we will be setting forth to identify unknown environmental chemicals.
But don't take my word for it.
Follow related tags:
new-york-city spectrometer oil fluorescence

20 Oil Testing kits (draft 1)
What I want to do
Buy 20 testing kits to Jeff's design.
The parts are as follows: 4 square glass bottles 2 Droppers 1 bottle of mineral oil 1 Packet of Olive Oil 1 "405nm" 5mw laser pointer
My attempt and results
All items arrived as described. The 405nm lasers seem to be a little off, but they say "+/- 10%" The one I tested was 397nm.
Questions and next steps
Getting these out to everyone who signed up in the comments of Jeff's note.
Follow related tags:
spectrometer oil-testing-kit
Oil Testing Kit: draft materials list
Update: Alpha kits are now available: http://store.publiclab.org/products/spectrometry-sampling-kit
What I want to do
We are developing a "companion kit" for the Public Lab Spectrometer tailored specifically for detecting and identifying petroleum contamination -- mostly for solid residue and tarballs at this point, but hopefully applicable for sheens too at some point.
My attempt and results
Based on a variety of experiments over the past few months (mainly this initial test and this series of more careful tests at Parts & Crafts), we are getting more confident about our ability to detect and identify types of oil contamination; that is, to distinguish motor, heating, and crude oils.
Long story short, you can shine a blue (405nm) laser through a jar of mineral oil which has had a very small amount of the suspected oil dissolved in it, and it'll fluoresce different colors depending on the type of oil it is.
To push this work forward, this new kit will include all of the following, to help people who want to contribute (or just try it out) with all the basic tools and materials. This is supposed to be paired with one of our existing spectrometers, by the way.
- 5oz mineral oil (baby oil -- the added fragrance doesn't fluoresce): $3 - http://www.amazon.com/Johnson-Baby-Oil-Kids-Ounce/dp/B000GCJM06/
- an eyedropper: $0.05 0 http://www.sciplus.com/p/CAP-WDROPPER_39038
- a 405nm blue/violet laser pen: $3 http://www.alibaba.com/product-gs/700677050/well_tested_405_nm_blue_laser.html, or http://www.ebay.com/itm/like/350812684726?lpid=82 to buy just one cuvettes
- 4 flat-sided jars: $0.35 each - http://www.sciplus.com/p/WHITCAP-BOTTLE_48212
- cotton swabs: $0.10
- olive oil test sample: $0.17
- paper instructions (yet to be made)
The basic instructions will be something like:
- Put on latex or nitrile gloves
- Wet a cotton swab with mineral oil
- Rub it on the sample -- a suspected tarball or lump of oily residue -- until it gets brownish (it could take a little while for it to dissolve)
- Dip the dirty swab (that's like a pirate insult... :-P) in one of the square bottles which has been filled 2/3 with mineral oil, and repeatedly and gently dunk it until the brown stuff dissolves and "taints" the mineral oil.
- Keep dunking until it looks like a very very weak tea -- so you can see the coloration. We need to come up with a standard way to determine how dark... maybe a printed comparison strip?
- Cap the square jar and throw away the cotton swab (bag it if it's really gross).
- Throw away the gloves and wash your hands
Then, inside your spectrometer box (to reduce stray light and to protect your eyes from the laser light):
- Without looking at the laser light directly (it's bad for your eyes!!!), shine the laser through a hole in your box, so the laser shines through your jar perpendicular to the spectrometer opening. We'll illustrate this better but look at the Parts & Crafts note above.
- Move the laser up and down until you see both the bright laser peak on your SpectralWorkbench.org graph, as well as the broader range of colors that are the fluorescence.
Really do check out the photos from the Parts & Crafts tests mentioned above to see more detail!

Questions and next steps
This list of materials has to be refined a bit, and maybe adjusted based on prices and availability. I added the olive oil packets because extra virgin olive oil will fluoresce because of the chlorophyll in it -- a good, non-toxic test case.
We also have to be sure people use the laser safely; only inside the box, and never looking at the light, let alone pointing it in their eye or something.
The methodology may need to be improved or adapted. Some samples may not dissolve readily in mineral oil, and methanol (denatured alcohol, from the hardware store) could be an alternative, though it's toxic.
Why I'm interested
Once we get people using this sort of kit, even if it still needs a lot of improvement, we should start making much faster progress at identifying oil samples. To date, lots of folks on SpectralWorkbench.org and in the Public Lab community are still using light bulbs for absorption spectroscopy, and many new spectrometer makers are not sure what to do once they've calibrated their spectrometer. We should get as many folks as possible doing this kind of laser oil testing, so this kit is a high priority.
Follow related tags:
oil-spill oil oil-spill-toolkit fluorescence
Spectrometry Sample Extraction at the Parts & Crafts Toolshed-Raising
I wanted to report back from last month's water quality meetup in Somerville, which was graciously hosted by Parts & Crafts and organized by Bryan Bonvallet, Katie Gradowski, and others on the Boston-area mailing list. Attendees were a nice mix of Public Lab regulars and newcomers, many from Parts & Craft's community of students and their parents. The event was on Nov 24 from 12-6pm.
Though there was a variety of work going on, here I'll just write a bit about the spectrometry work we did, as that's what I spent most of my time on.
Oil sample extraction
A group of us jumped right into trying to do some "extractions" -- where we try to use different liquids to dissolve materials we'd like to analyze in a spectrometer. Its common to have a solid or muddy sample with suspected oil contamination from motor or crude oil, but in order to make a dissolved solution of the oil through which we can shine a laser and take a fluorescence spectrum, we need a quick and reliable way to dissolve the oil and separate it from the sediment. (See that post for the full setup.)

I had learned a bit about this at the SETAC conference in Nashville some weeks earlier, and found that while we have been dissolving samples in non-toxic, cheap mineral oil from pharmacies, in the lab, a typical preparation is to dissolve samples using methanol, hexane, or more toxic solvents. I bought some methanol (also called denatured alcohol, and somewhat toxic -- it breaks down in a few days, but it will make you blind if you drink it) which seemed the least bad of the bunch, but we didn't really get around to using it, instead sticking to mineral oil to try to just do some more rigorous repeated tests with different samples, also trying to scan some samples 2 at a time so that the data would be recorded at exactly the same camera settings.
We'll try the methanol another time -- as a stronger solvent, maybe it'll work with some of the coal dust samples people have been having trouble dissolving: http://publiclab.org/notes/eustatic/09-09-2013/nungesser-test-detection-of-coal-or-petroleum-coke-for-flame-spectrometry


Patrick Herron from the Mystic River Watershed Association takes a sample of motor oil from his car.
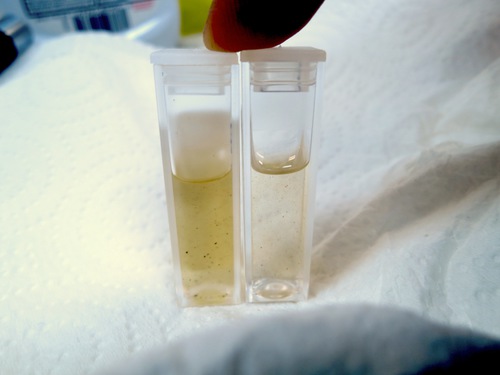
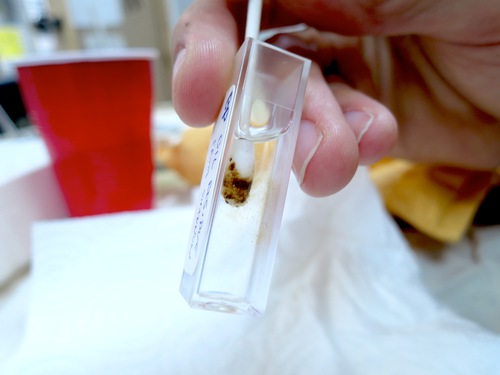
Anyhow, we went through a bunch of samples and collated them here, including various ones from the BP oil disaster, some from the Gowanus Canal. The basic technique we used (trying something new that could be a bit easier than the repeated dilutions Scott Eustis and I have been doing) was to dip a cotton swab in mineral oil, then rub it against a chunk from a sample, or in one case the dipstick from a car's motor oil reservoir.

Then we dipped the swab in a cuvette filled partially with more mineral oil and kind of stirred it around until it began to dissolve, which was usually visible as a yellowish cloud.


https://spectralworkbench.org/sets/show/745
The really neat part was seeing the pure heavy motor oil spectrum, which wasn't the same preparation (it was just a cuvette of pure DTE Heavy motor oil) have almost exactly the same spectral curve at the beginning and end of all our tests -- it shows that the setup is quite repeatable, and that our worry about the laser's batteries dying was unfounded. The dimness of all the other spectra was not related to the strength of the laser.

Takeaways
We need more concentrated solutions, because the fluorescence wasn't nearly as bright as in the pure motor oil. Dave Stoft has suggested that we also use more laser, or brighter lasers. Both ideas should be tested. Also, sand in some samples made it hard to get just dissolved oil into the cuvette; but the sand does settle out and the bubbles to eventually dissipate (above). Still, not as tidy as we'd like.
Another thing -- the setup I described for blue laser testing can be assembled from the box the Desktop Spectrometry Kit comes in! I believe Cort discovered this:
Other projects
There were a number of other projects going -- including the construction and testing of a thermal fishing bob (written about in this wiki page by Sara Wylie), demonstration and discussion of a DIY potentiostat by Craig Versek and Don Blair and much productive discussion of different water quality sensing approaches.
The event was a lot of fun and I'm certainly looking forward to a more in-depth reprisal in January, hopefully at HackerFarm!
Follow related tags:
spectrometer boston partsandcrafts oil

Poster on issues with PAH detection in fish
This poster (NOT released under an open license; merely published here with the permission of co-author Edwin Pena of Seton Hall University -- thank you!!!) was at this year's SETAC conference in Nashville, and describes some really interesting challenges with identifying PAHs (or as they call them, PAH-like substances) in fish oil. This includes a methodology to make fish oil from fish, which I reproduce here:
Fish oil was obtained from an “over the counter brand”: Nature’s Bounty (NB) (lot number: 371123-01), Lovaza (a prescription brand provided by Dr. John Sowa, Seton Hall University) DayBrook (DB) (commercial product provided from DayBrook industries), GILA (wild menhaden collected from the Barataria Bay, LA in 2010) and MVNJ (wild menhaden collected from the Delaware Bay, NJ in 2010). Wild menhaden were collected by NJ Fish and Wildlife and LA Wildlife and Fisheries.
Fish oil preparation: The head and tail of the fish were cut off, and the fish filleted and de-boned. The filets were cut into smaller pieces and pounded into meal using a glass tube inside a round bottom centrifuge tube. The meal was centrifuged in a round bottom tube for six hours at 10,000 rpm. Following centrifugation, two top layers could be seen, one oil and one aqueous. The bottom of the tube was punctured to separate the two layers.
The neat part was that the fish they used were menhaden from Barataria Bay, where Public Lab, GRN, and LUMCON folks have done a lot of work: http://publiclab.org/tag/barataria
Vitamin Standards/PAHs Standard Analysis To extract PAHs, the oil was thawed and mixed by vortexing. In a 1.5 ml microcentrifuge tube, 50 μl of fish oil and 1.15 ml of 75% ethanol (EtOH) were combined. The mixture was vortexed continuously for 1 minute and then the oil was separated from the EtOH by centrifuging for 20 minutes at 13,000 rpm. The oil went to the bottom of the tube. One milliliter of the EtOH was removed and placed in a quartz cuvette. Samples were analyzed for fluorescent compounds using two settings on a SpectraMax M5/M5 scanning fluorometer. The first setting involved holding the emission wavelength (Em) at 350 nm and scanning for excitation wavelengths (Ex) from 250 to 340 nm. This setting was best for aromatic hydrocarbons with one or two aromatic rings such as vitamin E (1 ring) and naphthol (2 rings). The second setting involved holding the Em at 450 nm and scanning for Ex from 250 to 430 nm. This setting was best for polycyclic aromatic hydrocarbons with 3, 4 and 5 rings such as hydroxypyrene and for vitamin A even though it has 1 aromatic ring. Figure 7.

So, the big takeaway is that vitamins E and A can give you false-positives for PAH contamination when using UV fluorescence to assess presence of PAHs, and those vitamins can be present in fishes because they occur in phytoplankton. Edwin and Carolyn make a recommendation for excitation/reading wavelengths of 350/450nm, which does not have the same issues with false positives due to vitamins.
We're not really quite at their level yet, and they are using a scanning fluorescence spectrometer while we're just using blue lasers, so I'm really most interested in the methodology for extracting fish oil from fish which you suspect are contaminated with PAHs. Edwin and Carolyn cite a parts-per-billion (ppb) range sensitivity in their tests!
Their full poster in PDF is here: edwin-pah-fish.pdf
Follow related tags:
spectrometer fish oil ultraviolet

Fluorescence of BP oil with UV laser: success!
What I want to do
Scott Eustis and I and others have made a number of attempts to get clear fluorescence spectra by shining a green laser through mineral oil which has had small amounts of crude oil dissolved in it. But we've struggled to get enough brightness into a Desktop Spectrometer.
My attempt and results
Today over lunch I was fiddling with a UV laser (~405 nanometers: buy on Amazon here for $8) with Matt Hirsch and we suddenly realized that it produces a much stronger spectrum than green lasers had. This may be because a laser can only create fluorescence at longer (lower energy) wavelengths than its own -- so green lasers could never create blue fluorescence. See the setup in the lead image for how we did it -- it was pretty easy. But PLEASE be careful not to shine this in your eye, and don't look at the laser dot directly as this could be a strong UV laser and could damage your eye even though it's hard to see with the naked eye.
The spectra were remarkably strong:

This is very exciting because it has a pretty good signal to noise ratio, and it's a lot to work with for potentially matching oils.
Questions and next steps
We were also able to measure the spectrum of Bertolli olive oil and an unidentified fuel liquid which is probably paraffin. So one thing we should do is take a lot of spectra of different oils and see if we can reliably distinguish them! If you do this, tag your spectra with "oil" please!

Finally, I created a little black cardboard box with the whole setup taped down inside to streamline the process. It includes space to store your laser pointer and samples, and standardizes the position and orientation of the laser and sample container. It's VERY helpful in doing these sorts of tests, especially for reducing stray light:

Update: Link to sample containers I used: http://www.sciplus.com/p/WHITCAP-BOTTLE_48212
Follow related tags:
spectrometer uv oil ultraviolet