DIY Indoor Air Quality Remediation Kit
As of Spring 2016, there are two main types of remediation kits being prototyped:
- the biobroth bubbler -- air bubbling through a bacterial solution
- the rhyzo-remediatior, air bubbling through plant roots growing in water and rocks
| Table of contents |
|---|
| Remediation | An introduction of indoor air remediation in the indoor environment |
| Increasing the Airflow | Discussion of diffusion limitation vs metabolic limitation |
| Pick Your Plant | An abbreviated list of plants that can degrade common air toxicants |
| Current Plant-Based Prototype | Assembly instructions for current plant air filter prototype |
| Early Plant filter prototype | Documentation on an earlier/outdated plant air filter prototype |

Biobubbler! @PublicLab #barnraising2015 pic.twitter.com/1q9dUxmb2D
— bronwen9 (@bronwen9) November 21, 2015The biobroth bubbler (pictured above) is still in its experimental stage and we are looking into the potential harms of introducing these bacteria colonies in the home before posting further documentation. As a result this wiki focuses on the rhyzo-remediatior (plant air filter).
Remediation
Domestic chemical ecologies have both many toxicant sources and many toxicant sinks. Formaldehyde slowly and silently off gasses from engineered woods, carpets, and permanent press clothing. Some of these silent emissions waft out open windows. Others are absorbed by human bodies or the bodies of companion species. Others still are metabolized by decorative indoor plants and the microbes that inhabit their roots.
Since the 1990s we have been hearing promises of plant-based air filters. See, for example, this patent filed in 1993. Some critics (see this 2009 critical review) find fault in the claim that plants-on-their-own can clean indoor air and state that the average home would need 680 plants to adequately scrub the air of toxicants.
Increasing the Airflow
Research indicates that it is not so much that different plants remediate the air differently, but that different plants cultivate different rhizospheric conditions by their root exudates and root autolysis. Plants with quantitatively more bacteria dwelling in their rhizosphere won’t remediate as much atmospheric formaldehyde as plants with fewer overall microorganisms amongst their roots but more gram-negative rods. The formaldehyde removal capacity of plants and their bacterial companion species increases as exposures increase, and over time the bacteria appear to “acquire an increased taste” for exposed toxicants and up-regulate their metabolism. Phyto-bio remediation does not appear to be reaction-limited but diffusion-limited. The amount of air breezing through the roots and across the leaves of indoor plants is minimal. The Public Lab DIY Indoor Air Remediation Kit builds upon these observations that, at least in theory, increasing the airflow through the root system could increase the remediation capacity of plants by upwards of 200 fold. Plant air scrubbers would not require the intermittent replacement replacement of filters but would become more efficient overtime.
Plants manage decomposition underground by providing sugars to symbiotic and beneficial fungi and bacteria in order to manage root growth and decomposition. Plants spend more energy below ground than above ground, and seasonally grow and kill roots just like leaves. We're piggy backing on this process, using plant-managed colonies of beneficial bacteria to scrub formaldehyde, a naturally occurring product of decomposition.
While there is evidence on both sides to indicate either the efficacy or inefficacy of plants-on-their-own as indoor air filters, there have been no published studies on the efficacy of plant systems with increased airflow, like the prototype offered by Public Lab. A similar $230 system made by a for profit company claims that it can clean a 10'x14' room in an hour. Some interior-landscaping industries suggests that 1 regular plant on its own (which could be 200 times less efficient than the Public Lab prototype) per 100 sq feet. critics say its more like 45 regular plants per 100 feet (surprise! you live in a greenhouse now!) so that would be 680 plants in a 1500 sq foot house. But if our system lives up to the theory you could have just three planters to maintain clean air across your home or one in your bedroom or one in the office. During the development of our remediation tool we found a 40% reduction of formaldehyde in a two bedroom with a single planter.
Pick Your Plant
For our system you will need to add a plant -- we suggest Golden Pathos or Snake Plant (Sansevieria) because of their metabolic efficiency and hardiness. Here are a few other plants that have been show to reduce ambient formaldehyde loads (starred * items also metabolize toluene and xylene):
- Dwarf date palm *
- Boston fern *
- Kimberly queen fern *
- English ivy *
- Lilyturf *
- Spider plant *
- Devil's ivy *
- Peace lily *
- Flamingo lily *
- Chinese evergreen
- Bamboo palm *
- Broadleaf lady palm *
- Variegated snake plant *
- Heartleaf philodendron
- Selloum philodendron
- Elephant ear philodendron
- Red-edged dracaena * Cornstalk dracaena Weeping fig *
- Barberton daisy
- Florist's chrysanthemum *
- Rubber plant

Current prototype
(See field test results here)
Supplies:
- You'll need to buy an aquarium pump (the $5.59 model 10 here) and reverse the diaphragm inside after removing the blue shell with a phillips head screwdriver. Here is a looping gif showing this simple hack (your pump will have one diaphragm in it and not two as is shown in the gif).
You can find this model at the above link or in most chain pet supply stores although it will be a few dollars more expensive in a brick and mortar store.
A few feet of flexible airline tubing ($1.99), available widely.
A non-draining flower pot.
A plant (see the above list).
A hydroculture growth medium such as Growstone and a 25 oz jar of activated carbon ($11-$20) from the fish aisle at the pet store). The growth medium will ship in units often much larger than what you will need for this project. Ask your local nursery or flowershop if you can buy as much as you need for your pot (should be less than $10).
For a 1500 sq. ft. home three plants might be best but one plant in one room that you spend a lot of time in or are particularly concerned about is a good way to start.
Instructions:
When you get the growth medium there is a little bit of work you have to do to get the plant ready. You can imagine how jarring it must be for a plant to suddenly have air rapidly flowing through its roots. So these first few steps ensure that your plant will be healthy so that your air can be healthy. It would be great if you could take pictures of the steps and we can help you along the way. Once you get the plant happy, all you need to do is periodically water it, and its metabolic capacity will actually increase with time (unlike mechanical filters that decrease with time). The aquaculture set up also decreases the amount of watering you have to do.
- Soak the activated carbon and the ceramic media in water to saturate. (Can be combined in a large bucket.) Soak a minimum of one hour. Both the carbon and the media absorb and hold moisture. The activated carbon will make noise when initially submerged in water. This is completely normal. After soaking the media, rinse with water until water runs clear. (The inner pot is often used as a strainer for this process.) Use a doubled cheesecloth or an old T-shirt to strain the carbon. Once the water runs clear, if you have not already done so, combined both the ceramic and the carbon in clean water and mix thoroughly. Mixing the media is easier to do when submerged in water.
 Photo by Tim Choy
- Remove the plant from its pot and gently remove as much soil from the roots as possible. Soak the plant’s roots in room temperature water for a short time. This will help loosen the remaining soil and make it easier to remove. After soaking, gently agitate the roots in the water to help remove soil. Gently massaging the root ball in the water will remove a significant amount of the soil. Using a fresh pail of room temperature water, a shower-head or faucet, clean the roots of all remaining soil, being very careful not to damage the root system. Repeat this process until the roots are entirely free of soil. This is very important for the future integrity of the plant!
 Photo by Jerry Zee
Once your root system is entirely free of soil, cut back roughly a quarter of the root system with a pair of sharp scissors. This will stimulate growth of new “water roots.” Note: keep root system moist while transplanting; do not allow roots to dry out. Now that your plants roots are entirely free of soil and your media is free of dust, you are ready to begin potting.
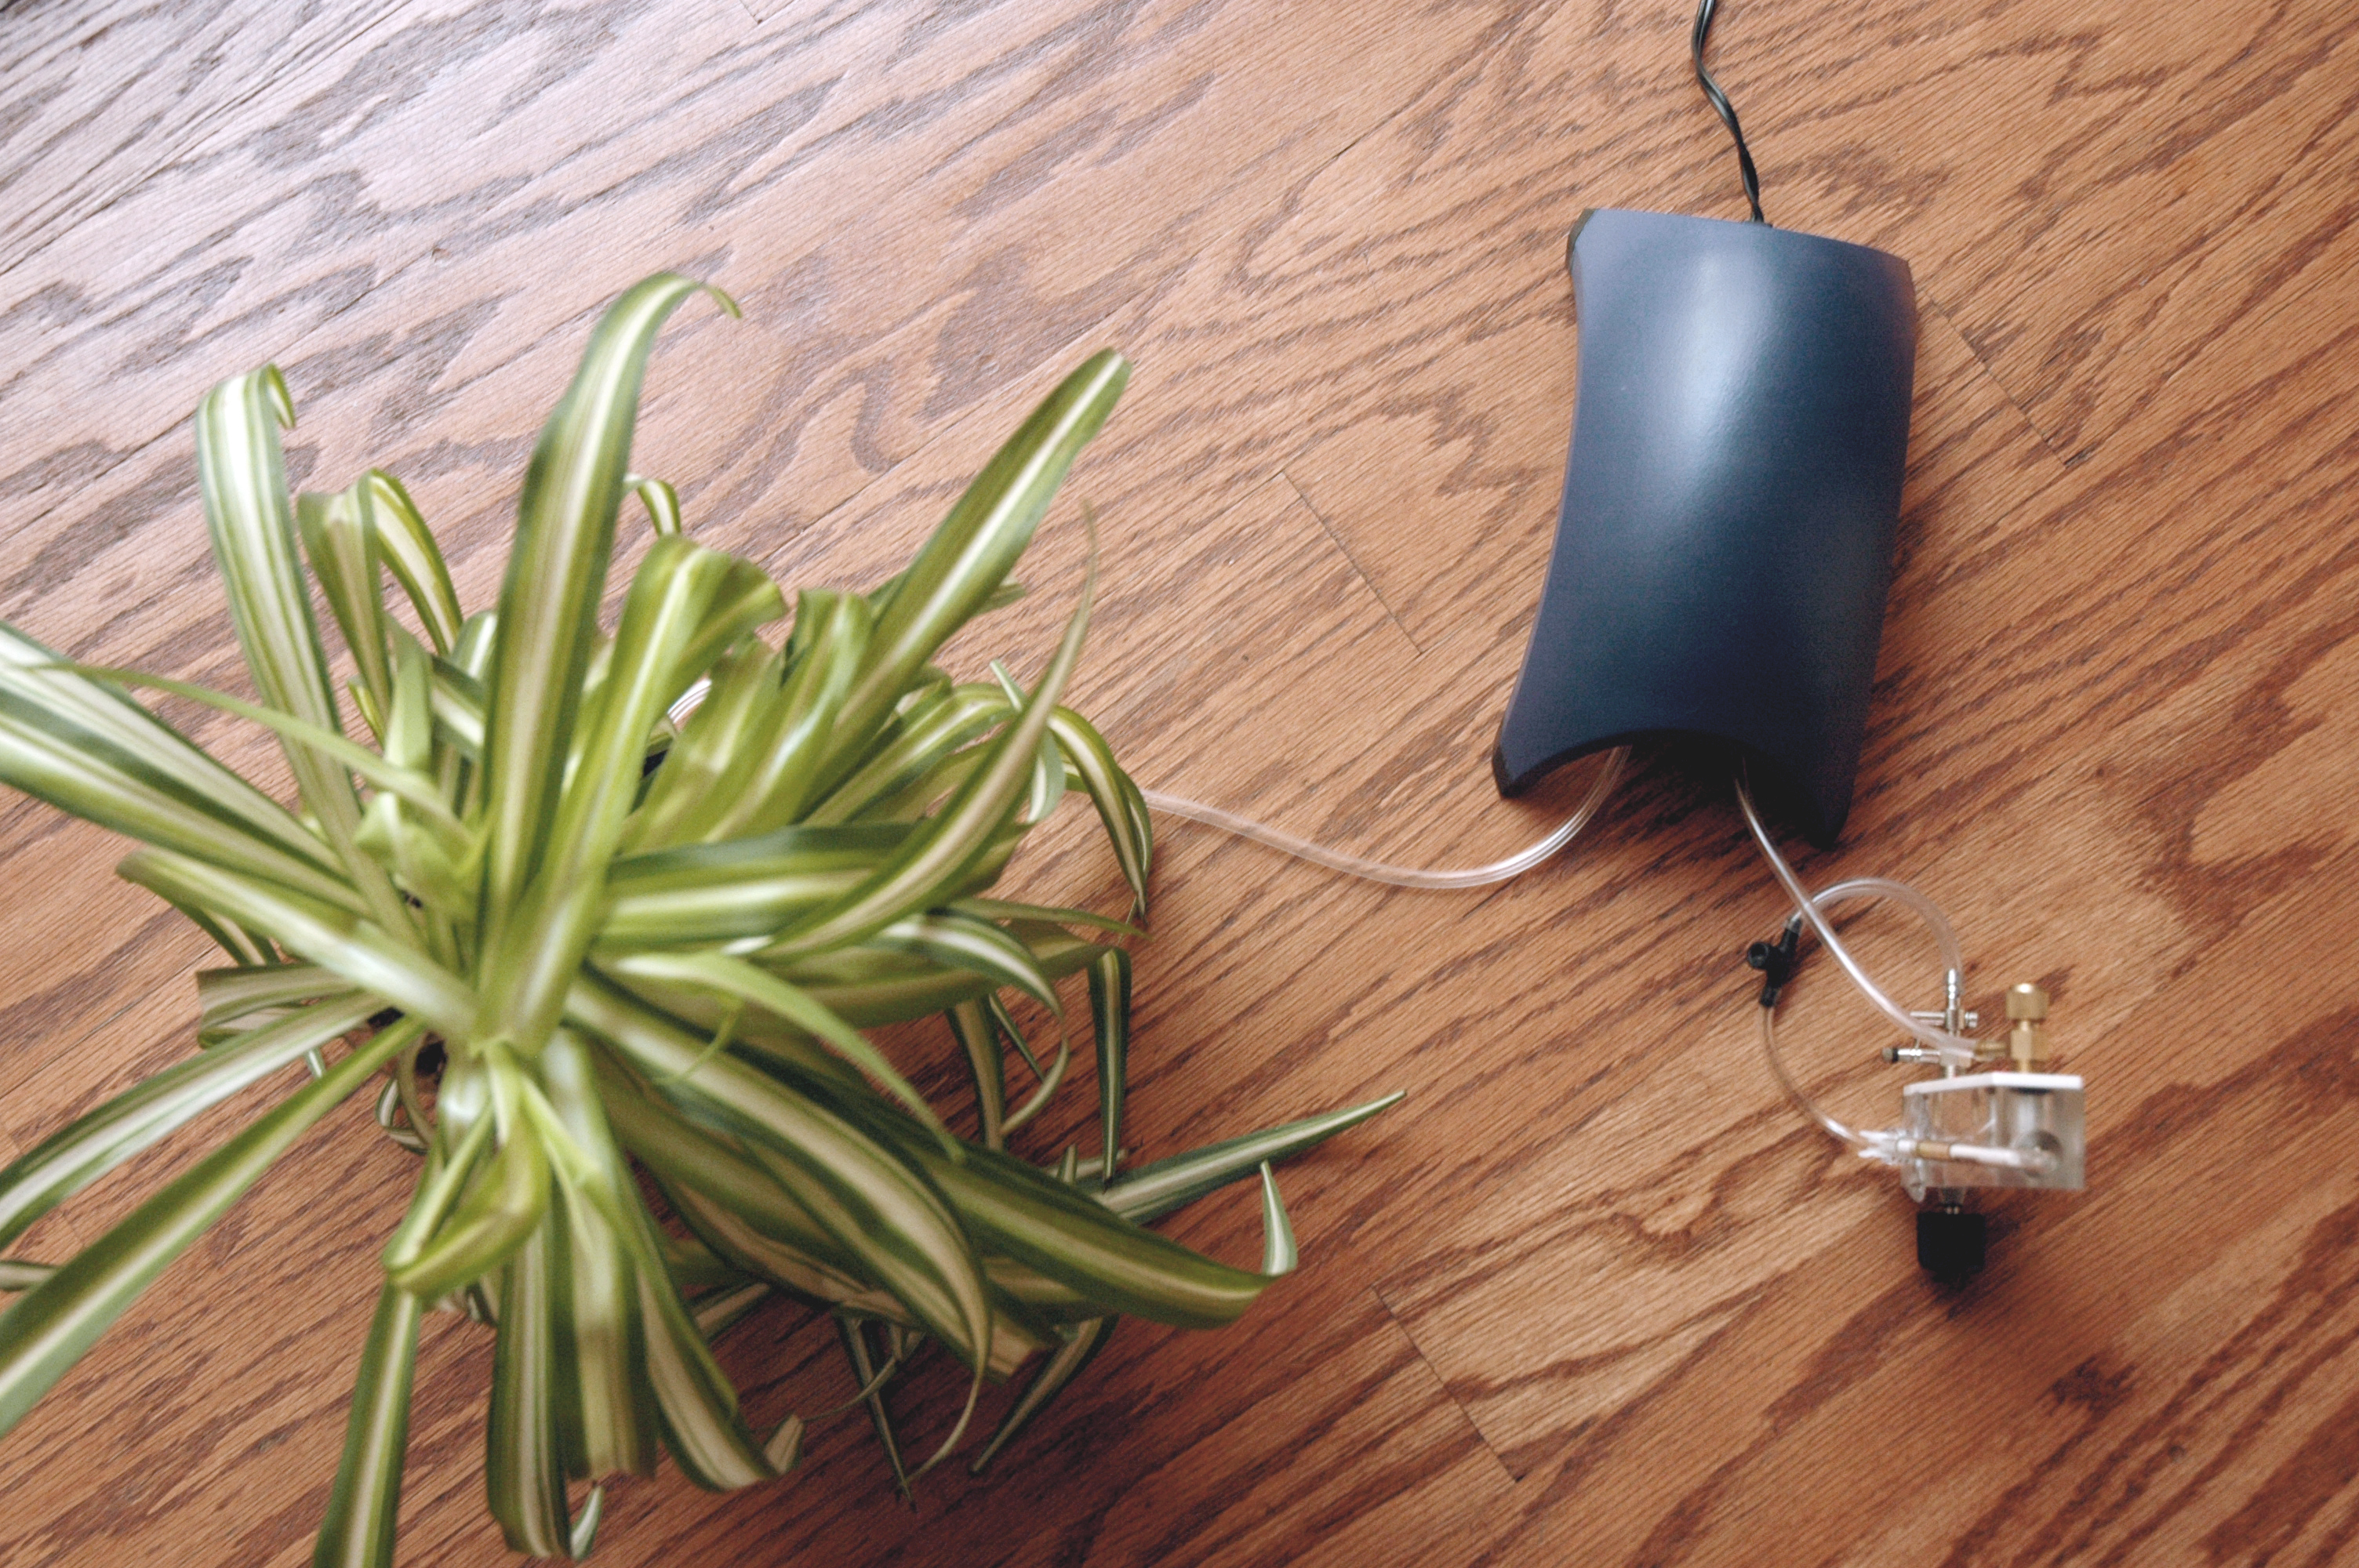
Pot the plant as you normally would just within the growth medium you have prepared. Be sure to snake the aquarium tubing over the lip of the container, with the end terminating high in the root ball. You will want to never have the water level in your planter high enough to be sucked into the tubing and destroy or contaminate the pump.
Allow your plant to acclimate itself to its new environment for at least two weeks before turning on the pump.
Instructions are adapted from the plans of former NASA scientist, Dr. Bill Wolverton.
First prototype
This was developed in a workshop at App State University in the fall of 2014. The setup adapts an existing pot with holes in it (this patching technique is not advised as it may introduce VOCs into the system) and also uses a flowmeter to assess the flow rate of the system, which is not necessary for daily use.

Start By sealing all but one hole in the bottom of the flower pot. (This open hole will be used to insert the aquarium tube) Make sure that the holes are tightly sealed to avoid water leakage.


Insert one section of the tubing in the hole (roughly 5" into the pot. avoid crimping the tube), and seal the hole around the tube with the epoxy.


Fill the pot with 3 inches of growth medium ensuring that the tube is above the rocks.

Attach the airstone intake to the tube inside the pot and cover with more rocks. Mark on the outside of the pot where the bottom of the intake is. This will act as a fill line when watering. If water is above this line, it will get sucked into the intake.

Cover the intake with another 1 in of rocks or growth medium of choice.


Next, place the plant on top of the rocks and secure more rocks or growth medium around the roots of the plant. Secure the plant around the roots. (Leave an inch in between the root systems and the air intake system to avoid suffocating the filter without losing air flow within the plant system.)


Next, attach a valve connector to the outside part of the tube. This is the end coming out of the pot. You can run any necessary length of tubing from this connector to the intake of the flow meter (the intake and outtake of the flow meter should be equipped with the conversion valves mentioned in materials.)


Next attach the tubing from the outtake to the vacuum pump. See below on how to convert the aquarium pump into a vacuum pump.

Reversing Pump and setting up flow meter with valves.
The first step is to reverse the diaphragm in the pump to convert it to a vacuum. Open up the four Philips head screws on the belly of the pump. Lift up, rotate 180 degrees, and then replace the diaphragm as indicated in the below GIF.
https://i.publiclab.org/system/images/photos/000/007/694/original/output_ra01xV.gif
Attach a small segment of airline tubing from the pump to the top of the flow meter (which you have equipped with the conversion valves at both openings) and then attach another small section of tubing to the bottom of the flow meter. You will have three points where you can adjust the flow rate (the meter, and both conversion valves). Open all valves to their most open--while still sealed--position. Once you've started the pump, use the large valve on the flow meter to regulate the flow rate down to .3 liters per minute (or 300 ml per minute).

Notes (to be cleaned up later): Gently separate (we're using mother-in-law's tongue) plants, remove dirt from plants We then filled the pot with recycled glass 3" up from the top, placed our filter in it, then filled another inch of rocks, placed the plant, and then filled the pot with rocks.
test air flow w/ flow meter each configuration before placing in the pot- 0.65 liters per minute (discard-a-stone coarse bubble), 0.7 liters per minute (aqua mist 1 cm), 0.65 liters per minute (aqua mist 5 cm x 14 cm)
Tube length has a negligible effect on air flow- we tested both short (4") and long (6') and saw little difference between the two. Is there a limit for how much air flow is too much for the plant? (temperature difference, etc.)
epoxy to fill in the holes of the plastic pot that we're using (BE SURE TO THOROUGHLY SEAL HOLES), seran wrap should work as well; use one of the existing holes to run the tube through the pot. It's useful to find a pot that has sufficient gaps to run the tubing underneath without crimping. Leave enough room with the tube to have at least a few inches running outside of the pot, Make sure to have enough tubing to allow the filter used to sit above the water level.
Leave an inch in between the root systems and the air intake system to avoid suffocating the filter without losing air flow within the plant system. With this setup, we're getting 0.95 liters per minute of airflow.
to reverse the motor remove diaphragm from the pump and reverse it- vacuum bingo! (GIF LOCATION)
http://www.wolvertonenvironmental.com/airFAQ.htm
More information on plant types usable for the kit: http://eartheasy.com/blog/2009/05/the-top-10-plants-for-removing-indoor-toxins/ http://www.healthcentral.com/cold-flu/cf/slideshows/10-houseplants-detox-your-home#slide=11