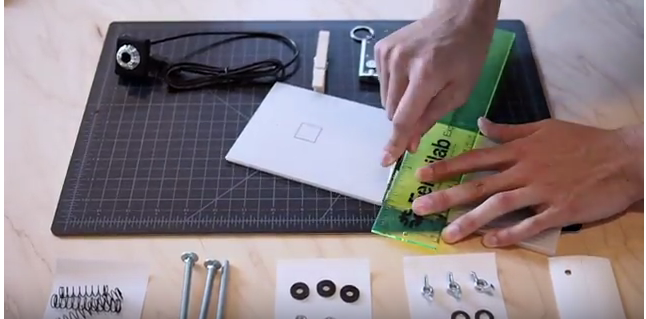
Assembling a microscope of your own? You can build one with the following supplies:
- Coroplast, cardboard, or pre-cut acrylic sheets
- long bolts
- nuts (regular and wingnuts)
- washers
- screws
- webcam
- foam tape
- small flashlight
- clip (if necessary to hold flashlight: small reading lights are also great!)
This iteration is shown with a webcam serving as both camera and lens (more information about the lens conversion is available here). Stay tuned for instructions relating to assembly with a RaspberryPi camera and additional lens configurations.
Step-By-Step Instructions

Cut out your microscope stages. Cut or punch holes for your bolts on both pieces, and in the top, cut a hole that is be enough for your lens to pass through. You do not need to do this on the bottom piece, but lining the two pieces up and tracing the hole on the bottom piece will help you to place your camera.

Push the long bolts through the holes on the bottom piece and secure them in place with washers and nuts.
Add springs (or rubber bands if that's the version you have!) to each bolt.

If you have the rubber band version, you'll add those last, like this:

Prepare your webcam microscope. Full instructions for conversion can be found here.

Place your webcam microscope on the bottom stage, centered underneath the hole, then add the top stage and the remaining washers and wingnuts.

The clothes pin and binder clip can be used to position your light and hold its button down, but it's not perfect -- show us how you've solved this problem!
Connect your camera
On a laptop, use Photo Booth for Macs, or you can go to https://infrgram.org/sandbox/ in most browsers to access your webcam.
If you have an Android phone, you can use this app to connect to a webcam directly if you have an OTG USB adaptor; scan this QR code to get the app:

You're ready to go! Place a slide over the hole and get started: use the wingnuts to raise and lower the stage, and adjust the distance and angle of the light until your sample is in focus.
8 Comments
In this section:
Connect your camera
On a laptop, use Photo Booth for Macs, or you can go to http://infrgram.org/sandbox/ in most browsers to access your webcam.
http://infrgram.org/sandbox/ is a broken link. Is there a typo there?
Is this a question? Click here to post it to the Questions page.
Or try https://publiclab.github.io/infragram/ for a more up-to-date version of that webapp!
Reply to this comment...
Log in to comment
try https://infragram.org/sandbox/
Reply to this comment...
Log in to comment
Thanks for catching that: I just updated the link on the page. I am having some difficulty getting my video feed to appear in the sandbox, am wondering if it's an issue with my own privacy/blocker settings or something else (Firefox and Chrome are both stuck for me) but will tinker with it a bit and see if there's something on the user side that might be hanging me up. Let us know if you're successful!
Reply to this comment...
Log in to comment
You may also be able to use any WebRTC camera app - Infragram is just one of them.
Try https://pixlcore.com/demos/webcamjs/demos/large.html (or https://pixlcore.com/demos/webcamjs/demos/)
You may be able to make a GIF with this: https://www.webrtc-experiment.com/msr/gif-recorder.html
Reply to this comment...
Log in to comment
Hello! I noticed when constructing the microscope that the usage of rubber bands instead of springs may cause the Coroplast material to bend and could possibly deform permanently. To remedy this, I added two slots at the edges of the stage where each band is supposed to wrap around.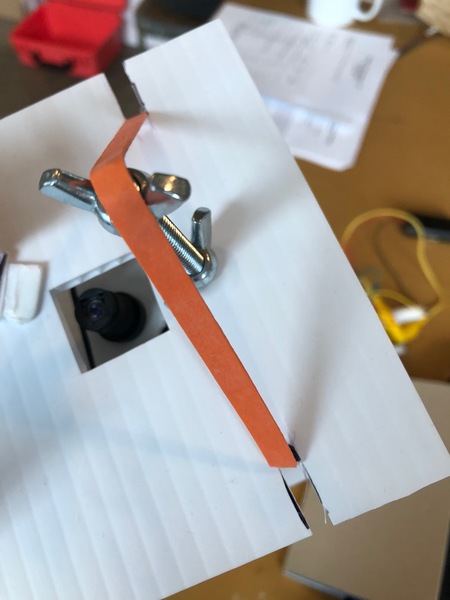
See attached image
Reply to this comment...
Log in to comment
I noticed the same problem that jiteovien noticed but my solution was to use a popsicle stick under the Coroplast and placing the rubber band over that. So there is a sandwich of a rubber band, a popsicle stick, and Coroplast. I also don't use a rubber band on the back 2 bolts but do this on the front only.
Additionally, I cut an X in the Coroplast instead of a hole for the bolts. It is then easy to keep the orientation in place with a minimum of hardware. It just takes 3 bolts, 2 wing nuts, and 1 rubber band (plus the popsicle stick). The only bolt hole that is not cut as an X is the one used for focusing and that one is just larger than the bolt. This hole is sized best when there is little friction between the bolt and the Coroplast.
Reply to this comment...
Log in to comment
For Early Bird and Intro kits, we ultimately got a slightly different model of webcam -- it has a retracting cable, and an extra screw when compared to the originals in the tutorial above. Note that if you're getting a laser cut acrylic stage, this won't be an issue.
What we've found is that the cable is easy to shift when converting the webcam, and this is good. The new webcams also still pass right through the slot (shown below) so your cable can neatly come out the bottom of the microscope.
However, if you don't want to mess with the cable, you can ALSO punch a small hole as shown in the image below, expanding the slot where the webcam clip goes, and the cable will go right out that hole. If you don't have a hole punch as big as ours, you can also just cut a groove using scissors or a box knife -- but be careful!
We're very happy that we were able to offer already-cut holes in this kit rather than just blank coroplast, as it's allowed us to print instructions on the stages. But the holes vary in quality, and we'll probably move to a die-cut soon, instead of a sign cutter (kudos to @mathew for this idea!). If you've gotten a set of REALLY BAD holes, send us a photo and we can replace it. But we're making sure they're all usable.
How have people been doing assembling their microscopes? Chime in and share your photos here!
We'll also be offering the laser-cut stages as an upgrade kit if you really find you want a bit more rigidity. Stay tuned!
Is this a question? Click here to post it to the Questions page.
Reply to this comment...
Log in to comment
Login to comment.