Oil testing kit Blog

Bolt and acrylic cuvette holder research
What I want to do
I want to try a bolt-and-plate acrylic skeleton for a more rigid attempt at a cuvette holder, following up on a cafeteria design session at the Barnraising with @tonyc, @matej, @ygstcu, and others. Sketches:


My attempt and results
I'm just sourcing parts right now, and am going to try cardboard "shelves" before doing acrylic ones.
Nylon spacers in 1/2" lengths with 1/4" exterior diameters for #6 bolts: http://www.mcmaster.com/#94639a303/=101d502 (we may choose different ones later) are $8 per 100.
I'll find bolts and such at the hardware store when these arrive. The key factors are:
- cuvette height off the "floor" so the beam intersects the clear part of the cuvette
- a shelf with square hole at top
- a shelf with square hole somewhere below the beam path, for stability
- eventually a dark material for the shelves
- ensuring the circuit board
- circuit board held in position by the knob bolt
- dial on a C-shaped piece pinned by the shelves (this'll make more sense when I have a prototype built
The knob would allow consistent dimming of the LED using USB power -- no batteries. We're thinking of just using a Digispark or another cheap mini Arduino clone, with a simple program on it for dimming via potentiometer. This might be nice for folks to later add different programs, or different LEDs that could be mixed, or whatever.
The dimmer could be numbered so you can just turn it to the right setting. I'd hope we could assume the power to the LED is pretty consistent, but we can test that.
The whole LED/dimmer could also be placed inline with the spectrometer for absorption, instead of at 90 degrees for fluorescence. So this'd be a generalized cuvette frame.
Eager to try this out to see if it'd work! A lot depends on if we can get bright enough LEDs
Follow related tags:
spectrometer fluorescence barnraising cuvette

Oil testing kit: Making measurements
Back to work. Yesterday recorded most of the spectra. It was necessary to add two layers of the cardboard material under the spectrometer section for it to align well with the laser path. This was about the same distance that the collimating slit was offset from the line printed on the box. No big deal.
Also noted that a sturdier base could be made to hold the sample cells the better as the cells sometimes tilt.
I will report soon.
EO
Follow related tags:
spectrometer fluorescence oil-testing-kit oil-testing-kit-beta

Oil sample concentration session at Barnraising
We're having a great discussion on how to concentrate oil samples collected from sheens and other places, following up on some of @matej's work in this research note.
Concentration of sheens
One question was on concentration. If you see a sheen, how do you know how much oil there is?
@eustatic mentioned the Bonn Agreement on Oil Appearance Code: mentioned in this oil sheen thickness guide by NOAA: http://response.restoration.noaa.gov/sites/default/files/OWJA_2012.pdf (see lead image as well)


Concentration's affect on spectra
@ethanbass mentions tests he's done (and research he's found) that shows spectral change from different dilutions of diesel. But mentions the idea of looking at the darkness/opaqueness (using absorbence spectroscopy) of the sample as a measure of its concentration, which we could use to adjust for concentration in our tests.
So, if you have an unknown, at a certain opacity, you need to get your reference (crude oil, say) to the same opacity to make a comparison. You could use absorbence spectroscopy to achieve this, perhaps. (@ethanbass)

Oil absorbent cloths
@mathew has mentioned oil-only absorbent sheets from the Leak and Spill catalog (which is where I found the image above, so that's not open source) -- we found them here:
Oil-absorbent plastic cloth ($79 per hundred sheets): http://www.newpig.com/webapp/wcs/stores/servlet/ProductDisplay?storeId=10651&catalogId=17208&langId=-1&partNumber=p_MAT403&cm_cat=PPZ1
This page says that the cloths "Can be wrung out and incinerated after use to reduce waste or for fuels blending", and are made of polypropelene.
More in the comments, coming!
Follow related tags:
spectrometer oil-spill oil spill

Separating Oil from Water by Freezing the Water
What I want to do
I attempted to extract various types of oils previously mixed with (tap) water by freezing the water. This idea is based on a fact that oil has usually lower freezing point than water so I should be able to collect the oil from the top of the ice. This technique has been already used to separate natural oils from water. Please keep in mind that all of the amounts of substances are not exact because I did not used calibrated pipettes. Also parts of some more viscose products remained attached to the walls of the eye dropper or a plastic flask.
My attempt and results
I mixed the following oils with water in ratio 1:20 (1.5ml oil to 30ml water): 5W-30 Crude ConEd Dielectric Oil Fluid 20W-50 80W-90


After that I froze the the mixtures in my freezer for one day. The Product Oils (PO) separated from the frozen Product Water (PO) on the surface in different volumes for each type of PO, probably mainly due to different viscosities of the oils (but also some other properties). Following image is showing all the recovered amounts in comparison to 1ml of clean water sample. a) 5W-30 recovered b) Crude recovered c) ConEd recovered d) 20W-50 recovered e) 80W-90 recovered w) water 1ml for comparison


In the first two attempts, a) and b) samples, I was using the eyedropper to collect the oil. After that I realized that the more viscose POs are attaching to the eyedropper walls so I stoppered using it. I poured the remaining products directly directly from the flask into the cuvettes.
 I noticed that the 5W-30 (only) dramatically changed it's appearance and consistence after freezing. It's color changed from transparent honey to non-transparent milk.
Samples of Pure Initial Oil Spectra Compared and Recovered PO Spectra
I took triplicate spectra of each oil before mixing with water and after recovering the PO. Here below are some examples. You can find all spectra at https://spectralworkbench.org/profile/matej
ConEd DIelectric Fluid IN (pure)
ConEd DIelectric Fluid PO (recovered)
Crude IN
Crude PO
5W-30 IN
5W-30 PO
Questions and next steps
Next steps are as referred to in my initial research note here: http://publiclab.org/notes/Matej/11-04-2015/oil-sheen-testing
This was 1:20 ratio testing. Seems like the amount of recovered PO widely varies from awesome (approx.) 75% to not so awesome but still workable (approx.) 20% or less. In case of low amounts you might have to use the Q-tip & mineral oil method previously mentioned here and here However I did not tested the PO with mixed with mineral oil yet. I am also wondering what could be such Oil to Water ratio in an actual oil spill? This method of collecting PO is certainly working and is very accessible. However, it might be changing chemicals and spectral properties of some oils. This is still TBD, In this particular case I found major differences just in the 5W-30. Product water spectra will be also be the next step. Note: Perhaps use of "thinner" cuvettes will be more helpful in case of using less recovered PO.
Why I'm interested
I am interested to test figure out a way how to prepare best specs for the OTK and to test the ability of different different DIY techniques to separate oil from water. This is one of the methods I am trying.
Follow related tags:
spectrometer oil-spill oil crude
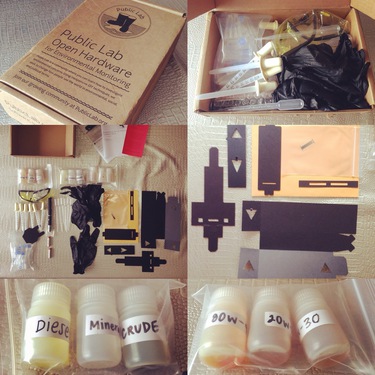
Oil Testing Kit BetaBeta
Better Late than Never So first off i apologise for not publishing anything earlier (i thought i had but it seems it never got uploaded)
here are a few photos of my original unboxing from the 5th sept

Kit Build Laser pen cuvette frame build comments
- V section laser pen support a bit fiddly to assemble, and Triangle cut outs are a little too small
- images in printed instructions in kit are very dark, may be better with sketches showing folds and with arrows showing direction (or use instructions online)
- could benefit from a support under laser pan at the area under push button to prevent sagging and prevent the laser beam moving causing different readings
Spectrometer 3.0 build comments
- Much easier to build due to the white printed grid on the outside faces
- camera position should be set with camera activated to check alignment on screen
- care must be taken to make sure the camera is vertically aligned or the scan area will be offset and effect accurate capture in workbench
Workbench calibration Using Osram 20w energy saving bulb

100% Mineral oil from test kit

100% crude oil from test kit

100% Diesel from test Kit

Note. that the oil sample Cuvette could do with improvement as the sample sits low and not level
Follow related tags:
spectrometer oil oil-testing-kit for

Oil testing kit Beta programme - Scanning the unknown & the not so well known…
Oil testing kit Beta programme - Scanning the unknown & the not so well known…
Date: 5/Nov/2015
Here I document my experience collecting samples in my neighbourhood with the Public Lab Spectrometer 3.0, which was assembled using these instructions.
Due to time constraints I have only been able to scan three substances. These are: * Mr Muscle glass cleaner * Hardened and compacted residue from outside a car mechanic's workshop * Oil on asphalt
1) Scanning Mr Muscle glass cleaner

I had not planned to scan for this originally. It came about because in my last experiments, I spilled crude oil over the table and side of my computer. @TedF suggested I try cleaning the spill with window cleaner as it is very volatile. It worked! And I am glad for it - my laptop doesn't smell of crude! So, if any of you ever spill crude on your table or electronic equipment, Mr Muscle can help!
Mr Muscle scan:
Not knowing what the scan would return, I was very surprised to find that the peak was very similar to that of mineral oil. Indeed, the peak of Mr Muscle is at 407 nm. Here is rep a:


And when I went to find similar matches I found that it was similar to @melissan's OTK _Mineral_oil reps b and c:

I wonder if @melissan and in general if we were all given the same mineral oil in out OTK packages.
I scanned again for rep b…

And when I went to find similar matches I found that it was similar again to @melissan's OTK _Mineral_oil reps b and c but aldo @warren's OTK Test UV laser baseline, and my own MrMuscle rep a. Why if rep a was similar to @melissan's samples did it not return these other similar matches before?

The wavelength range of rep b is from 404 to 411 nm with a peak at 407; while rep a also has a peak at 407 nm the range for rep a is from 404 to 413 nm with a less 'smooth' drop of wavelength at the higher end of the spectrum.
Mr Muscle rep c:

With the similar matches showing @melissan's rep c; my previous MrMuscle reps; and my Mineral oil test with attenuator:

This rep had the same range as rep a but the peak was not as smooth as the other two reps. Again, as with my scanning of previous samples I switched the cuvette around 180 degrees (which means that if all else remains the same (e.g. spectrometer is solid and stable) rep a and c would always look the same - as shown in the image below). In reality, however, the spectrometer was indeed moved around a little as I opened the cuvette frame lid. These changes/errors could of course be minimised if I make a support base that firmly holds the spectrometer and cuvette frame tightly in place.
Here we can see that rep a and rep c are the closest in shape:

A few reflections: Does this mean that the cuvette is different on each side? And that the spectrometer can actually pick up that difference? Does it matter? I went back to look at my comparisons of previous scanned samples and found that in some case, reps a and c were similar but not in others. I did reuse some of the cuvettes washing them with dish soap and MrMuscle - but I did not keep track of which were which.
2) Scanning hardened and compacted residue from outside a car mechanic's workshop


The main mechanic's workshop was closed when I went to collect my sample but the place where they keep the cars, just up the cul-de-sac was open. A man re-arranging one of the cars came over in the car and asked "What's that?". Crouched, I finished scraping the sample and turned to him. I recognised him from some minutes ago, when I had come to see where I wanted to take the sample from - we had briefly made eye contact from afar. I realised I needed something sturdy to scrape the black residue and collect it into the cuvette.
"This?" I said.
"Are you a scientist?" he asked.
"Ha!" I hesitated - a million possible answers relating to informal science flashing before my eyes.
"Me? No. I'm just doing a... project."
"Are you with Harringey*?" he insisted.
"No. Look, my shoe laces are untied - a council rep wouldn't come out like this and would not be scraping a sample with an old medication tray."
"Oh, ok, so you're not with the council? What are you going to find in that?" he asked.
"Well, I don't know. That's what I'd like to try and see."
"Oil. That's what you'll find. It's just old oil."
*Harringey is our borough; the Harringey council is our local government.
A few reflections: When poking around and behaving out of the ordinary, one might raise suspicion… In this case I did not feel like sharing with him my story about OTK or our cardboard spectrometer. Maybe because he felt threatened by what I was doing but also because I was not sure that what I was doing was going to yield any results that would affect him… something to think about. Did he not ask more pressingly because he did notice my shoes laces were untied - or because I was a woman? or…
I took my collected sample and separated it into two cuvettes. I poured mineral oil and shook the samples for about 10 minutes to try to dissolve the material. Reps a and d correspond to the sample in cuvette 1; reps b and c correspond to cuvette 2.
Here is the 'dissolved' sample before vigorous shaking and separation into two cuvettes:

i) Cuvette 1 Here are the scans from cuvette 1. Rep a (which is the first rep) for cuvette 1:


The closest matches for this rep include my mineral oil sample scans as well as @melissan's reps for mineral oil:

Rep d (which is the second rep) for cuvette 1. Again, for this rep, I took the cuvette out of the frame and turned it 180 degrees:

Interestingly, the closest matches for this rep include @melissan's rep c for mineral oil but also all of my Mr Muscle reps, and my oil on asphalt test (which I document below)…

ii) Cuvette 2
Here are the scans from cuvette 2. This is rep a (which is the first rep) for cuvette 2:


The closest matches for this rep included @cbreuer's Gowanus Canal sediment #2; @duds_bc unknown specimen 1; and UV on limunifore white laminate board by @lievenv:

Rep c (which is the second rep) for cuvette 2. Again, for this rep, I took the cuvette out of the frame and turned it 180 degrees:

The closest matches for this rep included @jeffh's Supposedly ultraviolet flashlight; @miriamarchem8's Nitrogen #3; and @lievenv's UV on red paper:

And here are the four reps compared.

Clearly, I did not shake the material well enough in my cuvette and the material was not dissolved and spread evenly.
What I would have done differently: 1) Crushed the powdery material even more finely and dissolved it for longer; 2) made that drill-powered centrifuge…
3) Scanning oil on asphalt
There was a convenient (and also inconvenient) oil mark on the asphalt right in front of our house:

I stood there in front of it thinking about the best way to get a sample of it and then remembered seeing a picture in the Public Lab website of someone mopping up some oil with a q-tip. I then went back into the house to gather the appropriate materials and equipment for data collection: latex gloves, cuvettes filled with mineral oil, q-tips, and zip-lock bag.
To collect the oil sample I pressed the cotton bud onto the asphalt - especially, on the protruding gravel to avoid getting dirt and debris. I repeated this for each of the two cotton buds of two q-tips for a total of 4 'samples'.
This was good in principle. Back in the 'lab' I carefully removed from the buds any debris I didn’t manage to avoid. I then dipped each bud into mineral oil squeezed the tip against the side of the cuvette. A nice droplet of partially dissolved oil slid down into the cuvette, which I had partially filled with mineral oil. I did this with three of the four buds but the third was lost to the bottom of paper cup with old tea… Not the best lab after all!
Sample of asphalt oil 'dissolved' in mineral oil:

Due to time constraints I only did one rep of my oil on asphalt, so I have yet to finish this properly. For now here is rep a:


The closest matches found were @melissan's mineral oil rep b and all of my Mr Muscle's reps…

Reflections: What I take home from this exercise is that my spectrometer needs to be held more tightly together so that there is consistency in the readings - e.g. the cuvette should always be in the same spot - tightly pressed against the spectrometer's slit. This, I found, made a great difference in the readings - more than whether that cuvette frame lid was on or off. Also, the type of cuvette USED would make a difference (as I briefly discuss in my technical issues research note [ HYPERLINK HERE ]). And finally, more samples at higher concentrations and more reps. Also, has anyone found any other solvent for this kind of sampling? But I also think I might not have had enough concentration of my substance for the spectrometer to capture it. How could this higher resolution be achieved?
This is all for now! Hope to continue some more work on this in the near future!
Related research notes:
Oil testing kit Beta programme - Package content
Oil testing kit Beta programme - Assembly: cuvette frame
Oil testing kit Beta programme - Assembly: spectrometer
Oil testing kit Beta programme - Calibration
Oil testing kit Beta programme - Scanning OTK samples
Oil testing kit Beta programme - Technical adjustments (hack!)
Follow related tags:
spectrometer calibration fluorescence spectrometer-calibration