Revisions for Video Spectrometer Construction
| 50 CURRENT | warren |
November 17, 2013 18:09
| about 11 years ago
This page documents the construction of the video spectrometer, which is no longer actively supported. Please see one of the following newer designs:
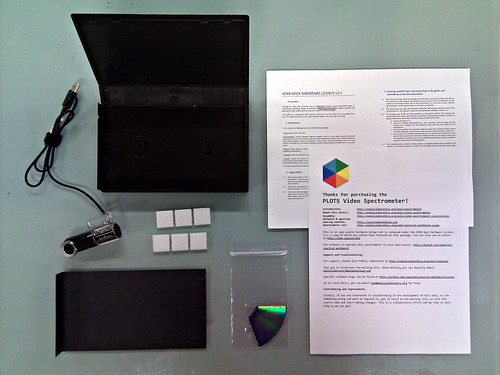
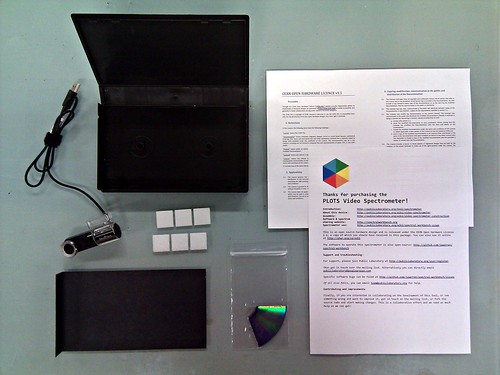
Also consider purchasing a Public Lab kit from our store: These instructions are no longer up to date. Please read above.For usage, see video spectrometer usage. For drafts and older instructions, see video spectrometer construction drafts. If you have trouble, see Video Spectrometer Troubleshooting Quick-start videoThis 10 minute video walks through a simplified but effective version of the video spectrometer. It skips the step of removing the infrared filter, but can be modified later for infrared data: Full step-by-step instructionsConstruction using these steps should take less than 1 hour. Open-source software to operate this spectrometer is available at: https://spectralworkbench.org MaterialsEverything necessary to make a DIY spectrometer:
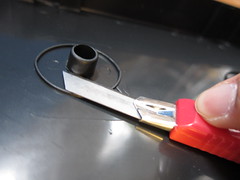
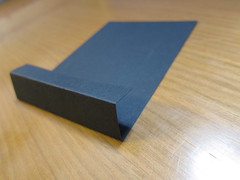
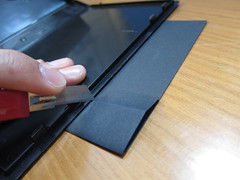
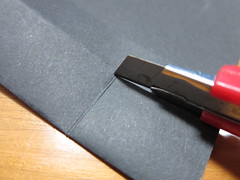
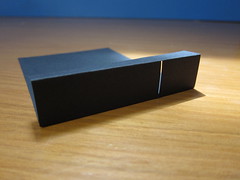
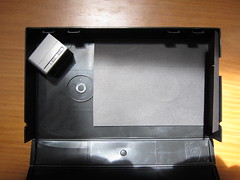
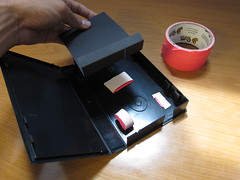
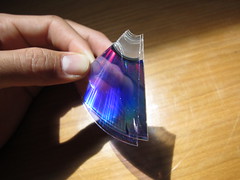
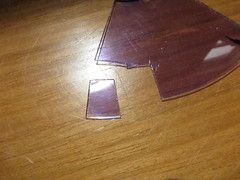
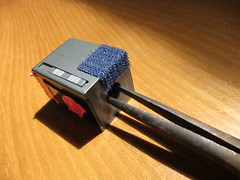
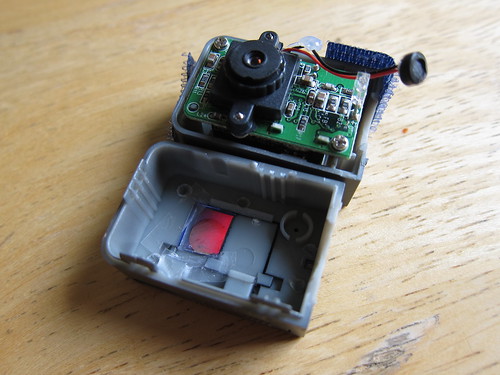
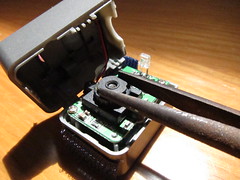
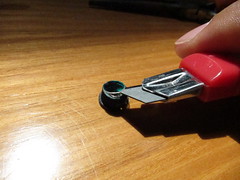
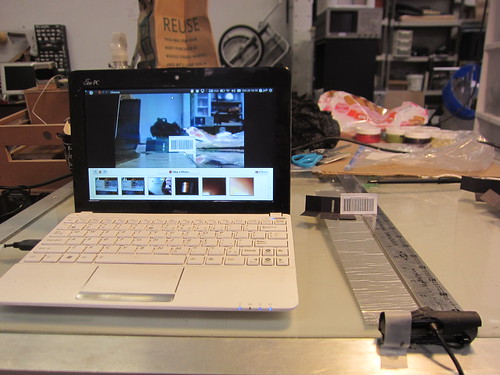
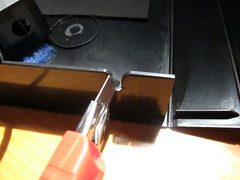
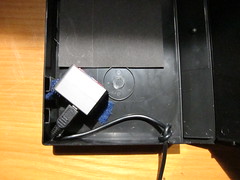
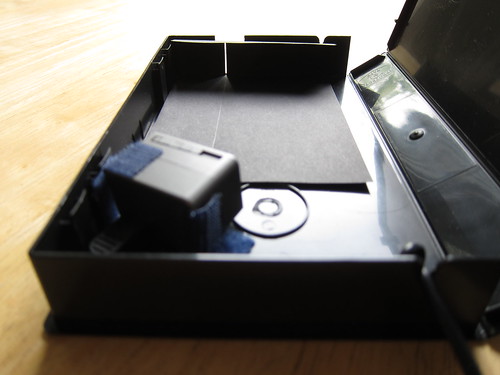
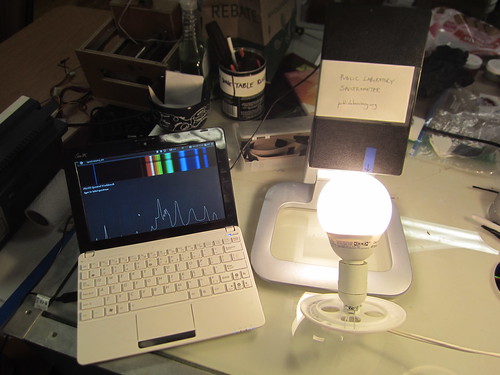
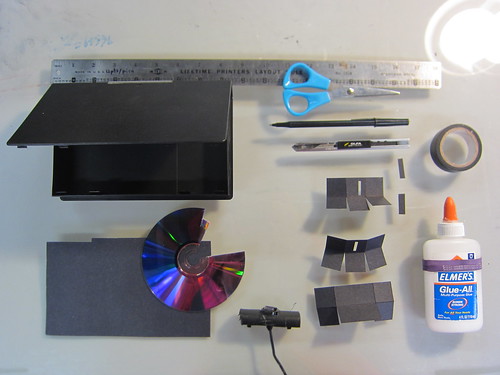
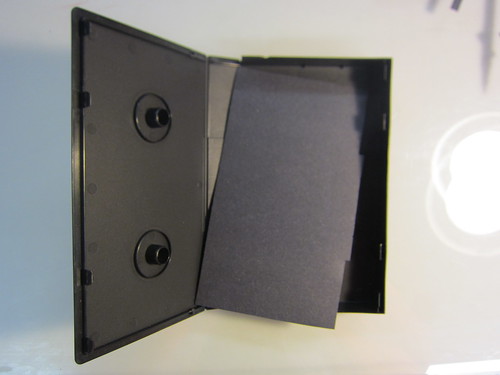
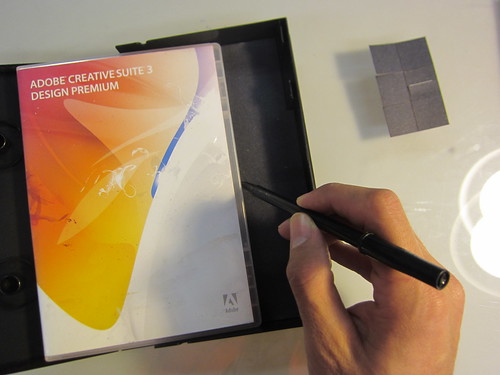
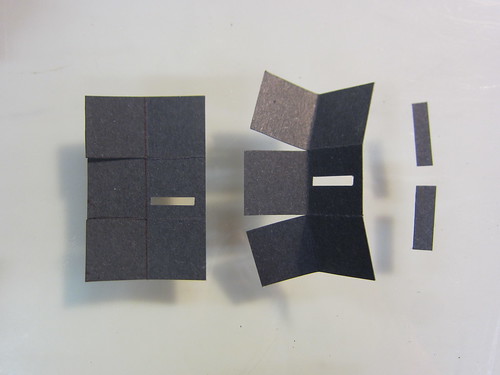
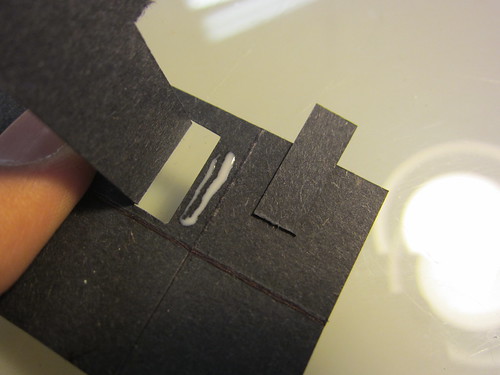
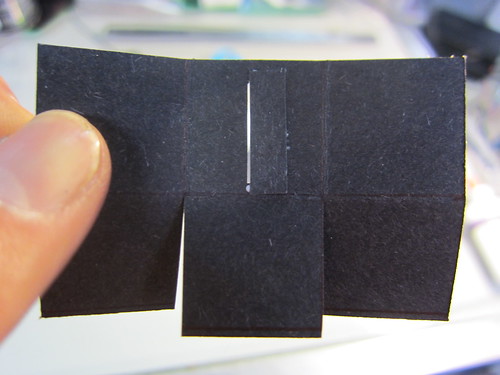
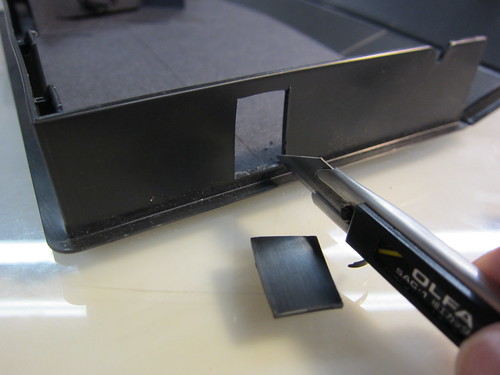
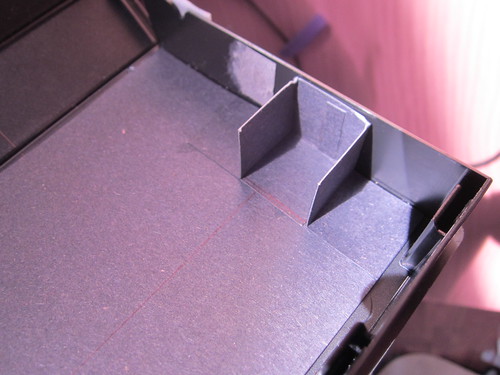
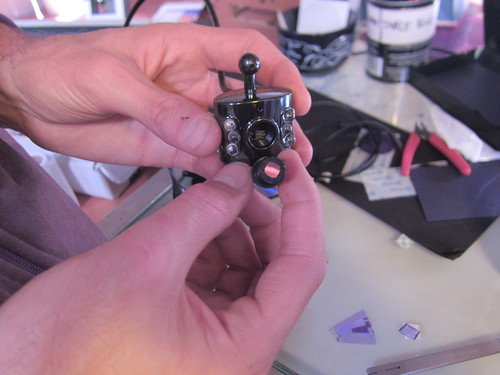
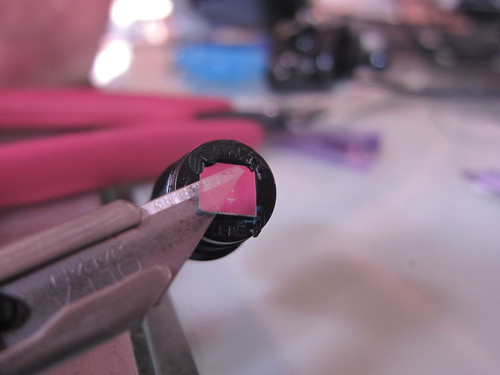
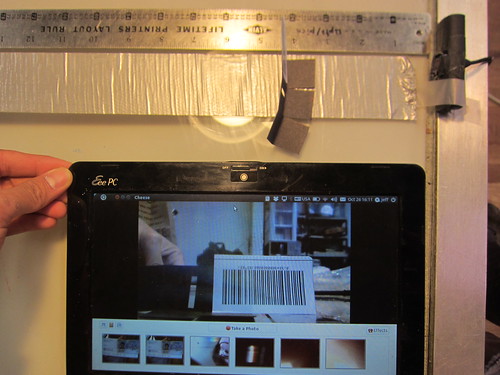
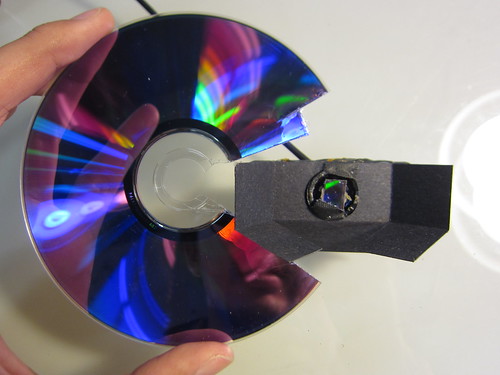
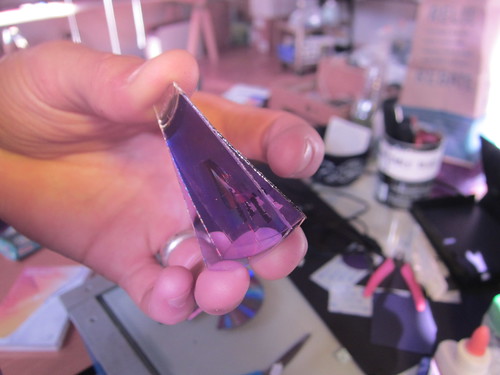
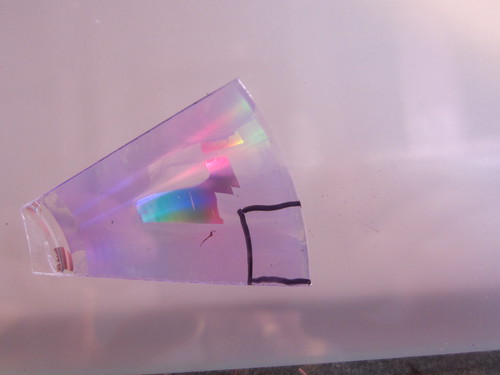
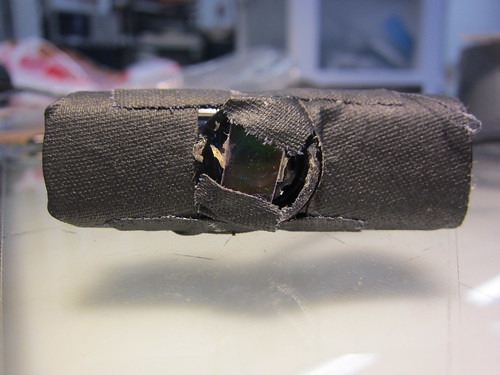
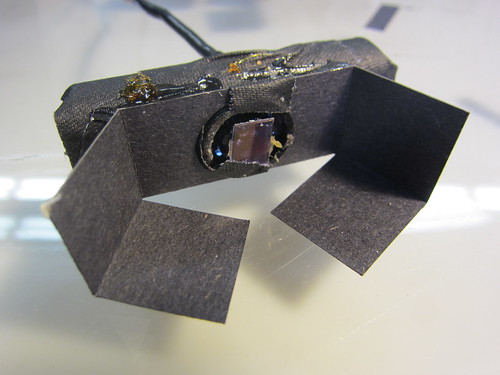
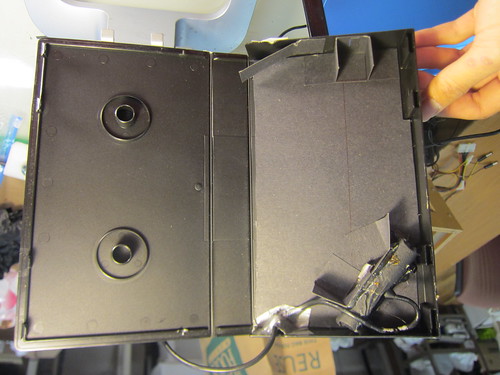
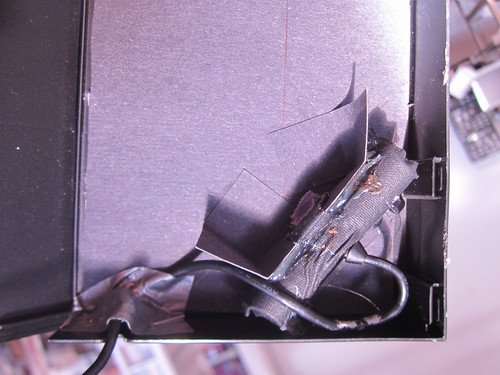
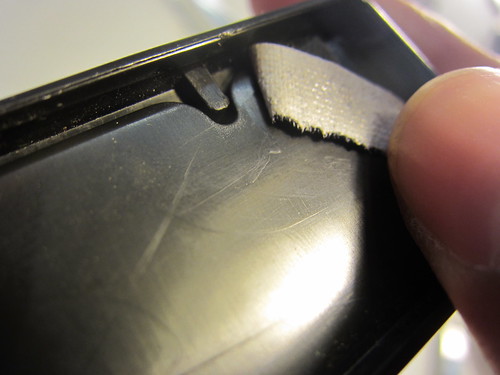
Construction1. Cut off the VHS nubsThe flatter the better. Some cases have nubs on the top; it's still not a bad idea to remove them as they can create reflections in the case. Get out your black card and straighten it if it's become crooked. The kits ship with a pre-folded card as shown. 2. 3 cm from the edge, carefully cut out a <1 mm wide strip where shownThis is one of the most important steps; the slit should be very consistently straight, and quite narrow. Light will pass through here to enter the spectrometer. Generally, the narrower the slit the higher resolution the device, but then less light can enter, so you won't get as strong of a reading. 3. Put the card in the box, and cut a larger opening in the VHS case to expose the slitThe opening can be a centimeter wide; the black paper just lets you make a more precise slit than you'd get when cutting the box. You can also replace the slit to make it more precise or if it gets damaged. 4. Snap off the useless half of the webcamSome cameras may sit flat on the bottom of the box; our kit includes a nice, compact camera with flat sides (hard to find! too much ergonomics!) but you can make it even smaller by snapping it in half. If you can't find a flat-bottomed camera, you can use hot glue, epoxy, moldable plastic, or metal brackets to ensure that your camera stays level and rigidly in place. 5. Check that your camera will align with the slit, and attach the black cardAn imaginary line directly from the slit should intersect the lens. You may have to adjust the angle of the webcam later, once you start collecting spectra. Tape or glue your black card in place, firmly abutting the wall with the opening. You may have to add black tape (gaffe tape works well) to absorb reflections if your box is very shiny or has light leaks. 6. Split the DVD-R into layers and cut a small rectangle from the clear layerDon't get fingerprints on the DVD, and cut your "grating" from the outside edge where the track lines are more parallel. You can cut this piece down more precisely later. 7. Apply gentle pressure with pliers to open the webcam, and cut the DVD to fit inside the lens holeYou'll have enough DVD to try again if this goes wrong. Align the outside edge of the DVD so the track lines will appear vertical in the resulting video. 8. Tape or glue the DVD piece in placeSuperglue may leave a "frosty" looking stain, so try hot glue or epoxy. Tape works fine -- just don't cover where the camera will look through. 9. Unscrew the lens and remove the infrared filterHeating the lens a bit with a hair dryer can help loosen it. The filter will look iridescent -- you can throw it away. Screw the lens back in close to how it was. More tips on removing filters from other types of webcams can be found here: Webcam filter removal 10. Look at a barcode through the webcam to refocus it to about 20 cm (8") awayUse a webcam program like Photo Booth or even https://spectralworkbench.org/capture (experimental). A barcode has fine details so it's a nice test of focus. (The above image is of an older kit) Rotate the camera lens to adjust the focus. You may need to gently use a pair of needle-nosed pliers at first. Anything around 8 inches away from the lens should be in focus. This means your slit will be in focus when the box is closed. If you don't carefully refocus your camera, your spectra will be of very low resolution. Now snap your webcam back together. 11. Cut a notch for the USB cable, and fix your camera inside the boxLeave a couple inches of cable slack in the box. A knot inside the notch assures that the camera is not disturbed even if you yank the cable a bit. You can use Velcro to allow for re-adjusting the camera angle; it'll be about 45 degrees and you can glue it in place once you've gotten it right. 12. Close off any light leaks with dark tapeShiny sides inside the box may create reflections, and light may leak in where the hinge meets the corner of the box. Dark gaffe tape can help, as can more pieces of black paper. Some people line their boxes with felt or black velvet (fancy!). A completed spectrometerI added a blue tape with an arrow so you know where the slot is, and mounted it on an old LCD monitor stand. Pro-fessional! Using your spectrometerThe PLOTS Spectral Workbench software is still in beta, but you should be able to get started collecting spectra. A video on how to use the spectrometer is on the front page: https://spectralworkbench.org Getting involvedThe design is still being modified and improved. If you have ideas for how to make it better, chip in on the mailing list by joining Public Lab: http://publiclaboratory.org/join |
Revert | |
| 49 | warren |
August 30, 2013 15:49
| over 11 years ago
This page documents the construction of the video spectrometer, which is no longer actively supported. Please see one of the following newer designs:
Also consider purchasing a Public Lab kit from our store: These instructions are no longer up to date. Please read above.For usage, see video spectrometer usage. For drafts and older instructions, see video spectrometer construction drafts. If you have trouble, see Video Spectrometer Troubleshooting Quick-start videoThis 10 minute video walks through a simplified but effective version of the video spectrometer. It skips the step of removing the infrared filter, but can be modified later for infrared data: Full step-by-step instructionsConstruction using these steps should take less than 1 hour. Open-source software to operate this spectrometer is available at: https://spectralworkbench.org MaterialsEverything necessary to make a DIY spectrometer:
Construction1. Cut off the VHS nubsThe flatter the better. Some cases have nubs on the top; it's still not a bad idea to remove them as they can create reflections in the case. Get out your black card and straighten it if it's become crooked. The kits ship with a pre-folded card as shown. 2. 3 cm from the edge, carefully cut out a <1 mm wide strip where shownThis is one of the most important steps; the slit should be very consistently straight, and quite narrow. Light will pass through here to enter the spectrometer. Generally, the narrower the slit the higher resolution the device, but then less light can enter, so you won't get as strong of a reading. 3. Put the card in the box, and cut a larger opening in the VHS case to expose the slitThe opening can be a centimeter wide; the black paper just lets you make a more precise slit than you'd get when cutting the box. You can also replace the slit to make it more precise or if it gets damaged. 4. Snap off the useless half of the webcamSome cameras may sit flat on the bottom of the box; our kit includes a nice, compact camera with flat sides (hard to find! too much ergonomics!) but you can make it even smaller by snapping it in half. If you can't find a flat-bottomed camera, you can use hot glue, epoxy, moldable plastic, or metal brackets to ensure that your camera stays level and rigidly in place. 5. Check that your camera will align with the slit, and attach the black cardAn imaginary line directly from the slit should intersect the lens. You may have to adjust the angle of the webcam later, once you start collecting spectra. Tape or glue your black card in place, firmly abutting the wall with the opening. You may have to add black tape (gaffe tape works well) to absorb reflections if your box is very shiny or has light leaks. 6. Split the DVD-R into layers and cut a small rectangle from the clear layerDon't get fingerprints on the DVD, and cut your "grating" from the outside edge where the track lines are more parallel. You can cut this piece down more precisely later. 7. Apply gentle pressure with pliers to open the webcam, and cut the DVD to fit inside the lens holeYou'll have enough DVD to try again if this goes wrong. Align the outside edge of the DVD so the track lines will appear vertical in the resulting video. 8. Tape or glue the DVD piece in placeSuperglue may leave a "frosty" looking stain, so try hot glue or epoxy. Tape works fine -- just don't cover where the camera will look through. 9. Unscrew the lens and remove the infrared filterHeating the lens a bit with a hair dryer can help loosen it. The filter will look iridescent -- you can throw it away. Screw the lens back in close to how it was. More tips on removing filters from other types of webcams can be found here: Webcam filter removal 10. Look at a barcode through the webcam to refocus it to about 20 cm (8") awayUse a webcam program like Photo Booth or even https://spectralworkbench.org/capture (experimental). A barcode has fine details so it's a nice test of focus. (The above image is of an older kit) Rotate the camera lens to adjust the focus. You may need to gently use a pair of needle-nosed pliers at first. Anything around 8 inches away from the lens should be in focus. This means your slit will be in focus when the box is closed. If you don't carefully refocus your camera, your spectra will be of very low resolution. Now snap your webcam back together. 11. Cut a notch for the USB cable, and fix your camera inside the boxLeave a couple inches of cable slack in the box. A knot inside the notch assures that the camera is not disturbed even if you yank the cable a bit. You can use Velcro to allow for re-adjusting the camera angle; it'll be about 45 degrees and you can glue it in place once you've gotten it right. 12. Close off any light leaks with dark tapeShiny sides inside the box may create reflections, and light may leak in where the hinge meets the corner of the box. Dark gaffe tape can help, as can more pieces of black paper. Some people line their boxes with felt or black velvet (fancy!). A completed spectrometerI added a blue tape with an arrow so you know where the slot is, and mounted it on an old LCD monitor stand. Pro-fessional! Using your spectrometerThe PLOTS Spectral Workbench software is still in beta, but you should be able to get started collecting spectra. A video on how to use the spectrometer is on the front page: https://spectralworkbench.org Getting involvedThe design is still being modified and improved. If you have ideas for how to make it better, chip in on the mailing list by joining Public Lab: http://publiclaboratory.org/join |
Revert | |
| 48 | warren |
December 16, 2012 16:44
| about 12 years ago
This page documents the construction of the video spectrometer, which is no longer actively supported. Please see one of the following newer designs:
These instructions are no longer up to date. Please read above.For usage, see video spectrometer usage. For drafts and older instructions, see video spectrometer construction drafts. If you have trouble, see Video Spectrometer Troubleshooting Quick-start videoThis 10 minute video walks through a simplified but effective version of the video spectrometer. It skips the step of removing the infrared filter, but can be modified later for infrared data: Full step-by-step instructionsConstruction using these steps should take less than 1 hour. Open-source software to operate this spectrometer is available at: https://spectralworkbench.org MaterialsEverything necessary to make a DIY spectrometer:
Construction1. Cut off the VHS nubsThe flatter the better. Some cases have nubs on the top; it's still not a bad idea to remove them as they can create reflections in the case. Get out your black card and straighten it if it's become crooked. The kits ship with a pre-folded card as shown. 2. 3 cm from the edge, carefully cut out a <1 mm wide strip where shownThis is one of the most important steps; the slit should be very consistently straight, and quite narrow. Light will pass through here to enter the spectrometer. Generally, the narrower the slit the higher resolution the device, but then less light can enter, so you won't get as strong of a reading. 3. Put the card in the box, and cut a larger opening in the VHS case to expose the slitThe opening can be a centimeter wide; the black paper just lets you make a more precise slit than you'd get when cutting the box. You can also replace the slit to make it more precise or if it gets damaged. 4. Snap off the useless half of the webcamSome cameras may sit flat on the bottom of the box; our kit includes a nice, compact camera with flat sides (hard to find! too much ergonomics!) but you can make it even smaller by snapping it in half. If you can't find a flat-bottomed camera, you can use hot glue, epoxy, moldable plastic, or metal brackets to ensure that your camera stays level and rigidly in place. 5. Check that your camera will align with the slit, and attach the black cardAn imaginary line directly from the slit should intersect the lens. You may have to adjust the angle of the webcam later, once you start collecting spectra. Tape or glue your black card in place, firmly abutting the wall with the opening. You may have to add black tape (gaffe tape works well) to absorb reflections if your box is very shiny or has light leaks. 6. Split the DVD-R into layers and cut a small rectangle from the clear layerDon't get fingerprints on the DVD, and cut your "grating" from the outside edge where the track lines are more parallel. You can cut this piece down more precisely later. 7. Apply gentle pressure with pliers to open the webcam, and cut the DVD to fit inside the lens holeYou'll have enough DVD to try again if this goes wrong. Align the outside edge of the DVD so the track lines will appear vertical in the resulting video. 8. Tape or glue the DVD piece in placeSuperglue may leave a "frosty" looking stain, so try hot glue or epoxy. Tape works fine -- just don't cover where the camera will look through. 9. Unscrew the lens and remove the infrared filterHeating the lens a bit with a hair dryer can help loosen it. The filter will look iridescent -- you can throw it away. Screw the lens back in close to how it was. More tips on removing filters from other types of webcams can be found here: Webcam filter removal 10. Look at a barcode through the webcam to refocus it to about 20 cm (8") awayUse a webcam program like Photo Booth or even https://spectralworkbench.org/capture (experimental). A barcode has fine details so it's a nice test of focus. (The above image is of an older kit) Rotate the camera lens to adjust the focus. You may need to gently use a pair of needle-nosed pliers at first. Anything around 8 inches away from the lens should be in focus. This means your slit will be in focus when the box is closed. If you don't carefully refocus your camera, your spectra will be of very low resolution. Now snap your webcam back together. 11. Cut a notch for the USB cable, and fix your camera inside the boxLeave a couple inches of cable slack in the box. A knot inside the notch assures that the camera is not disturbed even if you yank the cable a bit. You can use Velcro to allow for re-adjusting the camera angle; it'll be about 45 degrees and you can glue it in place once you've gotten it right. 12. Close off any light leaks with dark tapeShiny sides inside the box may create reflections, and light may leak in where the hinge meets the corner of the box. Dark gaffe tape can help, as can more pieces of black paper. Some people line their boxes with felt or black velvet (fancy!). A completed spectrometerI added a blue tape with an arrow so you know where the slot is, and mounted it on an old LCD monitor stand. Pro-fessional! Using your spectrometerThe PLOTS Spectral Workbench software is still in beta, but you should be able to get started collecting spectra. A video on how to use the spectrometer is on the front page: https://spectralworkbench.org Getting involvedThe design is still being modified and improved. If you have ideas for how to make it better, chip in on the mailing list by joining Public Lab: http://publiclaboratory.org/join |
Revert | |
| 47 | warren |
December 16, 2012 16:38
| about 12 years ago
Update: pre-order a spectrometer kit (including one which attaches to your mobile phone) now at the Breadpig StoreThis page documents the construction of the video spectrometer, which is no longer actively supported. Please see one of the following newer designs:
These instructions are no longer up to date. Please read above.For usage, see video spectrometer usage. For drafts and older instructions, see video spectrometer construction drafts. If you have trouble, see Video Spectrometer Troubleshooting Quick-start videoThis 10 minute video walks through a simplified but effective version of the video spectrometer. It skips the step of removing the infrared filter, but can be modified later for infrared data: Full step-by-step instructionsConstruction using these steps should take less than 1 hour. Open-source software to operate this spectrometer is available at: https://spectralworkbench.org MaterialsEverything necessary to make a DIY spectrometer:
Construction1. Cut off the VHS nubsThe flatter the better. Some cases have nubs on the top; it's still not a bad idea to remove them as they can create reflections in the case. Get out your black card and straighten it if it's become crooked. The kits ship with a pre-folded card as shown. 2. 3 cm from the edge, carefully cut out a <1 mm wide strip where shownThis is one of the most important steps; the slit should be very consistently straight, and quite narrow. Light will pass through here to enter the spectrometer. Generally, the narrower the slit the higher resolution the device, but then less light can enter, so you won't get as strong of a reading. 3. Put the card in the box, and cut a larger opening in the VHS case to expose the slitThe opening can be a centimeter wide; the black paper just lets you make a more precise slit than you'd get when cutting the box. You can also replace the slit to make it more precise or if it gets damaged. 4. Snap off the useless half of the webcamSome cameras may sit flat on the bottom of the box; our kit includes a nice, compact camera with flat sides (hard to find! too much ergonomics!) but you can make it even smaller by snapping it in half. If you can't find a flat-bottomed camera, you can use hot glue, epoxy, moldable plastic, or metal brackets to ensure that your camera stays level and rigidly in place. 5. Check that your camera will align with the slit, and attach the black cardAn imaginary line directly from the slit should intersect the lens. You may have to adjust the angle of the webcam later, once you start collecting spectra. Tape or glue your black card in place, firmly abutting the wall with the opening. You may have to add black tape (gaffe tape works well) to absorb reflections if your box is very shiny or has light leaks. 6. Split the DVD-R into layers and cut a small rectangle from the clear layerDon't get fingerprints on the DVD, and cut your "grating" from the outside edge where the track lines are more parallel. You can cut this piece down more precisely later. 7. Apply gentle pressure with pliers to open the webcam, and cut the DVD to fit inside the lens holeYou'll have enough DVD to try again if this goes wrong. Align the outside edge of the DVD so the track lines will appear vertical in the resulting video. 8. Tape or glue the DVD piece in placeSuperglue may leave a "frosty" looking stain, so try hot glue or epoxy. Tape works fine -- just don't cover where the camera will look through. 9. Unscrew the lens and remove the infrared filterHeating the lens a bit with a hair dryer can help loosen it. The filter will look iridescent -- you can throw it away. Screw the lens back in close to how it was. More tips on removing filters from other types of webcams can be found here: Webcam filter removal 10. Look at a barcode through the webcam to refocus it to about 20 cm (8") awayUse a webcam program like Photo Booth or even https://spectralworkbench.org/capture (experimental). A barcode has fine details so it's a nice test of focus. (The above image is of an older kit) Rotate the camera lens to adjust the focus. You may need to gently use a pair of needle-nosed pliers at first. Anything around 8 inches away from the lens should be in focus. This means your slit will be in focus when the box is closed. If you don't carefully refocus your camera, your spectra will be of very low resolution. Now snap your webcam back together. 11. Cut a notch for the USB cable, and fix your camera inside the boxLeave a couple inches of cable slack in the box. A knot inside the notch assures that the camera is not disturbed even if you yank the cable a bit. You can use Velcro to allow for re-adjusting the camera angle; it'll be about 45 degrees and you can glue it in place once you've gotten it right. 12. Close off any light leaks with dark tapeShiny sides inside the box may create reflections, and light may leak in where the hinge meets the corner of the box. Dark gaffe tape can help, as can more pieces of black paper. Some people line their boxes with felt or black velvet (fancy!). A completed spectrometerI added a blue tape with an arrow so you know where the slot is, and mounted it on an old LCD monitor stand. Pro-fessional! Using your spectrometerThe PLOTS Spectral Workbench software is still in beta, but you should be able to get started collecting spectra. A video on how to use the spectrometer is on the front page: https://spectralworkbench.org Getting involvedThe design is still being modified and improved. If you have ideas for how to make it better, chip in on the mailing list by joining Public Lab: http://publiclaboratory.org/join |
Revert | |
| 46 | warren |
December 16, 2012 16:38
| about 12 years ago
Update: pre-order a spectrometer kit (including one which attaches to your mobile phone) now at the Breadpig StoreThis page documents the construction of the video spectrometer, which is no longer actively supported. Please see one of the following newer designs:
These instructions are no longer up to date. Please read above.For usage, see video spectrometer usage. For drafts and older instructions, see video spectrometer construction drafts. If you have trouble, see Video Spectrometer Troubleshooting Quick-start videoThis 10 minute video walks through a simplified but effective version of the video spectrometer. It skips the step of removing the infrared filter, but can be modified later for infrared data: Full step-by-step instructionsConstruction using these steps should take less than 1 hour. Open-source software to operate this spectrometer is available at: https://spectralworkbench.org MaterialsEverything necessary to make a DIY spectrometer:
Construction1. Cut off the VHS nubsThe flatter the better. Some cases have nubs on the top; it's still not a bad idea to remove them as they can create reflections in the case. Get out your black card and straighten it if it's become crooked. The kits ship with a pre-folded card as shown. 2. 3 cm from the edge, carefully cut out a <1 mm wide strip where shownThis is one of the most important steps; the slit should be very consistently straight, and quite narrow. Light will pass through here to enter the spectrometer. Generally, the narrower the slit the higher resolution the device, but then less light can enter, so you won't get as strong of a reading. 3. Put the card in the box, and cut a larger opening in the VHS case to expose the slitThe opening can be a centimeter wide; the black paper just lets you make a more precise slit than you'd get when cutting the box. You can also replace the slit to make it more precise or if it gets damaged. 4. Snap off the useless half of the webcamSome cameras may sit flat on the bottom of the box; our kit includes a nice, compact camera with flat sides (hard to find! too much ergonomics!) but you can make it even smaller by snapping it in half. If you can't find a flat-bottomed camera, you can use hot glue, epoxy, moldable plastic, or metal brackets to ensure that your camera stays level and rigidly in place. 5. Check that your camera will align with the slit, and attach the black cardAn imaginary line directly from the slit should intersect the lens. You may have to adjust the angle of the webcam later, once you start collecting spectra. Tape or glue your black card in place, firmly abutting the wall with the opening. You may have to add black tape (gaffe tape works well) to absorb reflections if your box is very shiny or has light leaks. 6. Split the DVD-R into layers and cut a small rectangle from the clear layerDon't get fingerprints on the DVD, and cut your "grating" from the outside edge where the track lines are more parallel. You can cut this piece down more precisely later. 7. Apply gentle pressure with pliers to open the webcam, and cut the DVD to fit inside the lens holeYou'll have enough DVD to try again if this goes wrong. Align the outside edge of the DVD so the track lines will appear vertical in the resulting video. 8. Tape or glue the DVD piece in placeSuperglue may leave a "frosty" looking stain, so try hot glue or epoxy. Tape works fine -- just don't cover where the camera will look through. 9. Unscrew the lens and remove the infrared filterHeating the lens a bit with a hair dryer can help loosen it. The filter will look iridescent -- you can throw it away. Screw the lens back in close to how it was. More tips on removing filters from other types of webcams can be found here: Webcam filter removal 10. Look at a barcode through the webcam to refocus it to about 20 cm (8") awayUse a webcam program like Photo Booth or even https://spectralworkbench.org/capture (experimental). A barcode has fine details so it's a nice test of focus. (The above image is of an older kit) Rotate the camera lens to adjust the focus. You may need to gently use a pair of needle-nosed pliers at first. Anything around 8 inches away from the lens should be in focus. This means your slit will be in focus when the box is closed. If you don't carefully refocus your camera, your spectra will be of very low resolution. Now snap your webcam back together. 11. Cut a notch for the USB cable, and fix your camera inside the boxLeave a couple inches of cable slack in the box. A knot inside the notch assures that the camera is not disturbed even if you yank the cable a bit. You can use Velcro to allow for re-adjusting the camera angle; it'll be about 45 degrees and you can glue it in place once you've gotten it right. 12. Close off any light leaks with dark tapeShiny sides inside the box may create reflections, and light may leak in where the hinge meets the corner of the box. Dark gaffe tape can help, as can more pieces of black paper. Some people line their boxes with felt or black velvet (fancy!). A completed spectrometerI added a blue tape with an arrow so you know where the slot is, and mounted it on an old LCD monitor stand. Pro-fessional! Using your spectrometerThe PLOTS Spectral Workbench software is still in beta, but you should be able to get started collecting spectra. A video on how to use the spectrometer is on the front page: https://spectralworkbench.org Getting involvedThe design is still being modified and improved. If you have ideas for how to make it better, chip in on the mailing list by joining Public Lab: http://publiclaboratory.org/join |
Revert | |
| 45 | warren |
December 08, 2012 00:28
| about 12 years ago
Update: pre-order a spectrometer kit (including one which attaches to your mobile phone) now at the Breadpig StoreThis page documents the construction of the video spectrometer. For usage, see video spectrometer usage. For drafts and older instructions, see video spectrometer construction drafts. If you have trouble, see Video Spectrometer Troubleshooting Quick-start videoThis 10 minute video walks through a simplified but effective version of the video spectrometer. It skips the step of removing the infrared filter, but can be modified later for infrared data: Full step-by-step instructionsConstruction using these steps should take less than 1 hour. Open-source software to operate this spectrometer is available at: https://spectralworkbench.org MaterialsEverything necessary to make a DIY spectrometer:
Construction1. Cut off the VHS nubsThe flatter the better. Some cases have nubs on the top; it's still not a bad idea to remove them as they can create reflections in the case. Get out your black card and straighten it if it's become crooked. The kits ship with a pre-folded card as shown. 2. 3 cm from the edge, carefully cut out a <1 mm wide strip where shownThis is one of the most important steps; the slit should be very consistently straight, and quite narrow. Light will pass through here to enter the spectrometer. Generally, the narrower the slit the higher resolution the device, but then less light can enter, so you won't get as strong of a reading. 3. Put the card in the box, and cut a larger opening in the VHS case to expose the slitThe opening can be a centimeter wide; the black paper just lets you make a more precise slit than you'd get when cutting the box. You can also replace the slit to make it more precise or if it gets damaged. 4. Snap off the useless half of the webcamSome cameras may sit flat on the bottom of the box; our kit includes a nice, compact camera with flat sides (hard to find! too much ergonomics!) but you can make it even smaller by snapping it in half. If you can't find a flat-bottomed camera, you can use hot glue, epoxy, moldable plastic, or metal brackets to ensure that your camera stays level and rigidly in place. 5. Check that your camera will align with the slit, and attach the black cardAn imaginary line directly from the slit should intersect the lens. You may have to adjust the angle of the webcam later, once you start collecting spectra. Tape or glue your black card in place, firmly abutting the wall with the opening. You may have to add black tape (gaffe tape works well) to absorb reflections if your box is very shiny or has light leaks. 6. Split the DVD-R into layers and cut a small rectangle from the clear layerDon't get fingerprints on the DVD, and cut your "grating" from the outside edge where the track lines are more parallel. You can cut this piece down more precisely later. 7. Apply gentle pressure with pliers to open the webcam, and cut the DVD to fit inside the lens holeYou'll have enough DVD to try again if this goes wrong. Align the outside edge of the DVD so the track lines will appear vertical in the resulting video. 8. Tape or glue the DVD piece in placeSuperglue may leave a "frosty" looking stain, so try hot glue or epoxy. Tape works fine -- just don't cover where the camera will look through. 9. Unscrew the lens and remove the infrared filterHeating the lens a bit with a hair dryer can help loosen it. The filter will look iridescent -- you can throw it away. Screw the lens back in close to how it was. More tips on removing filters from other types of webcams can be found here: Webcam filter removal 10. Look at a barcode through the webcam to refocus it to about 20 cm (8") awayUse a webcam program like Photo Booth or even https://spectralworkbench.org/capture (experimental). A barcode has fine details so it's a nice test of focus. (The above image is of an older kit) Rotate the camera lens to adjust the focus. You may need to gently use a pair of needle-nosed pliers at first. Anything around 8 inches away from the lens should be in focus. This means your slit will be in focus when the box is closed. If you don't carefully refocus your camera, your spectra will be of very low resolution. Now snap your webcam back together. 11. Cut a notch for the USB cable, and fix your camera inside the boxLeave a couple inches of cable slack in the box. A knot inside the notch assures that the camera is not disturbed even if you yank the cable a bit. You can use Velcro to allow for re-adjusting the camera angle; it'll be about 45 degrees and you can glue it in place once you've gotten it right. 12. Close off any light leaks with dark tapeShiny sides inside the box may create reflections, and light may leak in where the hinge meets the corner of the box. Dark gaffe tape can help, as can more pieces of black paper. Some people line their boxes with felt or black velvet (fancy!). A completed spectrometerI added a blue tape with an arrow so you know where the slot is, and mounted it on an old LCD monitor stand. Pro-fessional! Using your spectrometerThe PLOTS Spectral Workbench software is still in beta, but you should be able to get started collecting spectra. A video on how to use the spectrometer is on the front page: https://spectralworkbench.org Getting involvedThe design is still being modified and improved. If you have ideas for how to make it better, chip in on the mailing list by joining Public Lab: http://publiclaboratory.org/join |
Revert | |
| 44 | warren |
December 08, 2012 00:26
| about 12 years ago
Update: pre-order a spectrometer kit (including one which attaches to your mobile phone) now at the Breadpig Store This page documents the construction of the video spectrometer. For usage, see video spectrometer usage. For drafts and older instructions, see video spectrometer construction drafts. If you have trouble, see Video Spectrometer Troubleshooting Quick-start videoThis 10 minute video walks through a simplified but effective version of the video spectrometer. It skips the step of removing the infrared filter, but can be modified later for infrared data: Full step-by-step instructionsConstruction using these steps should take less than 1 hour. Open-source software to operate this spectrometer is available at: https://spectralworkbench.org MaterialsEverything necessary to make a DIY spectrometer:
Construction1. Cut off the VHS nubsThe flatter the better. Some cases have nubs on the top; it's still not a bad idea to remove them as they can create reflections in the case. Get out your black card and straighten it if it's become crooked. The kits ship with a pre-folded card as shown. 2. 3 cm from the edge, carefully cut out a <1 mm wide strip where shownThis is one of the most important steps; the slit should be very consistently straight, and quite narrow. Light will pass through here to enter the spectrometer. Generally, the narrower the slit the higher resolution the device, but then less light can enter, so you won't get as strong of a reading. 3. Put the card in the box, and cut a larger opening in the VHS case to expose the slitThe opening can be a centimeter wide; the black paper just lets you make a more precise slit than you'd get when cutting the box. You can also replace the slit to make it more precise or if it gets damaged. 4. Snap off the useless half of the webcamSome cameras may sit flat on the bottom of the box; our kit includes a nice, compact camera with flat sides (hard to find! too much ergonomics!) but you can make it even smaller by snapping it in half. If you can't find a flat-bottomed camera, you can use hot glue, epoxy, moldable plastic, or metal brackets to ensure that your camera stays level and rigidly in place. 5. Check that your camera will align with the slit, and attach the black cardAn imaginary line directly from the slit should intersect the lens. You may have to adjust the angle of the webcam later, once you start collecting spectra. Tape or glue your black card in place, firmly abutting the wall with the opening. You may have to add black tape (gaffe tape works well) to absorb reflections if your box is very shiny or has light leaks. 6. Split the DVD-R into layers and cut a small rectangle from the clear layerDon't get fingerprints on the DVD, and cut your "grating" from the outside edge where the track lines are more parallel. You can cut this piece down more precisely later. 7. Apply gentle pressure with pliers to open the webcam, and cut the DVD to fit inside the lens holeYou'll have enough DVD to try again if this goes wrong. Align the outside edge of the DVD so the track lines will appear vertical in the resulting video. 8. Tape or glue the DVD piece in placeSuperglue may leave a "frosty" looking stain, so try hot glue or epoxy. Tape works fine -- just don't cover where the camera will look through. 9. Unscrew the lens and remove the infrared filterHeating the lens a bit with a hair dryer can help loosen it. The filter will look iridescent -- you can throw it away. Screw the lens back in close to how it was. More tips on removing filters from other types of webcams can be found here: Webcam filter removal 10. Look at a barcode through the webcam to refocus it to about 20 cm (8") awayUse a webcam program like Photo Booth or even https://spectralworkbench.org/capture (experimental). A barcode has fine details so it's a nice test of focus. (The above image is of an older kit) Rotate the camera lens to adjust the focus. You may need to gently use a pair of needle-nosed pliers at first. Anything around 8 inches away from the lens should be in focus. This means your slit will be in focus when the box is closed. If you don't carefully refocus your camera, your spectra will be of very low resolution. Now snap your webcam back together. 11. Cut a notch for the USB cable, and fix your camera inside the boxLeave a couple inches of cable slack in the box. A knot inside the notch assures that the camera is not disturbed even if you yank the cable a bit. You can use Velcro to allow for re-adjusting the camera angle; it'll be about 45 degrees and you can glue it in place once you've gotten it right. 12. Close off any light leaks with dark tapeShiny sides inside the box may create reflections, and light may leak in where the hinge meets the corner of the box. Dark gaffe tape can help, as can more pieces of black paper. Some people line their boxes with felt or black velvet (fancy!). A completed spectrometerI added a blue tape with an arrow so you know where the slot is, and mounted it on an old LCD monitor stand. Pro-fessional! Using your spectrometerThe PLOTS Spectral Workbench software is still in beta, but you should be able to get started collecting spectra. A video on how to use the spectrometer is on the front page: https://spectralworkbench.org Getting involvedThe design is still being modified and improved. If you have ideas for how to make it better, chip in on the mailing list by joining Public Lab: http://publiclaboratory.org/join |
Revert | |
| 43 | mathew |
December 07, 2012 19:37
| about 12 years ago
Update: pre-order a spectrometer kit (including one which attaches to your mobile phone) now at our Breadpig This page documents the construction of the video spectrometer. For usage, see video spectrometer usage. For drafts and older instructions, see video spectrometer construction drafts. If you have trouble, see Video Spectrometer Troubleshooting Quick-start videoThis 10 minute video walks through a simplified but effective version of the video spectrometer. It skips the step of removing the infrared filter, but can be modified later for infrared data: Full step-by-step instructionsConstruction using these steps should take less than 1 hour. Open-source software to operate this spectrometer is available at: https://spectralworkbench.org MaterialsEverything necessary to make a DIY spectrometer:
Construction1. Cut off the VHS nubsThe flatter the better. Some cases have nubs on the top; it's still not a bad idea to remove them as they can create reflections in the case. Get out your black card and straighten it if it's become crooked. The kits ship with a pre-folded card as shown. 2. 3 cm from the edge, carefully cut out a <1 mm wide strip where shownThis is one of the most important steps; the slit should be very consistently straight, and quite narrow. Light will pass through here to enter the spectrometer. Generally, the narrower the slit the higher resolution the device, but then less light can enter, so you won't get as strong of a reading. 3. Put the card in the box, and cut a larger opening in the VHS case to expose the slitThe opening can be a centimeter wide; the black paper just lets you make a more precise slit than you'd get when cutting the box. You can also replace the slit to make it more precise or if it gets damaged. 4. Snap off the useless half of the webcamSome cameras may sit flat on the bottom of the box; our kit includes a nice, compact camera with flat sides (hard to find! too much ergonomics!) but you can make it even smaller by snapping it in half. If you can't find a flat-bottomed camera, you can use hot glue, epoxy, moldable plastic, or metal brackets to ensure that your camera stays level and rigidly in place. 5. Check that your camera will align with the slit, and attach the black cardAn imaginary line directly from the slit should intersect the lens. You may have to adjust the angle of the webcam later, once you start collecting spectra. Tape or glue your black card in place, firmly abutting the wall with the opening. You may have to add black tape (gaffe tape works well) to absorb reflections if your box is very shiny or has light leaks. 6. Split the DVD-R into layers and cut a small rectangle from the clear layerDon't get fingerprints on the DVD, and cut your "grating" from the outside edge where the track lines are more parallel. You can cut this piece down more precisely later. 7. Apply gentle pressure with pliers to open the webcam, and cut the DVD to fit inside the lens holeYou'll have enough DVD to try again if this goes wrong. Align the outside edge of the DVD so the track lines will appear vertical in the resulting video. 8. Tape or glue the DVD piece in placeSuperglue may leave a "frosty" looking stain, so try hot glue or epoxy. Tape works fine -- just don't cover where the camera will look through. 9. Unscrew the lens and remove the infrared filterHeating the lens a bit with a hair dryer can help loosen it. The filter will look iridescent -- you can throw it away. Screw the lens back in close to how it was. More tips on removing filters from other types of webcams can be found here: Webcam filter removal 10. Look at a barcode through the webcam to refocus it to about 20 cm (8") awayUse a webcam program like Photo Booth or even https://spectralworkbench.org/capture (experimental). A barcode has fine details so it's a nice test of focus. (The above image is of an older kit) Rotate the camera lens to adjust the focus. You may need to gently use a pair of needle-nosed pliers at first. Anything around 8 inches away from the lens should be in focus. This means your slit will be in focus when the box is closed. If you don't carefully refocus your camera, your spectra will be of very low resolution. Now snap your webcam back together. 11. Cut a notch for the USB cable, and fix your camera inside the boxLeave a couple inches of cable slack in the box. A knot inside the notch assures that the camera is not disturbed even if you yank the cable a bit. You can use Velcro to allow for re-adjusting the camera angle; it'll be about 45 degrees and you can glue it in place once you've gotten it right. 12. Close off any light leaks with dark tapeShiny sides inside the box may create reflections, and light may leak in where the hinge meets the corner of the box. Dark gaffe tape can help, as can more pieces of black paper. Some people line their boxes with felt or black velvet (fancy!). A completed spectrometerI added a blue tape with an arrow so you know where the slot is, and mounted it on an old LCD monitor stand. Pro-fessional! Using your spectrometerThe PLOTS Spectral Workbench software is still in beta, but you should be able to get started collecting spectra. A video on how to use the spectrometer is on the front page: https://spectralworkbench.org Getting involvedThe design is still being modified and improved. If you have ideas for how to make it better, chip in on the mailing list by joining Public Lab: http://publiclaboratory.org/join |
Revert | |
| 42 | warren |
August 27, 2012 15:54
| over 12 years ago
Update: Get a spectrometer kit (including one which attaches to your mobile phone) now at our Kickstarter campaign This page documents the construction of the video spectrometer. For usage, see video spectrometer usage. For drafts and older instructions, see video spectrometer construction drafts. If you have trouble, see Video Spectrometer Troubleshooting Quick-start videoThis 10 minute video walks through a simplified but effective version of the video spectrometer. It skips the step of removing the infrared filter, but can be modified later for infrared data: Full step-by-step instructionsConstruction using these steps should take less than 1 hour. Open-source software to operate this spectrometer is available at: https://spectralworkbench.org MaterialsEverything necessary to make a DIY spectrometer:
Construction1. Cut off the VHS nubsThe flatter the better. Some cases have nubs on the top; it's still not a bad idea to remove them as they can create reflections in the case. Get out your black card and straighten it if it's become crooked. The kits ship with a pre-folded card as shown. 2. 3 cm from the edge, carefully cut out a <1 mm wide strip where shownThis is one of the most important steps; the slit should be very consistently straight, and quite narrow. Light will pass through here to enter the spectrometer. Generally, the narrower the slit the higher resolution the device, but then less light can enter, so you won't get as strong of a reading. 3. Put the card in the box, and cut a larger opening in the VHS case to expose the slitThe opening can be a centimeter wide; the black paper just lets you make a more precise slit than you'd get when cutting the box. You can also replace the slit to make it more precise or if it gets damaged. 4. Snap off the useless half of the webcamSome cameras may sit flat on the bottom of the box; our kit includes a nice, compact camera with flat sides (hard to find! too much ergonomics!) but you can make it even smaller by snapping it in half. If you can't find a flat-bottomed camera, you can use hot glue, epoxy, moldable plastic, or metal brackets to ensure that your camera stays level and rigidly in place. 5. Check that your camera will align with the slit, and attach the black cardAn imaginary line directly from the slit should intersect the lens. You may have to adjust the angle of the webcam later, once you start collecting spectra. Tape or glue your black card in place, firmly abutting the wall with the opening. You may have to add black tape (gaffe tape works well) to absorb reflections if your box is very shiny or has light leaks. 6. Split the DVD-R into layers and cut a small rectangle from the clear layerDon't get fingerprints on the DVD, and cut your "grating" from the outside edge where the track lines are more parallel. You can cut this piece down more precisely later. 7. Apply gentle pressure with pliers to open the webcam, and cut the DVD to fit inside the lens holeYou'll have enough DVD to try again if this goes wrong. Align the outside edge of the DVD so the track lines will appear vertical in the resulting video. 8. Tape or glue the DVD piece in placeSuperglue may leave a "frosty" looking stain, so try hot glue or epoxy. Tape works fine -- just don't cover where the camera will look through. 9. Unscrew the lens and remove the infrared filterHeating the lens a bit with a hair dryer can help loosen it. The filter will look iridescent -- you can throw it away. Screw the lens back in close to how it was. More tips on removing filters from other types of webcams can be found here: Webcam filter removal 10. Look at a barcode through the webcam to refocus it to about 20 cm (8") awayUse a webcam program like Photo Booth or even https://spectralworkbench.org/capture (experimental). A barcode has fine details so it's a nice test of focus. (The above image is of an older kit) Rotate the camera lens to adjust the focus. You may need to gently use a pair of needle-nosed pliers at first. Anything around 8 inches away from the lens should be in focus. This means your slit will be in focus when the box is closed. If you don't carefully refocus your camera, your spectra will be of very low resolution. Now snap your webcam back together. 11. Cut a notch for the USB cable, and fix your camera inside the boxLeave a couple inches of cable slack in the box. A knot inside the notch assures that the camera is not disturbed even if you yank the cable a bit. You can use Velcro to allow for re-adjusting the camera angle; it'll be about 45 degrees and you can glue it in place once you've gotten it right. 12. Close off any light leaks with dark tapeShiny sides inside the box may create reflections, and light may leak in where the hinge meets the corner of the box. Dark gaffe tape can help, as can more pieces of black paper. Some people line their boxes with felt or black velvet (fancy!). A completed spectrometerI added a blue tape with an arrow so you know where the slot is, and mounted it on an old LCD monitor stand. Pro-fessional! Using your spectrometerThe PLOTS Spectral Workbench software is still in beta, but you should be able to get started collecting spectra. A video on how to use the spectrometer is on the front page: https://spectralworkbench.org Getting involvedThe design is still being modified and improved. If you have ideas for how to make it better, chip in on the mailing list by joining Public Lab: http://publiclaboratory.org/join |
Revert | |
| 41 | warren |
August 27, 2012 15:53
| over 12 years ago
Update: Get a spectrometer kit (including one which attaches to your mobile phone) now at our Kickstarter campaign This page documents the construction of the video spectrometer. For usage, see video spectrometer usage. For drafts and older instructions, see video spectrometer construction drafts. If you have trouble, see Video Spectrometer Troubleshooting Quick-start videoThis 10 minute video walks through a simplified but effective version of the video spectrometer. It skips the step of removing the infrared filter, but can be modified later for infrared data: Full step-by-step instructionsConstruction using these steps should take less than 1 hour. Open-source software to operate this spectrometer is available at: https://spectralworkbench.org MaterialsEverything necessary to make a DIY spectrometer:
Construction1. Cut off the VHS nubsThe flatter the better. Some cases have nubs on the top; it's still not a bad idea to remove them as they can create reflections in the case. Get out your black card and straighten it if it's become crooked. The kits ship with a pre-folded card as shown. 2. 3 cm from the edge, carefully cut out a <1 mm wide strip where shownThis is one of the most important steps; the slit should be very consistently straight, and quite narrow. Light will pass through here to enter the spectrometer. Generally, the narrower the slit the higher resolution the device, but then less light can enter, so you won't get as strong of a reading. 3. Put the card in the box, and cut a larger opening in the VHS case to expose the slitThe opening can be a centimeter wide; the black paper just lets you make a more precise slit than you'd get when cutting the box. You can also replace the slit to make it more precise or if it gets damaged. 4. Snap off the useless half of the webcamSome cameras may sit flat on the bottom of the box; our kit includes a nice, compact camera with flat sides (hard to find! too much ergonomics!) but you can make it even smaller by snapping it in half. If you can't find a flat-bottomed camera, you can use hot glue, epoxy, moldable plastic, or metal brackets to ensure that your camera stays level and rigidly in place. 5. Check that your camera will align with the slit, and attach the black cardAn imaginary line directly from the slit should intersect the lens. You may have to adjust the angle of the webcam later, once you start collecting spectra. Tape or glue your black card in place, firmly abutting the wall with the opening. You may have to add black tape (gaffe tape works well) to absorb reflections if your box is very shiny or has light leaks. 6. Split the DVD-R into layers and cut a small rectangle from the clear layerDon't get fingerprints on the DVD, and cut your "grating" from the outside edge where the track lines are more parallel. You can cut this piece down more precisely later. 7. Apply gentle pressure with pliers to open the webcam, and cut the DVD to fit inside the lens holeYou'll have enough DVD to try again if this goes wrong. Align the outside edge of the DVD so the track lines will appear vertical in the resulting video. 8. Tape or glue the DVD piece in placeSuperglue may leave a "frosty" looking stain, so try hot glue or epoxy. Tape works fine -- just don't cover where the camera will look through. 9. Unscrew the lens and remove the infrared filterHeating the lens a bit with a hair dryer can help loosen it. The filter will look iridescent -- you can throw it away. Screw the lens back in close to how it was. More tips on removing filters from other types of webcams can be found here: Webcam filter removal 10. Look at a barcode through the webcam to refocus it to about 20 cm (8") awayUse a webcam program like Photo Booth or even https://spectralworkbench.org/capture (experimental). A barcode has fine details so it's a nice test of focus. (The above image is of an older kit) Rotate the camera lens to adjust the focus. You may need to gently use a pair of needle-nosed pliers at first. Anything around 8 inches away from the lens should be in focus. This means your slit will be in focus when the box is closed. If you don't carefully refocus your camera, your spectra will be of very low resolution. Now snap your webcam back together. 11. Cut a notch for the USB cable, and fix your camera inside the boxLeave a couple inches of cable slack in the box. A knot inside the notch assures that the camera is not disturbed even if you yank the cable a bit. You can use Velcro to allow for re-adjusting the camera angle; it'll be about 45 degrees and you can glue it in place once you've gotten it right. 12. Close off any light leaks with dark tapeShiny sides inside the box may create reflections, and light may leak in where the hinge meets the corner of the box. Dark gaffe tape can help, as can more pieces of black paper. Some people line their boxes with felt or black velvet (fancy!). A completed spectrometerI added a blue tape with an arrow so you know where the slot is, and mounted it on an old LCD monitor stand. Pro-fessional! Using your spectrometerThe PLOTS Spectral Workbench software is still in beta, but you should be able to get started collecting spectra. A video on how to use the spectrometer is on the front page: https://spectralworkbench.org Getting involvedThe design is still being modified and improved. If you have ideas for how to make it better, chip in on the mailing list by joining Public Lab: http://publiclaboratory.org/join |
Revert | |
| 40 | Misterdeman |
August 17, 2012 23:35
| over 12 years ago
This page documents the construction of the video spectrometer. For usage, see video spectrometer usage. For drafts and older instructions, see video spectrometer construction drafts. If you have trouble, see Video Spectrometer Troubleshooting Quick-start videoThis 10 minute video walks through a simplified but effective version of the video spectrometer. It skips the step of removing the infrared filter, but can be modified later for infrared data: Full step-by-step instructionsConstruction using these steps should take less than 1 hour. Open-source software to operate this spectrometer is available at: https://spectralworkbench.org MaterialsEverything necessary to make a DIY spectrometer:
Construction1. Cut off the VHS nubsThe flatter the better. Some cases have nubs on the top; it's still not a bad idea to remove them as they can create reflections in the case. Get out your black card and straighten it if it's become crooked. The kits ship with a pre-folded card as shown. 2. 3 cm from the edge, carefully cut out a <1 mm wide strip where shownThis is one of the most important steps; the slit should be very consistently straight, and quite narrow. Light will pass through here to enter the spectrometer. Generally, the narrower the slit the higher resolution the device, but then less light can enter, so you won't get as strong of a reading. 3. Put the card in the box, and cut a larger opening in the VHS case to expose the slitThe opening can be a centimeter wide; the black paper just lets you make a more precise slit than you'd get when cutting the box. You can also replace the slit to make it more precise or if it gets damaged. 4. Snap off the useless half of the webcamSome cameras may sit flat on the bottom of the box; our kit includes a nice, compact camera with flat sides (hard to find! too much ergonomics!) but you can make it even smaller by snapping it in half. If you can't find a flat-bottomed camera, you can use hot glue, epoxy, moldable plastic, or metal brackets to ensure that your camera stays level and rigidly in place. 5. Check that your camera will align with the slit, and attach the black cardAn imaginary line directly from the slit should intersect the lens. You may have to adjust the angle of the webcam later, once you start collecting spectra. Tape or glue your black card in place, firmly abutting the wall with the opening. You may have to add black tape (gaffe tape works well) to absorb reflections if your box is very shiny or has light leaks. 6. Split the DVD-R into layers and cut a small rectangle from the clear layerDon't get fingerprints on the DVD, and cut your "grating" from the outside edge where the track lines are more parallel. You can cut this piece down more precisely later. 7. Apply gentle pressure with pliers to open the webcam, and cut the DVD to fit inside the lens holeYou'll have enough DVD to try again if this goes wrong. Align the outside edge of the DVD so the track lines will appear vertical in the resulting video. 8. Tape or glue the DVD piece in placeSuperglue may leave a "frosty" looking stain, so try hot glue or epoxy. Tape works fine -- just don't cover where the camera will look through. 9. Unscrew the lens and remove the infrared filterHeating the lens a bit with a hair dryer can help loosen it. The filter will look iridescent -- you can throw it away. Screw the lens back in close to how it was. More tips on removing filters from other types of webcams can be found here: Webcam filter removal 10. Look at a barcode through the webcam to refocus it to about 20 cm (8") awayUse a webcam program like Photo Booth or even https://spectralworkbench.org/capture (experimental). A barcode has fine details so it's a nice test of focus. (The above image is of an older kit) Rotate the camera lens to adjust the focus. You may need to gently use a pair of needle-nosed pliers at first. Anything around 8 inches away from the lens should be in focus. This means your slit will be in focus when the box is closed. If you don't carefully refocus your camera, your spectra will be of very low resolution. Now snap your webcam back together. 11. Cut a notch for the USB cable, and fix your camera inside the boxLeave a couple inches of cable slack in the box. A knot inside the notch assures that the camera is not disturbed even if you yank the cable a bit. You can use Velcro to allow for re-adjusting the camera angle; it'll be about 45 degrees and you can glue it in place once you've gotten it right. 12. Close off any light leaks with dark tapeShiny sides inside the box may create reflections, and light may leak in where the hinge meets the corner of the box. Dark gaffe tape can help, as can more pieces of black paper. Some people line their boxes with felt or black velvet (fancy!). A completed spectrometerI added a blue tape with an arrow so you know where the slot is, and mounted it on an old LCD monitor stand. Pro-fessional! Using your spectrometerThe PLOTS Spectral Workbench software is still in beta, but you should be able to get started collecting spectra. A video on how to use the spectrometer is on the front page: https://spectralworkbench.org Getting involvedThe design is still being modified and improved. If you have ideas for how to make it better, chip in on the mailing list by joining Public Lab: http://publiclaboratory.org/join |
Revert | |
| 39 | warren |
August 03, 2012 18:59
| over 12 years ago
This page documents the construction of the video spectrometer. For usage, see video spectrometer usage. For drafts and older instructions, see video spectrometer construction drafts. If you have trouble, see Video Spectrometer Troubleshooting Quick-start videoThis 10 minute video walks through a simplified but effective version of the video spectrometer. It skips the step of removing the infrared filter, but can be modified later for infrared data: Full step-by-step instructionsConstruction using these steps should take less than 1 hour. Open-source software to operate this spectrometer is available at: https://spectralworkbench.org MaterialsEverything necessary to make a DIY spectrometer:
Construction1. Cut off the VHS nubsThe flatter the better. Some cases have nubs on the top; it's still not a bad idea to remove them as they can create reflections in the case. Get out your black card and straighten it if it's become crooked. The kits ship with a pre-folded card as shown. 2. 2 cm from the edge, carefully cut out a <1 mm wide strip where shownThis is one of the most important steps; the slit should be very consistently straight, and quite narrow. Light will pass through here to enter the spectrometer. Generally, the narrower the slit the higher resolution the device, but then less light can enter, so you won't get as strong of a reading. 3. Put the card in the box, and cut a larger opening in the VHS case to expose the slitThe opening can be a centimeter wide; the black paper just lets you make a more precise slit than you'd get when cutting the box. You can also replace the slit to make it more precise or if it gets damaged. 4. Snap off the useless half of the webcamSome cameras may sit flat on the bottom of the box; our kit includes a nice, compact camera with flat sides (hard to find! too much ergonomics!) but you can make it even smaller by snapping it in half. If you can't find a flat-bottomed camera, you can use hot glue, epoxy, moldable plastic, or metal brackets to ensure that your camera stays level and rigidly in place. 5. Check that your camera will align with the slit, and attach the black cardAn imaginary line directly from the slit should intersect the lens. You may have to adjust the angle of the webcam later, once you start collecting spectra. Tape or glue your black card in place, firmly abutting the wall with the opening. You may have to add black tape (gaffe tape works well) to absorb reflections if your box is very shiny or has light leaks. 6. Split the DVD-R into layers and cut a small rectangle from the clear layerDon't get fingerprints on the DVD, and cut your "grating" from the outside edge where the track lines are more parallel. You can cut this piece down more precisely later. 7. Apply gentle pressure with pliers to open the webcam, and cut the DVD to fit inside the lens holeYou'll have enough DVD to try again if this goes wrong. Align the outside edge of the DVD so the track lines will appear vertical in the resulting video. 8. Tape or glue the DVD piece in placeSuperglue may leave a "frosty" looking stain, so try hot glue or epoxy. Tape works fine -- just don't cover where the camera will look through. 9. Unscrew the lens and remove the infrared filterHeating the lens a bit with a hair dryer can help loosen it. The filter will look iridescent -- you can throw it away. Screw the lens back in close to how it was. More tips on removing filters from other types of webcams can be found here: Webcam filter removal 10. Look at a barcode through the webcam to refocus it to about 20 cm (8") awayUse a webcam program like Photo Booth or even https://spectralworkbench.org/capture (experimental). A barcode has fine details so it's a nice test of focus. (The above image is of an older kit) Rotate the camera lens to adjust the focus. You may need to gently use a pair of needle-nosed pliers at first. Anything around 8 inches away from the lens should be in focus. This means your slit will be in focus when the box is closed. If you don't carefully refocus your camera, your spectra will be of very low resolution. Now snap your webcam back together. 11. Cut a notch for the USB cable, and fix your camera inside the boxLeave a couple inches of cable slack in the box. A knot inside the notch assures that the camera is not disturbed even if you yank the cable a bit. You can use Velcro to allow for re-adjusting the camera angle; it'll be about 45 degrees and you can glue it in place once you've gotten it right. 12. Close off any light leaks with dark tapeShiny sides inside the box may create reflections, and light may leak in where the hinge meets the corner of the box. Dark gaffe tape can help, as can more pieces of black paper. Some people line their boxes with felt or black velvet (fancy!). A completed spectrometerI added a blue tape with an arrow so you know where the slot is, and mounted it on an old LCD monitor stand. Pro-fessional! Using your spectrometerThe PLOTS Spectral Workbench software is still in beta, but you should be able to get started collecting spectra. A video on how to use the spectrometer is on the front page: https://spectralworkbench.org Getting involvedThe design is still being modified and improved. If you have ideas for how to make it better, chip in on the mailing list by joining Public Lab: http://publiclaboratory.org/join |
Revert | |
| 38 | warren |
August 03, 2012 18:57
| over 12 years ago
IntroductionThis page documents the construction of the video spectrometer. For usage, see video spectrometer usage. For drafts and older instructions, see video spectrometer construction drafts. This hardware design is released under the CERN Open Hardware License 1.1. An agreement is detailed here: http://publiclaboratory.org/wiki/ohl-agreement. If you have trouble, see Video Spectrometer Troubleshooting To remove the filter, see Webcam Filter Removal Video instructionsThis 10 minute video walks through a simplified but effective version of the video spectrometer. It skips the step of removing the infrared filter, but can be modified later for infrared data: Full step-by-step instructionsConstruction using these steps takes approx. 1 hour. Open-source software to operate this spectrometer is available at: https://spectralworkbench.org MaterialsEverything necessary to make a DIY spectrometer:
Construction1. Cut off the VHS nubsThe flatter the better. Some cases have nubs on the top; it's still not a bad idea to remove them as they can create reflections in the case. Get out your black card and straighten it if it's become crooked. The kits ship with a pre-folded card as shown. 2. 2 cm from the edge, carefully cut out a <1 mm wide strip where shownThis is one of the most important steps; the slit should be very consistently straight, and quite narrow. Light will pass through here to enter the spectrometer. Generally, the narrower the slit the higher resolution the device, but then less light can enter, so you won't get as strong of a reading. 3. Put the card in the box, and cut a larger opening in the VHS case to expose the slitThe opening can be a centimeter wide; the black paper just lets you make a more precise slit than you'd get when cutting the box. You can also replace the slit to make it more precise or if it gets damaged. 4. Snap off the useless half of the webcamSome cameras may sit flat on the bottom of the box; our kit includes a nice, compact camera with flat sides (hard to find! too much ergonomics!) but you can make it even smaller by snapping it in half. If you can't find a flat-bottomed camera, you can use hot glue, epoxy, moldable plastic, or metal brackets to ensure that your camera stays level and rigidly in place. 5. Check that your camera will align with the slit, and attach the black cardAn imaginary line directly from the slit should intersect the lens. You may have to adjust the angle of the webcam later, once you start collecting spectra. Tape or glue your black card in place, firmly abutting the wall with the opening. You may have to add black tape (gaffe tape works well) to absorb reflections if your box is very shiny or has light leaks. 6. Split the DVD-R into layers and cut a small rectangle from the clear layerDon't get fingerprints on the DVD, and cut your "grating" from the outside edge where the track lines are more parallel. You can cut this piece down more precisely later. 7. Apply gentle pressure with pliers to open the webcam, and cut the DVD to fit inside the lens holeYou'll have enough DVD to try again if this goes wrong. Align the outside edge of the DVD so the track lines will appear vertical in the resulting video. 8. Tape or glue the DVD piece in placeSuperglue may leave a "frosty" looking stain, so try hot glue or epoxy. Tape works fine -- just don't cover where the camera will look through. 9. Unscrew the lens and remove the infrared filterHeating the lens a bit with a hair dryer can help loosen it. The filter will look iridescent -- you can throw it away. Screw the lens back in close to how it was. 10. Look at a barcode through the webcam to refocus it to about 20 cm (8") awayUse a webcam program like Photo Booth or even https://spectralworkbench.org/capture (experimental). A barcode has fine details so it's a nice test of focus. (The above image is of an older kit) Rotate the camera lens to adjust the focus. You may need to gently use a pair of needle-nosed pliers at first. Anything around 8 inches away from the lens should be in focus. This means your slit will be in focus when the box is closed. If you don't carefully refocus your camera, your spectra will be of very low resolution. Now snap your webcam back together. 11. Cut a notch for the USB cable, and fix your camera inside the boxLeave a couple inches of cable slack in the box. A knot inside the notch assures that the camera is not disturbed even if you yank the cable a bit. You can use Velcro to allow for re-adjusting the camera angle; it'll be about 45 degrees and you can glue it in place once you've gotten it right. 12. Close off any light leaks with dark tapeShiny sides inside the box may create reflections, and light may leak in where the hinge meets the corner of the box. Dark gaffe tape can help, as can more pieces of black paper. Some people line their boxes with felt or black velvet (fancy!). A completed spectrometerI added a blue tape with an arrow so you know where the slot is, and mounted it on an old LCD monitor stand. Pro-fessional! Using your spectrometerThe PLOTS Spectral Workbench software is still in beta, but you should be able to get started collecting spectra. A video on how to use the spectrometer is on the front page: https://spectralworkbench.org Getting involvedThe design is still being modified and improved. If you have ideas for how to make it better, chip in on the mailing list by joining Public Lab: http://publiclaboratory.org/join |
Revert | |
| 37 | Shannon |
April 30, 2012 21:35
| over 12 years ago
IntroductionThis page documents the construction of the video spectrometer. For usage, see video spectrometer usage. For drafts and older instructions, see video spectrometer construction drafts. This hardware design is released under the CERN Open Hardware License 1.1. An agreement is detailed here: http://publiclaboratory.org/wiki/ohl-agreement. If you have trouble, see Video Spectrometer Troubleshooting To remove the filter, see Webcam Filter Removal Video instructionsThis 10 minute video walks through a simplified but effective version of the video spectrometer. It results in a visible-range spectrometer, but can be modified later for infrared range data: These step-by-step instructions will work, but are more complex than those in the above video. The shipping kit uses the above method. Full step-by-step instructionsConstruction using these steps takes approx. 1 hour. Open-source software to operate this spectrometer is available at: http://github.com/jywarren/spectral-workbench MaterialsEverything necessary to make a DIY Spectrometer (let's try to reduce this list!):
Optional:
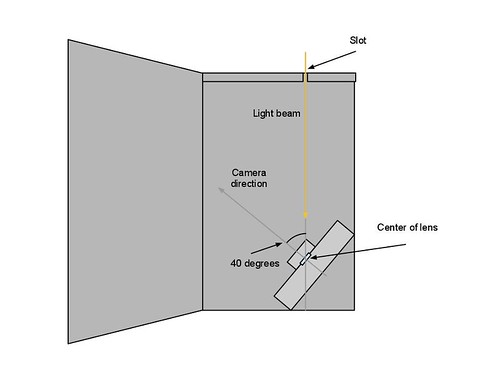
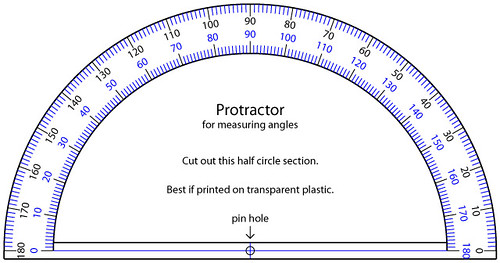
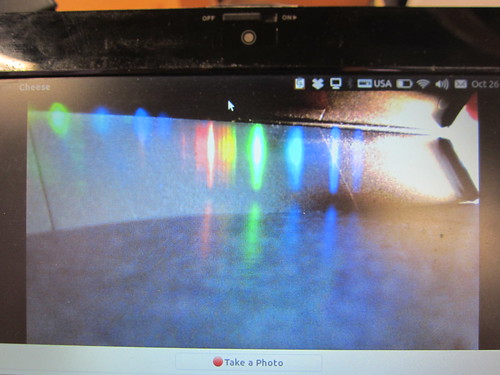
Construction1. Make a base cardCut a flat piece of black card (the stiffer the better!) and glue or double-sided tape it to the bottom of your VHS case. 2. Use some proprietary software (packaging) to draw a straight lineThis will be the path of your beam of light, so it should allow room for a webcam at one end, and a narrow slot at the other. I drew it a little closer to the outer edge of the case, maybe 2" from the edge. Adobe Creative Suite is so great for drawing straight lines! ;-) 3. Cut a 1 3/4" x 2 5/8" piece of black cardstock, divided into six 7/8" squaresCut and crease it as shown so you can make a stable box-like shape. Cut an extra bit of 7/8"-long card as shown -- this will be used to make a very narrow slot. Be sure the sides of the slot and the extra bit are completely straight! Use a straight-edge. This is the "bracket" for your precision slot. 4. Glue the strip onto your bracket to make a very precise slotIt should be less then 1mm wide. You can use a piece of card paper to keep a consistent width, but I prefer to eyeball it. If you use just a tiny bit of white glue, it should give you a few seconds to get it right before it's too dry to move. Let this dry thoroughly before continuing. 5. Check your precise slot by looking through it at a lightThe slot should be roughly centered, horizontally, and should extend to within 3-4mm of either the top and bottom. It should be of even width, a bit less than a millimeter. 6. Cut a hole centered on the guideline you drewIt should be as tall as your slot but leave enough plastic to remain stiff. You can use a big drill bit here too if it's easier. 7. Glue your slot in so it covers the hole you cutYou'll have to bend the center flap under so that the slot directly abuts the hole. Make sure it lines up with the light beam guideline you drew. 8. Unscrew the lens and look for the reddish/bluish infrared filterOn most webcams, you should be able to remove the lens without opening the case. 9. Slide a knife under the filter and pop it out, then screw the lens back inYou can throw the filter away; we won't be needing it. 10. Look at a barcode through the webcam to adjust its range of focusRotate the camera lens to adjust the focus. You may need to gently use a pair of needle-nosed pliers at first. Anything between around 4-11 inches away from the lens should be in focus. This means your slot will be in focus when it's installed opposite the camera. 11. Turn the camera lens to focus itA barcode is a nice test since it has many fine lines -- just like the spectra will have. It should be in focus at about 8" away from the camera. 12. Cut a piece of DVD-R and peel it apart carefullyDon't get any fingerprints on it! The DVD piece should be in the orientation shown -- so that the "track lines" of the DVD-R remain vertical in the camera's image. You won't be able to see the lines, so keep track of them as you make the cut and get ready to attach it to the camera. Once you cut the DVD-R piece, you should be able to split the layers apart using the tip of an X-acto knife. Choose the most transparent part. 13. Separate the 2 layers, and choose the lower, more transparent one14. Cut out a small rectangle of DVD, keeping the track lines verticalChoose a clear area with no fingerprints or chips of reflective material. 15. Tape or glue the DVD-R bit in front of the lensHere I covered the camera too, since it has built-in LED lights which would interfere with our readings. 16. Mount your cameraUse hot glue or something similar to firmly and sturdily mount your camera on a piece of card (cut similarly to your slot). How you do this will vary depending on your webcam but it should be horizontal and pointed straight . This can be tough -- a lot of hot glue can be helpful. 17. Position the webcam to point 40 degrees away from the slotThis varies by camera, so don't glue it down yet. 18. Line up the camera lens with your drawn guidelineFor this camera, it was at 50 degrees away from pointing straight at the slot. See the following step for a protractor you can use to measure. 18a. ProtractorPrint this or trace it to measure the angle of your camera. 19. Adjust the angle of the camera so that you can see the whole spectrumEven with the top open, you can see that there are finer lines (indicating good focus and a narrow, precise slot) and see the range of colors. An angle of 40 degrees away from the slot should be good but you may need to make finer adjustments, and it varies by camera. Once you have it, glue the camera in place and secure it with a lot of hot glue. 20. Knot the USB cable and tape it in placeLeave a couple inches of slack in the box. You can cut a small hole for the cable to exit the box; the knot assures that the camera is not disturbed even if you yank the cable. 21. Close off any potential light leaks with dark tape22. Boot up the Spectral Workbench software to see a spectrumhttp://github.com/jywarren/spectral-workbench You may have to press the up/down arrows to choose the height you're sampling from. Press Tab to choose the calibration mode which will help you line things up. 23. A completed spectrometerI added a blue tape with an arrow so you know where the slot is, and mounted it on an old LCD monitor stand. Pro-fessional! Using your spectrometerThe PLOTS Spectral Workbench software is not yet complete, but with a little configuration you should be able to get it running and start saving spectra. A video on how to use the spectrometer is coming soon. Consider purchasing a microphone stand and clip for $14. Design refinementsThe design is still being modified and improved. If you have ideas for how to make it better, chip in on the mailing list. Some ideas are listed here; feel free to contribute:
|
Revert | |
| 36 | warren |
March 07, 2012 15:39
| almost 13 years ago
IntroductionThis page documents the construction of the video spectrometer. For usage, see video spectrometer usage. For drafts and older instructions, see video spectrometer construction drafts. This hardware design will soon be released under the CERN Open Hardware License 1.1. A draft agreement is under development here: http://publiclaboratory.org/wiki/ohl-agreement and should be complete in a few days. If you have trouble, see Video Spectrometer Troubleshooting To remove the filter, see Webcam Filter Removal Video instructionsThis 10 minute video walks through a simplified but effective version of the video spectrometer. It results in a visible-range spectrometer, but can be modified later for infrared range data: These step-by-step instructions will work, but are more complex than those in the above video. The shipping kit uses the above method. Full step-by-step instructionsConstruction using these steps takes approx. 1 hour. Open-source software to operate this spectrometer is available at: http://github.com/jywarren/spectral-workbench MaterialsEverything necessary to make a DIY Spectrometer (let's try to reduce this list!):
Optional:
Construction1. Make a base cardCut a flat piece of black card (the stiffer the better!) and glue or double-sided tape it to the bottom of your VHS case. 2. Use some proprietary software (packaging) to draw a straight lineThis will be the path of your beam of light, so it should allow room for a webcam at one end, and a narrow slot at the other. I drew it a little closer to the outer edge of the case, maybe 2" from the edge. Adobe Creative Suite is so great for drawing straight lines! ;-) 3. Cut a 1 3/4" x 2 5/8" piece of black cardstock, divided into six 7/8" squaresCut and crease it as shown so you can make a stable box-like shape. Cut an extra bit of 7/8"-long card as shown -- this will be used to make a very narrow slot. Be sure the sides of the slot and the extra bit are completely straight! Use a straight-edge. This is the "bracket" for your precision slot. 4. Glue the strip onto your bracket to make a very precise slotIt should be less then 1mm wide. You can use a piece of card paper to keep a consistent width, but I prefer to eyeball it. If you use just a tiny bit of white glue, it should give you a few seconds to get it right before it's too dry to move. Let this dry thoroughly before continuing. 5. Check your precise slot by looking through it at a lightThe slot should be roughly centered, horizontally, and should extend to within 3-4mm of either the top and bottom. It should be of even width, a bit less than a millimeter. 6. Cut a hole centered on the guideline you drewIt should be as tall as your slot but leave enough plastic to remain stiff. You can use a big drill bit here too if it's easier. 7. Glue your slot in so it covers the hole you cutYou'll have to bend the center flap under so that the slot directly abuts the hole. Make sure it lines up with the light beam guideline you drew. 8. Unscrew the lens and look for the reddish/bluish infrared filterOn most webcams, you should be able to remove the lens without opening the case. 9. Slide a knife under the filter and pop it out, then screw the lens back inYou can throw the filter away; we won't be needing it. 10. Look at a barcode through the webcam to adjust its range of focusRotate the camera lens to adjust the focus. You may need to gently use a pair of needle-nosed pliers at first. Anything between around 4-11 inches away from the lens should be in focus. This means your slot will be in focus when it's installed opposite the camera. 11. Turn the camera lens to focus itA barcode is a nice test since it has many fine lines -- just like the spectra will have. It should be in focus at about 8" away from the camera. 12. Cut a piece of DVD-R and peel it apart carefullyDon't get any fingerprints on it! The DVD piece should be in the orientation shown -- so that the "track lines" of the DVD-R remain vertical in the camera's image. You won't be able to see the lines, so keep track of them as you make the cut and get ready to attach it to the camera. Once you cut the DVD-R piece, you should be able to split the layers apart using the tip of an X-acto knife. Choose the most transparent part. 13. Separate the 2 layers, and choose the lower, more transparent one14. Cut out a small rectangle of DVD, keeping the track lines verticalChoose a clear area with no fingerprints or chips of reflective material. 15. Tape or glue the DVD-R bit in front of the lensHere I covered the camera too, since it has built-in LED lights which would interfere with our readings. 16. Mount your cameraUse hot glue or something similar to firmly and sturdily mount your camera on a piece of card (cut similarly to your slot). How you do this will vary depending on your webcam but it should be horizontal and pointed straight . This can be tough -- a lot of hot glue can be helpful. 17. Position the webcam to point 40 degrees away from the slotThis varies by camera, so don't glue it down yet. 18. Line up the camera lens with your drawn guidelineFor this camera, it was at 50 degrees away from pointing straight at the slot. See the following step for a protractor you can use to measure. 18a. ProtractorPrint this or trace it to measure the angle of your camera. 19. Adjust the angle of the camera so that you can see the whole spectrumEven with the top open, you can see that there are finer lines (indicating good focus and a narrow, precise slot) and see the range of colors. An angle of 40 degrees away from the slot should be good but you may need to make finer adjustments, and it varies by camera. Once you have it, glue the camera in place and secure it with a lot of hot glue. 20. Knot the USB cable and tape it in placeLeave a couple inches of slack in the box. You can cut a small hole for the cable to exit the box; the knot assures that the camera is not disturbed even if you yank the cable. 21. Close off any potential light leaks with dark tape22. Boot up the Spectral Workbench software to see a spectrumhttp://github.com/jywarren/spectral-workbench You may have to press the up/down arrows to choose the height you're sampling from. Press Tab to choose the calibration mode which will help you line things up. 23. A completed spectrometerI added a blue tape with an arrow so you know where the slot is, and mounted it on an old LCD monitor stand. Pro-fessional! Using your spectrometerThe PLOTS Spectral Workbench software is not yet complete, but with a little configuration you should be able to get it running and start saving spectra. A video on how to use the spectrometer is coming soon. Consider purchasing a microphone stand and clip for $14. Design refinementsThe design is still being modified and improved. If you have ideas for how to make it better, chip in on the mailing list. Some ideas are listed here; feel free to contribute:
|
Revert | |
| 35 | warren |
February 22, 2012 23:03
| almost 13 years ago
IntroductionThis page documents the construction of the video spectrometer. For usage, see video spectrometer usage. For drafts and older instructions, see video spectrometer construction drafts. This hardware design will soon be released under the CERN Open Hardware License 1.1. A draft agreement is under development here: http://publiclaboratory.org/wiki/ohl-agreement and should be complete in a few days. If you have trouble, see Video Spectrometer Troubleshooting To remove the filter, see Webcam Filter Removal Video instructionsThis 10 minute video walks through a simplified but effective version of the video spectrometer. It results in a visible-range spectrometer, but can be modified later for infrared range data: Full step-by-step instructionsConstruction using these steps takes approx. 1 hour. Open-source software to operate this spectrometer is available at: http://github.com/jywarren/spectral-workbench MaterialsEverything necessary to make a DIY Spectrometer (let's try to reduce this list!):
Optional:
Construction1. Make a base cardCut a flat piece of black card (the stiffer the better!) and glue or double-sided tape it to the bottom of your VHS case. 2. Use some proprietary software (packaging) to draw a straight lineThis will be the path of your beam of light, so it should allow room for a webcam at one end, and a narrow slot at the other. I drew it a little closer to the outer edge of the case, maybe 2" from the edge. Adobe Creative Suite is so great for drawing straight lines! ;-) 3. Cut a 1 3/4" x 2 5/8" piece of black cardstock, divided into six 7/8" squaresCut and crease it as shown so you can make a stable box-like shape. Cut an extra bit of 7/8"-long card as shown -- this will be used to make a very narrow slot. Be sure the sides of the slot and the extra bit are completely straight! Use a straight-edge. This is the "bracket" for your precision slot. 4. Glue the strip onto your bracket to make a very precise slotIt should be less then 1mm wide. You can use a piece of card paper to keep a consistent width, but I prefer to eyeball it. If you use just a tiny bit of white glue, it should give you a few seconds to get it right before it's too dry to move. Let this dry thoroughly before continuing. 5. Check your precise slot by looking through it at a lightThe slot should be roughly centered, horizontally, and should extend to within 3-4mm of either the top and bottom. It should be of even width, a bit less than a millimeter. 6. Cut a hole centered on the guideline you drewIt should be as tall as your slot but leave enough plastic to remain stiff. You can use a big drill bit here too if it's easier. 7. Glue your slot in so it covers the hole you cutYou'll have to bend the center flap under so that the slot directly abuts the hole. Make sure it lines up with the light beam guideline you drew. 8. Unscrew the lens and look for the reddish/bluish infrared filterOn most webcams, you should be able to remove the lens without opening the case. 9. Slide a knife under the filter and pop it out, then screw the lens back inYou can throw the filter away; we won't be needing it. 10. Look at a barcode through the webcam to adjust its range of focusRotate the camera lens to adjust the focus. You may need to gently use a pair of needle-nosed pliers at first. Anything between around 4-11 inches away from the lens should be in focus. This means your slot will be in focus when it's installed opposite the camera. 11. Turn the camera lens to focus itA barcode is a nice test since it has many fine lines -- just like the spectra will have. It should be in focus at about 8" away from the camera. 12. Cut a piece of DVD-R and peel it apart carefullyDon't get any fingerprints on it! The DVD piece should be in the orientation shown -- so that the "track lines" of the DVD-R remain vertical in the camera's image. You won't be able to see the lines, so keep track of them as you make the cut and get ready to attach it to the camera. Once you cut the DVD-R piece, you should be able to split the layers apart using the tip of an X-acto knife. Choose the most transparent part. 13. Separate the 2 layers, and choose the lower, more transparent one14. Cut out a small rectangle of DVD, keeping the track lines verticalChoose a clear area with no fingerprints or chips of reflective material. 15. Tape or glue the DVD-R bit in front of the lensHere I covered the camera too, since it has built-in LED lights which would interfere with our readings. 16. Mount your cameraUse hot glue or something similar to firmly and sturdily mount your camera on a piece of card (cut similarly to your slot). How you do this will vary depending on your webcam but it should be horizontal and pointed straight . This can be tough -- a lot of hot glue can be helpful. 17. Position the webcam to point 40 degrees away from the slotThis varies by camera, so don't glue it down yet. 18. Line up the camera lens with your drawn guidelineFor this camera, it was at 50 degrees away from pointing straight at the slot. See the following step for a protractor you can use to measure. 18a. ProtractorPrint this or trace it to measure the angle of your camera. 19. Adjust the angle of the camera so that you can see the whole spectrumEven with the top open, you can see that there are finer lines (indicating good focus and a narrow, precise slot) and see the range of colors. An angle of 40 degrees away from the slot should be good but you may need to make finer adjustments, and it varies by camera. Once you have it, glue the camera in place and secure it with a lot of hot glue. 20. Knot the USB cable and tape it in placeLeave a couple inches of slack in the box. You can cut a small hole for the cable to exit the box; the knot assures that the camera is not disturbed even if you yank the cable. 21. Close off any potential light leaks with dark tape22. Boot up the Spectral Workbench software to see a spectrumhttp://github.com/jywarren/spectral-workbench You may have to press the up/down arrows to choose the height you're sampling from. Press Tab to choose the calibration mode which will help you line things up. 23. A completed spectrometerI added a blue tape with an arrow so you know where the slot is, and mounted it on an old LCD monitor stand. Pro-fessional! Using your spectrometerThe PLOTS Spectral Workbench software is not yet complete, but with a little configuration you should be able to get it running and start saving spectra. A video on how to use the spectrometer is coming soon. Consider purchasing a microphone stand and clip for $14. Design refinementsThe design is still being modified and improved. If you have ideas for how to make it better, chip in on the mailing list. Some ideas are listed here; feel free to contribute:
|
Revert | |
| 34 | warren |
February 02, 2012 14:55
| almost 13 years ago
IntroductionThis page documents the construction of the video spectrometer. For usage, see video spectrometer usage. For drafts and older instructions, see video spectrometer construction drafts. This hardware design will soon be released under the CERN Open Hardware License 1.1. A draft agreement is under development here: http://publiclaboratory.org/wiki/ohl-agreement and should be complete in a few days. If you have trouble, see Video Spectrometer Troubleshooting To remove the filter, see Webcam Filter Removal Video instructionsThis 10 minute video walks through a simplified but effective version of the video spectrometer. It results in a visible-range spectrometer, but can be modified later for infrared range data: Full step-by-step instructionsConstruction using these steps takes approx. 1 hour. Open-source software to operate this spectrometer is available at: http://github.com/jywarren/spectral-workbench MaterialsEverything necessary to make a DIY Spectrometer (let's try to reduce this list!):
Optional:
Construction1. Make a base cardCut a flat piece of black card (the stiffer the better!) and glue or double-sided tape it to the bottom of your VHS case. 2. Use some proprietary software (packaging) to draw a straight lineThis will be the path of your beam of light, so it should allow room for a webcam at one end, and a narrow slot at the other. I drew it a little closer to the outer edge of the case, maybe 2" from the edge. Adobe Creative Suite is so great for drawing straight lines! ;-) 3. Cut a 1 3/4" x 2 5/8" piece of black cardstock, divided into six 7/8" squaresCut and crease it as shown so you can make a stable box-like shape. Cut an extra bit of 7/8"-long card as shown -- this will be used to make a very narrow slot. Be sure the sides of the slot and the extra bit are completely straight! Use a straight-edge. This is the "bracket" for your precision slot. 4. Glue the strip onto your bracket to make a very precise slotIt should be less then 1mm wide. You can use a piece of card paper to keep a consistent width, but I prefer to eyeball it. If you use just a tiny bit of white glue, it should give you a few seconds to get it right before it's too dry to move. Let this dry thoroughly before continuing. 5. Check your precise slot by looking through it at a lightThe slot should be roughly centered, horizontally, and should extend to within 3-4mm of either the top and bottom. It should be of even width, a bit less than a millimeter. 6. Cut a hole centered on the guideline you drewIt should be as tall as your slot but leave enough plastic to remain stiff. You can use a big drill bit here too if it's easier. 7. Glue your slot in so it covers the hole you cutYou'll have to bend the center flap under so that the slot directly abuts the hole. Make sure it lines up with the light beam guideline you drew. 8. Unscrew the lens and look for the reddish/bluish infrared filterOn most webcams, you should be able to remove the lens without opening the case. 9. Slide a knife under the filter and pop it out, then screw the lens back inYou can throw the filter away; we won't be needing it. 10. Look at a barcode through the webcam to adjust its range of focusRotate the camera lens to adjust the focus. You may need to gently use a pair of needle-nosed pliers at first. Anything between around 4-11 inches away from the lens should be in focus. This means your slot will be in focus when it's installed opposite the camera. 11. Turn the camera lens to focus itA barcode is a nice test since it has many fine lines -- just like the spectra will have. It should be in focus at about 8" away from the camera. 12. Cut a piece of DVD-R and peel it apart carefullyDon't get any fingerprints on it! The DVD piece should be in the orientation shown -- so that the "track lines" of the DVD-R remain vertical in the camera's image. You won't be able to see the lines, so keep track of them as you make the cut and get ready to attach it to the camera. Once you cut the DVD-R piece, you should be able to split the layers apart using the tip of an X-acto knife. Choose the most transparent part. 13. Separate the 2 layers, and choose the lower, more transparent one14. Cut out a small rectangle of DVD, keeping the track lines verticalChoose a clear area with no fingerprints or chips of reflective material. 15. Tape or glue the DVD-R bit in front of the lensHere I covered the camera too, since it has built-in LED lights which would interfere with our readings. 16. Mount your cameraUse hot glue or something similar to firmly and sturdily mount your camera on a piece of card (cut similarly to your slot). How you do this will vary depending on your webcam but it should be horizontal and pointed straight . This can be tough -- a lot of hot glue can be helpful. 17. Position the webcam to point 40 degrees away from the slotThis varies by camera, so don't glue it down yet. 18. Line up the camera lens with your drawn guidelineFor this camera, it was at 50 degrees away from pointing straight at the slot. See the following step for a protractor you can use to measure. 18a. ProtractorPrint this or trace it to measure the angle of your camera. 19. Adjust the angle of the camera so that you can see the whole spectrumEven with the top open, you can see that there are finer lines (indicating good focus and a narrow, precise slot) and see the range of colors. An angle of 40 degrees away from the slot should be good but you may need to make finer adjustments, and it varies by camera. Once you have it, glue the camera in place and secure it with a lot of hot glue. 20. Knot the USB cable and tape it in placeLeave a couple inches of slack in the box. You can cut a small hole for the cable to exit the box; the knot assures that the camera is not disturbed even if you yank the cable. 21. Close off any potential light leaks with dark tape22. Boot up the Spectral Workbench software to see a spectrumhttp://github.com/jywarren/spectral-workbench You may have to press the up/down arrows to choose the height you're sampling from. Press Tab to choose the calibration mode which will help you line things up. 23. A completed spectrometerI added a blue tape with an arrow so you know where the slot is, and mounted it on an old LCD monitor stand. Pro-fessional! Using your spectrometerThe PLOTS Spectral Workbench software is not yet complete, but with a little configuration you should be able to get it running and start saving spectra. A video on how to use the spectrometer is coming soon. Consider purchasing a microphone stand and clip for $14. Design refinementsThe design is still being modified and improved. If you have ideas for how to make it better, chip in on the mailing list. Some ideas are listed here; feel free to contribute:
|
Revert | |
| 33 | warren |
December 13, 2011 21:48
| about 13 years ago
IntroductionThis page documents the construction of the video spectrometer. For usage, see video spectrometer usage. For drafts and older instructions, see video spectrometer construction drafts. This hardware design will soon be released under the CERN Open Hardware License 1.1. A draft agreement is under development here: http://publiclaboratory.org/wiki/ohl-agreement and should be complete in a few days. If you have trouble, see Video Spectrometer Troubleshooting Video instructionsThis 10 minute video walks through a simplified but effective version of the video spectrometer. It results in a visible-range spectrometer, but can be modified later for infrared range data: Full step-by-step instructionsConstruction using these steps takes approx. 1 hour. Open-source software to operate this spectrometer is available at: http://github.com/jywarren/spectral-workbench MaterialsEverything necessary to make a DIY Spectrometer (let's try to reduce this list!):
Optional:
Construction1. Make a base cardCut a flat piece of black card (the stiffer the better!) and glue or double-sided tape it to the bottom of your VHS case. 2. Use some proprietary software (packaging) to draw a straight lineThis will be the path of your beam of light, so it should allow room for a webcam at one end, and a narrow slot at the other. I drew it a little closer to the outer edge of the case, maybe 2" from the edge. Adobe Creative Suite is so great for drawing straight lines! ;-) 3. Cut a 1 3/4" x 2 5/8" piece of black cardstock, divided into six 7/8" squaresCut and crease it as shown so you can make a stable box-like shape. Cut an extra bit of 7/8"-long card as shown -- this will be used to make a very narrow slot. Be sure the sides of the slot and the extra bit are completely straight! Use a straight-edge. This is the "bracket" for your precision slot. 4. Glue the strip onto your bracket to make a very precise slotIt should be less then 1mm wide. You can use a piece of card paper to keep a consistent width, but I prefer to eyeball it. If you use just a tiny bit of white glue, it should give you a few seconds to get it right before it's too dry to move. Let this dry thoroughly before continuing. 5. Check your precise slot by looking through it at a lightThe slot should be roughly centered, horizontally, and should extend to within 3-4mm of either the top and bottom. It should be of even width, a bit less than a millimeter. 6. Cut a hole centered on the guideline you drewIt should be as tall as your slot but leave enough plastic to remain stiff. You can use a big drill bit here too if it's easier. 7. Glue your slot in so it covers the hole you cutYou'll have to bend the center flap under so that the slot directly abuts the hole. Make sure it lines up with the light beam guideline you drew. 8. Unscrew the lens and look for the reddish/bluish infrared filterOn most webcams, you should be able to remove the lens without opening the case. 9. Slide a knife under the filter and pop it out, then screw the lens back inYou can throw the filter away; we won't be needing it. 10. Look at a barcode through the webcam to adjust its range of focusRotate the camera lens to adjust the focus. You may need to gently use a pair of needle-nosed pliers at first. Anything between around 4-11 inches away from the lens should be in focus. This means your slot will be in focus when it's installed opposite the camera. 11. Turn the camera lens to focus itA barcode is a nice test since it has many fine lines -- just like the spectra will have. It should be in focus at about 8" away from the camera. 12. Cut a piece of DVD-R and peel it apart carefullyDon't get any fingerprints on it! The DVD piece should be in the orientation shown -- so that the "track lines" of the DVD-R remain vertical in the camera's image. You won't be able to see the lines, so keep track of them as you make the cut and get ready to attach it to the camera. Once you cut the DVD-R piece, you should be able to split the layers apart using the tip of an X-acto knife. Choose the most transparent part. 13. Separate the 2 layers, and choose the lower, more transparent one14. Cut out a small rectangle of DVD, keeping the track lines verticalChoose a clear area with no fingerprints or chips of reflective material. 15. Tape or glue the DVD-R bit in front of the lensHere I covered the camera too, since it has built-in LED lights which would interfere with our readings. 16. Mount your cameraUse hot glue or something similar to firmly and sturdily mount your camera on a piece of card (cut similarly to your slot). How you do this will vary depending on your webcam but it should be horizontal and pointed straight . This can be tough -- a lot of hot glue can be helpful. 17. Position the webcam to point 40 degrees away from the slotThis varies by camera, so don't glue it down yet. 18. Line up the camera lens with your drawn guidelineFor this camera, it was at 50 degrees away from pointing straight at the slot. See the following step for a protractor you can use to measure. 18a. ProtractorPrint this or trace it to measure the angle of your camera. 19. Adjust the angle of the camera so that you can see the whole spectrumEven with the top open, you can see that there are finer lines (indicating good focus and a narrow, precise slot) and see the range of colors. An angle of 40 degrees away from the slot should be good but you may need to make finer adjustments, and it varies by camera. Once you have it, glue the camera in place and secure it with a lot of hot glue. 20. Knot the USB cable and tape it in placeLeave a couple inches of slack in the box. You can cut a small hole for the cable to exit the box; the knot assures that the camera is not disturbed even if you yank the cable. 21. Close off any potential light leaks with dark tape22. Boot up the Spectral Workbench software to see a spectrumhttp://github.com/jywarren/spectral-workbench You may have to press the up/down arrows to choose the height you're sampling from. Press Tab to choose the calibration mode which will help you line things up. 23. A completed spectrometerI added a blue tape with an arrow so you know where the slot is, and mounted it on an old LCD monitor stand. Pro-fessional! Using your spectrometerThe PLOTS Spectral Workbench software is not yet complete, but with a little configuration you should be able to get it running and start saving spectra. A video on how to use the spectrometer is coming soon. Consider purchasing a microphone stand and clip for $14. Design refinementsThe design is still being modified and improved. If you have ideas for how to make it better, chip in on the mailing list. Some ideas are listed here; feel free to contribute:
|
Revert | |
| 32 | warren |
November 30, 2011 00:37
| about 13 years ago
IntroductionThis page documents the construction of the video spectrometer. For usage, see video spectrometer usage. For drafts and older instructions, see video spectrometer construction drafts. This hardware design will soon be released under the CERN Open Hardware License 1.1. A draft agreement is under development here: http://publiclaboratory.org/wiki/ohl-agreement and should be complete in a few days. Video instructionsThis 10 minute video walks through a simplified but effective version of the video spectrometer. It results in a visible-range spectrometer, but can be modified later for infrared range data: Full step-by-step instructionsConstruction using these steps takes approx. 1 hour. Open-source software to operate this spectrometer is available at: http://github.com/jywarren/spectral-workbench MaterialsEverything necessary to make a DIY Spectrometer (let's try to reduce this list!):
Optional:
Construction1. Make a base cardCut a flat piece of black card (the stiffer the better!) and glue or double-sided tape it to the bottom of your VHS case. 2. Use some proprietary software (packaging) to draw a straight lineThis will be the path of your beam of light, so it should allow room for a webcam at one end, and a narrow slot at the other. I drew it a little closer to the outer edge of the case, maybe 2" from the edge. Adobe Creative Suite is so great for drawing straight lines! ;-) 3. Cut a 1 3/4" x 2 5/8" piece of black cardstock, divided into six 7/8" squaresCut and crease it as shown so you can make a stable box-like shape. Cut an extra bit of 7/8"-long card as shown -- this will be used to make a very narrow slot. Be sure the sides of the slot and the extra bit are completely straight! Use a straight-edge. This is the "bracket" for your precision slot. 4. Glue the strip onto your bracket to make a very precise slotIt should be less then 1mm wide. You can use a piece of card paper to keep a consistent width, but I prefer to eyeball it. If you use just a tiny bit of white glue, it should give you a few seconds to get it right before it's too dry to move. Let this dry thoroughly before continuing. 5. Check your precise slot by looking through it at a lightThe slot should be roughly centered, horizontally, and should extend to within 3-4mm of either the top and bottom. It should be of even width, a bit less than a millimeter. 6. Cut a hole centered on the guideline you drewIt should be as tall as your slot but leave enough plastic to remain stiff. You can use a big drill bit here too if it's easier. 7. Glue your slot in so it covers the hole you cutYou'll have to bend the center flap under so that the slot directly abuts the hole. Make sure it lines up with the light beam guideline you drew. 8. Unscrew the lens and look for the reddish/bluish infrared filterOn most webcams, you should be able to remove the lens without opening the case. 9. Slide a knife under the filter and pop it out, then screw the lens back inYou can throw the filter away; we won't be needing it. 10. Look at a barcode through the webcam to adjust its range of focusRotate the camera lens to adjust the focus. You may need to gently use a pair of needle-nosed pliers at first. Anything between around 4-11 inches away from the lens should be in focus. This means your slot will be in focus when it's installed opposite the camera. 11. Turn the camera lens to focus itA barcode is a nice test since it has many fine lines -- just like the spectra will have. It should be in focus at about 8" away from the camera. 12. Cut a piece of DVD-R and peel it apart carefullyDon't get any fingerprints on it! The DVD piece should be in the orientation shown -- so that the "track lines" of the DVD-R remain vertical in the camera's image. You won't be able to see the lines, so keep track of them as you make the cut and get ready to attach it to the camera. Once you cut the DVD-R piece, you should be able to split the layers apart using the tip of an X-acto knife. Choose the most transparent part. 13. Separate the 2 layers, and choose the lower, more transparent one14. Cut out a small rectangle of DVD, keeping the track lines verticalChoose a clear area with no fingerprints or chips of reflective material. 15. Tape or glue the DVD-R bit in front of the lensHere I covered the camera too, since it has built-in LED lights which would interfere with our readings. 16. Mount your cameraUse hot glue or something similar to firmly and sturdily mount your camera on a piece of card (cut similarly to your slot). How you do this will vary depending on your webcam but it should be horizontal and pointed straight . This can be tough -- a lot of hot glue can be helpful. 17. Position the webcam to point 40 degrees away from the slotThis varies by camera, so don't glue it down yet. 18. Line up the camera lens with your drawn guidelineFor this camera, it was at 50 degrees away from pointing straight at the slot. See the following step for a protractor you can use to measure. 18a. ProtractorPrint this or trace it to measure the angle of your camera. 19. Adjust the angle of the camera so that you can see the whole spectrumEven with the top open, you can see that there are finer lines (indicating good focus and a narrow, precise slot) and see the range of colors. An angle of 40 degrees away from the slot should be good but you may need to make finer adjustments, and it varies by camera. Once you have it, glue the camera in place and secure it with a lot of hot glue. 20. Knot the USB cable and tape it in placeLeave a couple inches of slack in the box. You can cut a small hole for the cable to exit the box; the knot assures that the camera is not disturbed even if you yank the cable. 21. Close off any potential light leaks with dark tape22. Boot up the Spectral Workbench software to see a spectrumhttp://github.com/jywarren/spectral-workbench You may have to press the up/down arrows to choose the height you're sampling from. Press Tab to choose the calibration mode which will help you line things up. 23. A completed spectrometerI added a blue tape with an arrow so you know where the slot is, and mounted it on an old LCD monitor stand. Pro-fessional! Using your spectrometerThe PLOTS Spectral Workbench software is not yet complete, but with a little configuration you should be able to get it running and start saving spectra. A video on how to use the spectrometer is coming soon. Consider purchasing a microphone stand and clip for $14. Design refinementsThe design is still being modified and improved. If you have ideas for how to make it better, chip in on the mailing list. Some ideas are listed here; feel free to contribute:
|
Revert | |
| 31 | warren |
November 11, 2011 16:17
| about 13 years ago
IntroductionThis page documents the construction of the video spectrometer. For usage, see video spectrometer usage. For drafts and older instructions, see video spectrometer construction drafts. This hardware design will soon be released under the CERN Open Hardware License 1.1. A draft agreement is under development here: http://publiclaboratory.org/wiki/ohl-agreement and should be complete in a few days. Construction takes approx. 1 hour. Open-source software to operate this spectrometer is available at: http://github.com/jywarren/spectral-workbench MaterialsEverything necessary to make a DIY Spectrometer (let's try to reduce this list!):
Optional:
Construction1. Make a base cardCut a flat piece of black card (the stiffer the better!) and glue or double-sided tape it to the bottom of your VHS case. 2. Use some proprietary software (packaging) to draw a straight lineThis will be the path of your beam of light, so it should allow room for a webcam at one end, and a narrow slot at the other. I drew it a little closer to the outer edge of the case, maybe 2" from the edge. Adobe Creative Suite is so great for drawing straight lines! ;-) 3. Cut a 1 3/4" x 2 5/8" piece of black cardstock, divided into six 7/8" squaresCut and crease it as shown so you can make a stable box-like shape. Cut an extra bit of 7/8"-long card as shown -- this will be used to make a very narrow slot. Be sure the sides of the slot and the extra bit are completely straight! Use a straight-edge. This is the "bracket" for your precision slot. 4. Glue the strip onto your bracket to make a very precise slotIt should be less then 1mm wide. You can use a piece of card paper to keep a consistent width, but I prefer to eyeball it. If you use just a tiny bit of white glue, it should give you a few seconds to get it right before it's too dry to move. Let this dry thoroughly before continuing. 5. Check your precise slot by looking through it at a lightThe slot should be roughly centered, horizontally, and should extend to within 3-4mm of either the top and bottom. It should be of even width, a bit less than a millimeter. 6. Cut a hole centered on the guideline you drewIt should be as tall as your slot but leave enough plastic to remain stiff. You can use a big drill bit here too if it's easier. 7. Glue your slot in so it covers the hole you cutYou'll have to bend the center flap under so that the slot directly abuts the hole. Make sure it lines up with the light beam guideline you drew. 8. Unscrew the lens and look for the reddish/bluish infrared filterOn most webcams, you should be able to remove the lens without opening the case. 9. Slide a knife under the filter and pop it out, then screw the lens back inYou can throw the filter away; we won't be needing it. 10. Look at a barcode through the webcam to adjust its range of focusRotate the camera lens to adjust the focus. You may need to gently use a pair of needle-nosed pliers at first. Anything between around 4-11 inches away from the lens should be in focus. This means your slot will be in focus when it's installed opposite the camera. 11. Turn the camera lens to focus itA barcode is a nice test since it has many fine lines -- just like the spectra will have. It should be in focus at about 8" away from the camera. 12. Cut a piece of DVD-R and peel it apart carefullyDon't get any fingerprints on it! The DVD piece should be in the orientation shown -- so that the "track lines" of the DVD-R remain vertical in the camera's image. You won't be able to see the lines, so keep track of them as you make the cut and get ready to attach it to the camera. Once you cut the DVD-R piece, you should be able to split the layers apart using the tip of an X-acto knife. Choose the most transparent part. 13. Separate the 2 layers, and choose the lower, more transparent one14. Cut out a small rectangle of DVD, keeping the track lines verticalChoose a clear area with no fingerprints or chips of reflective material. 15. Tape or glue the DVD-R bit in front of the lensHere I covered the camera too, since it has built-in LED lights which would interfere with our readings. 16. Mount your cameraUse hot glue or something similar to firmly and sturdily mount your camera on a piece of card (cut similarly to your slot). How you do this will vary depending on your webcam but it should be horizontal and pointed straight . This can be tough -- a lot of hot glue can be helpful. 17. Position the webcam to point 40 degrees away from the slotThis varies by camera, so don't glue it down yet. 18. Line up the camera lens with your drawn guidelineFor this camera, it was at 50 degrees away from pointing straight at the slot. See the following step for a protractor you can use to measure. 18a. ProtractorPrint this or trace it to measure the angle of your camera. 19. Adjust the angle of the camera so that you can see the whole spectrumEven with the top open, you can see that there are finer lines (indicating good focus and a narrow, precise slot) and see the range of colors. An angle of 40 degrees away from the slot should be good but you may need to make finer adjustments, and it varies by camera. Once you have it, glue the camera in place and secure it with a lot of hot glue. 20. Knot the USB cable and tape it in placeLeave a couple inches of slack in the box. You can cut a small hole for the cable to exit the box; the knot assures that the camera is not disturbed even if you yank the cable. 21. Close off any potential light leaks with dark tape22. Boot up the Spectral Workbench software to see a spectrumhttp://github.com/jywarren/spectral-workbench You may have to press the up/down arrows to choose the height you're sampling from. Press Tab to choose the calibration mode which will help you line things up. 23. A completed spectrometerI added a blue tape with an arrow so you know where the slot is, and mounted it on an old LCD monitor stand. Pro-fessional! Using your spectrometerThe PLOTS Spectral Workbench software is not yet complete, but with a little configuration you should be able to get it running and start saving spectra. A video on how to use the spectrometer is coming soon. Consider purchasing a microphone stand and clip for $14. Design refinementsThe design is still being modified and improved. If you have ideas for how to make it better, chip in on the mailing list. Some ideas are listed here; feel free to contribute:
|
Revert |


