Revisions for Near Infrared Camera history
| 2 CURRENT | warren |
June 19, 2013 14:02
| over 11 years ago
This page needs revision
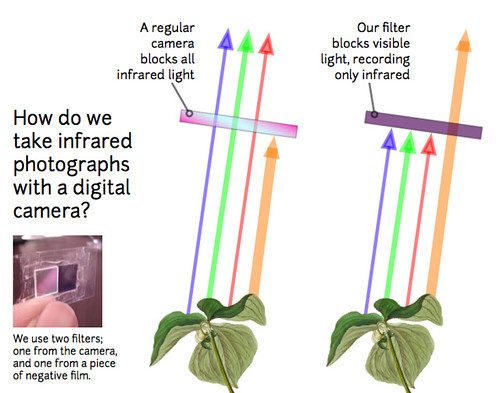
Infrared cameras for vegetation analysisInfrared photography can help assess a plant's health, and has been used on satellites and planes for agricultural and ecological assessment, mainly by vineyards, large farms and large-scale (read: expensive) research projects. There are public sources of infrared photography for the US available through the Department of Agriculture -- NAIP and Vegscape -- but this imagery is not collected when, as often, or at useable scale for individuals who are managing particular places. By creating a low-cost camera and working with farmers and environmental activists, we hope to explore grassroots uses for this kind of technology. What could farmers or activists do with leaf-scale, plant-scale, lot-scale, and field-scale data on plant health if the equipment costs as little as $10 or $35?
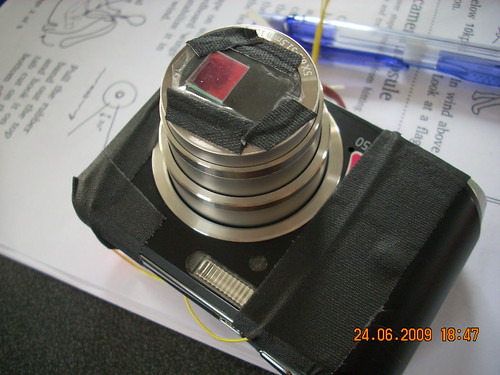
Screenshot from 2011-09-10-colorado-boulder-foothills-community-park-NRG. See how clearly plants are identifiable from bare earth, or pavement. The unique colors in this photo will be explained below. Keep reading to learn about the unique colors in this photo. Plants and infraredWe've been modifying cheap cameras to photograph in infrared (IR). The sensors in common digital cameras are sensitive to infrared, but come with a filter that blocks these wavelengths so that the photos look "normal" to us. Removing that filter allows us to pickup information in IR, and in that way begin to "see the invisible life of plants."
See, plants use visible light (mainly blue and red light) as 'food' -- not so much green light, which is why they reflect green away, and look green to our eyes. They also happen to reflect near infrared light (which is just beyond red light, but not visible to the human eye). This is because they chemically cannot convert infrared into usable food, and so they just bounce away to stay cool. The above image shows what colors of light plants absorb vs. reflect away.
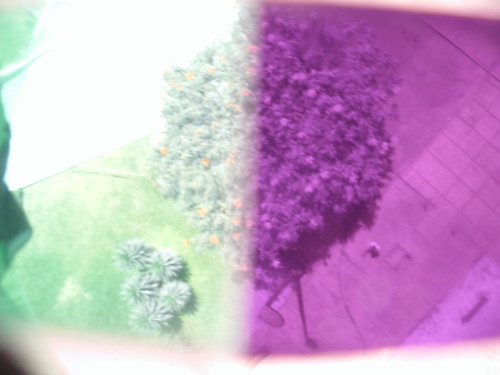
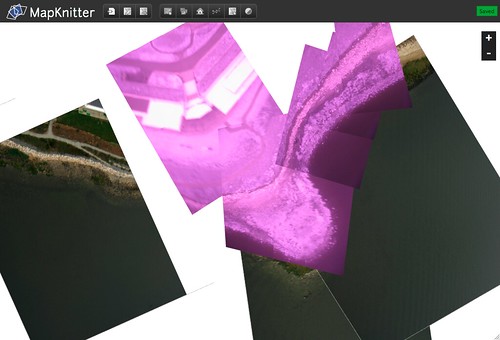
By using this unique property of plants, plus our ability to take near-infrared photos we can create composite images which highlight where plants are and how much they are photosynthesizing. (note: this video was made when people were still putting the film negative on the outside of the camera lens. To put the film negative directly inside the camera, once you have the infrared filter removed, put your cut film negative where the filter was, replace the rubber gasket and continue with the steps in the video for reassembling.) NDVI example: NRG example: How to take infrared and visible photographsBy putting both an infrared-pass filter and an infrared-block filter on the same camera, you can get both infrared and visible light with one photograph... though the areas don't overlap. This means you can get such imagery from the air using balloon mapping, while only risking one camera. Another alternative is to use a stereo camera system like the one being developed by the New York City chapter. Using Photoshop to do vegetation analysis with your picturesYou can use Adobe Photoshop (or GIMP, for an open-source, free alternative) to composite an infrared and visible image to do vegetation/photosynthesis analysis. The example photos were taken from an airplane window by Stewart Long. For a more comprehensive description of this process, and alternative means to do this analysis, see the infrared vegetation analysis activity. Using MapKnitter to make infrared/visible compositesIf you captured infrared and visible pictures from a balloon or kite, you can stitch them into a map using mapknitter.org. Mapknitter supports compsiting. It looks something like this, so far: |
Revert | |
| 1 | liz |
May 17, 2013 19:49
| over 11 years ago
This page needs revision
2011-2012 guides for making an infrared camera:We've been modifying cheap cameras to photograph in infrared (IR). The sensors in common digital cameras are sensitive to infrared, but come with a filter that blocks these wavelengths so that the photos look "normal" to us. Removing that filter allows us to pickup information in IR, and in that way begin to "see the invisible life of plants." (note: this video was made when people were still putting the film negative on the outside of the camera lens. To put the film negative directly inside the camera, once you have the infrared filter removed, put your cut film negative where the filter was, replace the rubber gasket and continue with the steps in the video for reassembling.) NDVI example: NRG example: How to take infrared and visible photographsBy putting both an infrared-pass filter and an infrared-block filter on the same camera, you can get both infrared and visible light with one photograph... though the areas don't overlap. This means you can get such imagery from the air using balloon mapping, while only risking one camera. Another alternative is to use a stereo camera system like the one being developed by the New York City chapter. Using Photoshop to do vegetation analysis with your picturesYou can use Adobe Photoshop (or GIMP, for an open-source, free alternative) to composite an infrared and visible image to do vegetation/photosynthesis analysis. The example photos were taken from an airplane window by Stewart Long. For a more comprehensive description of this process, and alternative means to do this analysis, see the infrared vegetation analysis activity. Using MapKnitter to make infrared/visible compositesIf you captured infrared and visible pictures from a balloon or kite, you can stitch them into a map using mapknitter.org. Mapknitter supports compsiting. It looks something like this, so far: |
Revert | |
| 0 | liz |
May 17, 2013 19:01
| over 11 years ago
This page needs revision
2011-2012 guides for making an infrared camera:(note: this video was made when people were still putting the film negative on the outside of the camera lens. To put the film negative directly inside the camera, once you have the infrared filter removed, put your cut film negative where the filter was, replace the rubber gasket and continue with the steps in the video for reassembling.) NDVI example: NRG example: How to take infrared and visible photographsBy putting both an infrared-pass filter and an infrared-block filter on the same camera, you can get both infrared and visible light with one photograph... though the areas don't overlap. This means you can get such imagery from the air using balloon mapping, while only risking one camera. Another alternative is to use a stereo camera system like the one being developed by the New York City chapter. Using Photoshop to do vegetation analysis with your picturesYou can use Adobe Photoshop (or GIMP, for an open-source, free alternative) to composite an infrared and visible image to do vegetation/photosynthesis analysis. The example photos were taken from an airplane window by Stewart Long. For a more comprehensive description of this process, and alternative means to do this analysis, see the infrared vegetation analysis activity. Using MapKnitter to make infrared/visible compositesIf you captured infrared and visible pictures from a balloon or kite, you can stitch them into a map using mapknitter.org. Mapknitter supports compsiting. It looks something like this, so far: |
Revert |


