One of the main problems of working with microplastics is that they can be difficult to tell apart from non-plastics. In my own lab, beginners can have up to an ~80% error rate where they either fail to identify some things as plastics, or identify non-plastics as plastics by mistake. This guide is designed to help reduce that margin of error so you can be more sure of what you've found.
This guide assumes you are working with samples from BabyLegs, and have prepared your sample by sorting and drying it, though it can be generalized to microplastics found in other ways.
Materials:
- Your microplastic sample, sorted and dried.
- A dissecting microscope. Dissecting scopes are different than compound microscopes, which are more common. Dissecting scopes have a larger working area on the stage (the place where you put the sample) and a lower magnification. If you don't have one, you can use a handheld/USB microscope (such as these), or even a magnifying glass. The less sophisticated your viewing system, the more likely you are to make an error.
- A glass or plastic petri dish, watch glass, or other flat, shallow container to look at your sample under the microscope with.
- Spotter's Guide to micoplastics, available here: Spotter's_Guide_to_Plastic_Pollution-_trawls-SM.pdf We've prepared this guide with common plastic types and common plastic-look alikes to aid identification.
- Tweezers
- Sewing needle & source of heat (like a lighter)
- Nail polish remover
- Datasheet (if you are collecting data systematically into some kind of data set. No need if you're just poking around). We have a blank datasheet here.
Forensic process
1. Is it plastic or not?
There are a few tricks to help you tell plastics from non-plastics. Use our Spotter's guide to help. Spotter's_Guide_to_Plastic_Pollution-_trawls-SM.pdf 
a) Look at it. Some plastics are very easy to identify because of their colour and shape, but be careful! Crab legs, shrimp exoskeletons, and tiny spiders can be bright red.
Compare it to other things. When you look at the plastic, compare it to other things fro the sample, especially things you've already identified as organics or non-plastics in the previous step. If you see a larger part of an exoskeleton, when you see a smaller fragment of one, you'll be able to identify it as part of an insect rather than a plastic. If you think it might be fiberglass, go get some fiberglass and compare it. If you think it might be a spider leg, go get a spider leg (ideally from a dead spider elsewhere in your sample!) and compare it. If you have microfibres, be sure to compare them to your contamination dish from when you were trawling.
Flip it over. One side can look different from the other. Look at its edges-- are they frayed like cotton, or more like fishing line? Is the thin edge of a fragment a brighter colour than the sides? This might be due to a recent fragmentation of a plastic.
Use a microscope or magnifying glass to get a closer look. Do you see cellular structures that indicate it's a plant, or terracing that indicate it's a rock? Are the edges drawn out in little strings like a stretched out plastic bag, or are they fibrous like a plant? Is it spherical with a "belly button" or pockmark that indicates it's a seed? There are some characteristic erosion patterns on plastic fragments that are different than rocks that can help with visual identification (We don't have copyright permission to reproduce them here, but you can Google them!). If you have a compound microscope, you can use that as well, but we find that a dissecting scope is much more useful. But use all the tools at your disposal!
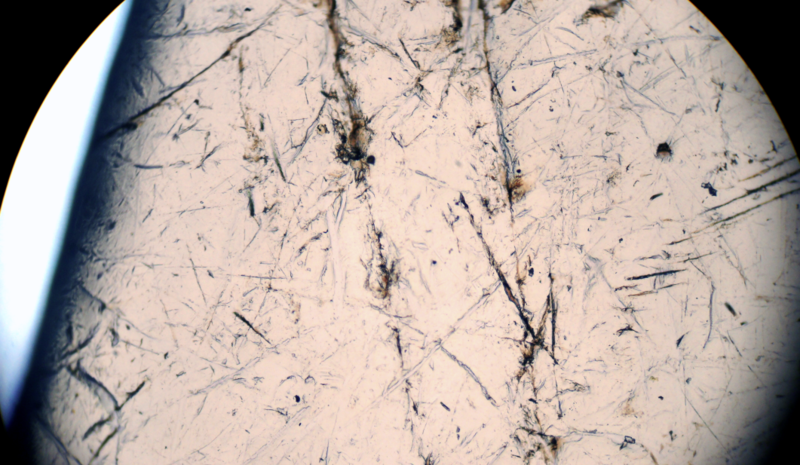
Figure: Erosion patterns on a hard plastic. There is pitting (round divets), parallel lines (on the right-hand side, like fingernails scratched it), groves (singular plow lines), and a crack (top left-hand side, where the line goes deeper into the plastic). This piece mostly has grooves.
b) Listen to it. Using the tweezers, tap the items to hear how they sound against the glass or plastic slide. Rocks and glass make a higher-pitched sound than many plastic fragments, and organics make a lower-pitched sound.
c) See how it moves. Plastics move differently in water, breezes, and static fields than other materials. If you introduce water, breeze, or static, be sure that the sample doesn't escape!
d) Cut it. First, measure and weigh it (see below), since this will destroy part of the sample. When you cut it open, look at the inside compared to the outside. If it is brighter inside, it is more likely to be plastic that has been in the weather for a while. If it is hollow, it is more likely to be an exoskeleton, grass, seed, or egg. If there are cellular structures, it is more likely to be a plant.
e) Use a hot needle test. First, measure and weigh the sample (see below), since this will destroy the sample. Put the end of a needle in the flame of a lighter until it glows (protect your fingers!). Touch the end of the needle to the plastic, ideally under a microscope. If the item shrinks away, melts, or burns black, it is likely plastic. If it smolders and goes out or burns cleanly, it is more likely organic. If it does not burn, it is more likely glass or a rock.
e) Use an acetone (nail polish remover) test. Some types of foam plastics will either dissolve or get sticky when acetone is applied. First, measure and weight the sample (see below) since this may destroy the sample. Rather than apply the acetone directly to the plastic, I prefer to make a tiny puddle of acetone and nudge part of the plastic into it. The stickiness or dissolving should happen within seconds. This won't tell you if something is plastic or not for sure, but it will help differentiate foamy-looking organics from some foamy plastics.
Discard all the items that you determine are not plastic. Keep the rest. This is your microplastic sample! Log these in the datasheet.
2. What type of plastic is it?
One of the main purposes of plastic forensics is to understand the types and thus perhaps the origins of microplastic pollution. This means you have to sort it into types. There are several key categories of plastics: fragments, threads, film, foam, pellets, microbeads, and microfibres.
In the blank datasheet, make an entry for each plastic (second tab). Record what type of plastic it is.


Fragments are one of the most common types of plastics you'll find in a marine sample. Fragments come off of larger plastics, especially in powerful ocean waves. They can have sharp or rounded edges, depending on how long they've been in the environment and in what conditions, but the edges can't help you date the plastic-- something with sharp edges might have been sitting at the bottom of the ocean for years before being stirred up, and something with rounded edges might have been stuck in an eddy for a short time. Fragments are hard or stiff, even if they are also very thin (think of a fragment from a plastic milk jug, for example, which would be thin but stiff).
 Film plastics, sometimes called sheet plastics, are like plastic bags or plastic wrap. They are very thin and flexible, and come from many sources: consumer (carrier bags), industrial (ag bags, feed bags), construction (Tyvek sheeting), and commercial (pallet wrapping). It is quite rare to find film plastics in marine samples because the strength of the ocean shreds them into nanoplastics beyond what you can see. They are more common in rivers, lakes, and near shorelines.

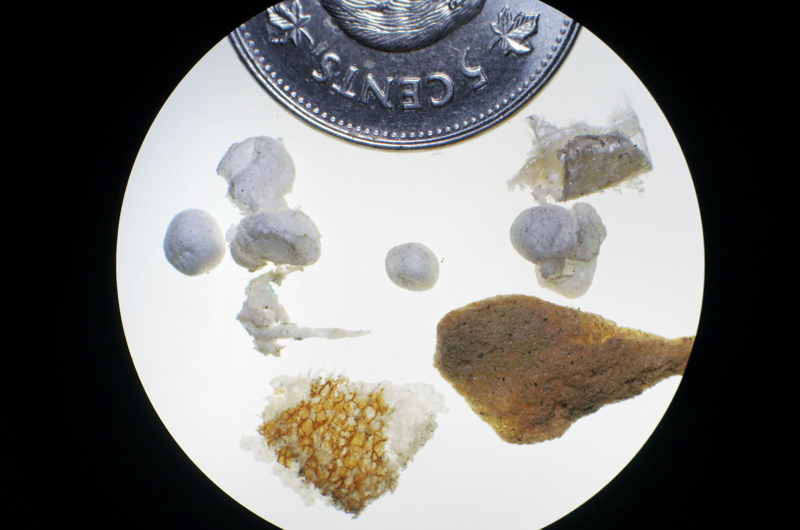
Foam plastics have air as part of their structures and are very light and fragment easily. They are squishy when you press on them. You're likely familiar with the brand name Styrofoam, which is one type of foam plastics. It is common to find little white beads from larger foam objects, but you can also find foam more similar to upholstery foams. Since their structures can be confused with cells, use the acetone/nail polish remover test when in doubt.

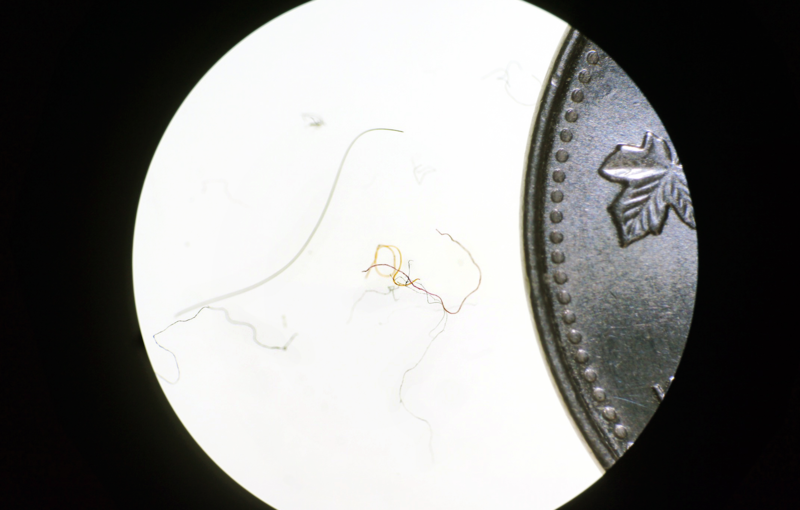
Threads are strands of plastic, usually from fishing line, though they can also be from mesh bags, pressed composites like fiberglass, cigarette butts, and other sources. They are sturdy though flexible, and can fray at the ends. They are usually smooth along their length, though some pitting and fraying can occur (as in the yellow thread above). They are much thicker and sturdier than microfibres.
 Microfibres come from synthetic textiles. They are much smaller than threads, and are usually kinked or wiggly. These are very common in a variety of aquatic environments, but they are also common in indoor environments and can easily contaminate your sample, making you assume that something that fell off your clothes or out of the air is from the water. These plastics are the main reason we use contamination controls during trawling. Because they are so small, they are likely to slip through your strainer. If you want to focus on these plastics, use a very fine, white strainer when processing samples.

Microbeads come from personal care products and are common in waters that have sewage outflows in them. They can be in a range of sizes, but most are brightly coloured (like the sparkly one in the image above, which we assume came from sparkly toothpaste). Most are perfectly round, but many are deformed as if they are half melted. They are much, much smaller than industrial pellets (below). 
This image shows one pellet (nurdle) and two microbeads to show relative size differences. Note that the green microbead is deformed.

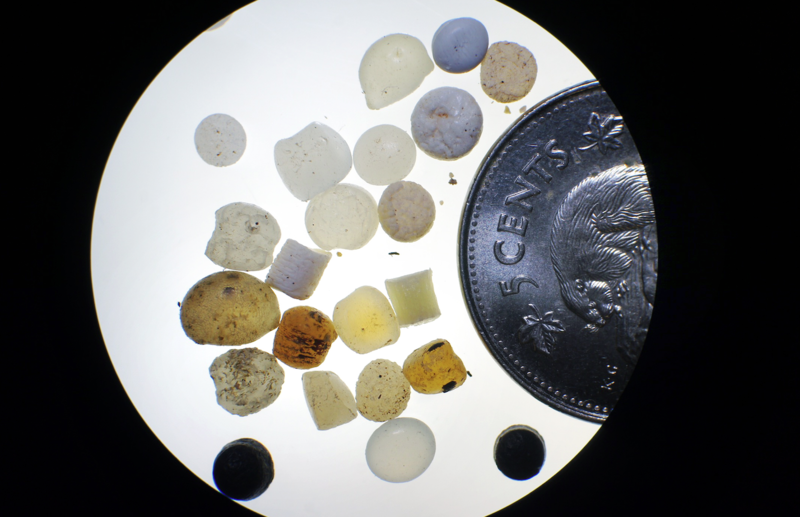
Industrial pellets, also called nurdles or production pellets, are the raw feedstock for manufacturers who make plastic items. These small plastics are shipped around the world, and many enter the ocean during shipping or transfer. They are spherical but are usually oddly squished like a bead. Some look like very short cylinders. Most of the time they are white or clear so that manufacturers can add their own colours, but we have found them in all sorts of colours, including bright purple. The longer a pellet is in the ocean, the more contaminants it collects, staining it a tea/coffee/tobacco yellow/orange/brown colour, like very old teeth. This can act as a proxy for aging the plastic, though the technique is not guaranteed, since a plastic in an oil spill can look very old very fast, and a plastic trapped in sand for a decade can emerge fresh and clear. Yet, people have used the brightness of pellets washing up on shorelines to identify shipping container spills in their areas, and even illegal industrial dumping.
3. How do you analyze the sample as a whole collection?Scientists and environmentalists, among others, have several common ways to talk about what a sample means.
a) Relative types (ratios). The microplastics in the Hudson River outside of New York City are mainly foam plastics. Off the northern shore of Newfoundland, they are mostly threads, presumably from fishing lines. Shipping areas have high concentrations of nurdles. Sewage outfalls carry microfibres and microbeads in high numbers. While microplastic pollution is "global," in scope it is also uneven and localized, and different areas are characterized by different plastics. You can characterize your area, and even compare different parts of an area by comparing the ratios of types of plastic to one another. If you can do inferential statistics such as ANOVA or t-tests, you will be able to say whether some categories are significantly greater than others. If not, you can only see whether some types of plastics really dominate others or not, or tend to characterize certain bodies of water. If you trawl before or after rainfall, tourist events, construction, increased shipping, etc., these counts can be used to chart changes in pollution characteristics.
b) Density. Most trawl studies aim to measure the density of plastics in an area (# plastics/km2), because it lets them compare their body of water to others. If you used a flowmeter or GPS with your trawling, you can calculate density (flowmeter is best, since GPS will only tell you how much ground you covered, which can be very different than amount of water that flowed through the trawl if that water was also moving in the same direction or against you, such as in tides or rivers). Microplastics tend to either sink or float on the surface of the water, with relatively few existing in the water column, so all trawl calculations in science assume density is based on surface area, not volume.
Measure the width of the trawl mouth (this is why we recommend square mouths!). Multiply that by the distance traveled/amount of water sampled in one trawl (make sure your units are adjusted!). Divide the number of plastics found in that trawl by that area. That is your density! In scientific literature on microplastics in surface water, density is presented as plastics/m2 or plastics/km2 (sorry, Americans. Metric is standard). Note that surface water density cannot be directly compared to shoreline plastic density-- they are measuring different things!
c) Weight and sizes. If you have access to calipers and a scale that measures at the milligram scale, you can measure the plastics. Then you can see the average weight and size, if there are outliers, what the variance is, if there are trends in sizes, and how your plastics compare to others. Scientists usually include these descriptive statistics in their reports, so you can compare how your sample compares to others. While calipers can be purchased for ~$20, scales that measure to the milligram are expensive and rare.

1 Comments
@liz awards a barnstar to maxliboiron for their awesome contribution!
Reply to this comment...
Log in to comment
Login to comment.