Created with baby's tights, soda pop bottles, and other inexpensive and easy to find materials, BabyLegs can be used to skim the surface of the water in rivers, streams, and oceans for floating marine microplastics by hand or from a boat. This instrument is called a surface trawl. Surface trawls are essentially fancy butterfly nets for catching surface plastics. These instructions start with an overview of basic concepts, and then a step-by-step protocol.
Where to trawl
You can use BabyLegs anywhere where there is water and you can get the water to flow through the device. Some of the ways people have deployed BabyLegs include:
Behind a human-powered boat like a canoe, paddle board, or skiff.
From a motorized boat, which requires an arm keeping the device out of the wake of the boat (which will down well the plastics).
By hand in flowing water.
Tied off to a wharf with fast flowing water.
Tied off from a bridge with fast flowing water beneath.

**
**
Positioning the trawl
No matter where you use BabyLegs, a main issue is to make sure the mouth of the container stays at the surface of the water at all times, so most of the mouth is underwater, and a small amount is above water. This ensures the surface of the water, where most buoyant plastics are, is always entering the container. If the trawl dives or twists, adjust your ropes. If it skips along the top of the water, slow down.
 This image shows an ideal position for BabyLegs in the water: 2/3 of the trawl is underwater, and 1/3 is above water. This way, when there are waves or other disruptions, you are always capturing a sample at the surface of the water.
Keep BabyLegs out of wake, turbulence, or disrupted water flow. Turbulence "down wells" plastic, pushing them deeper in the water column. If you're tying BabyLegs to a wharf or bridge, ensure she doesn't bump against anything or end up in an eddy. From a boat, keep BabyLegs out of the wake. We recommend using an extending arm to pull her alongside a vessel rather than behind it.
Water should always be running through BabyLegs, not "choking up" or flowing out again. Otherwise, you'll lose plastics. This is especially important when you are taking BabyLegs out of the water or changing direction (if you are in a boat or doing things by hand). This image shows dye moving through BabyLegs without flowing back out of the mouth. The image was taken during a validation in a flume tank.

Timing will vary, though we do not recommend trawling for less than half an hour if you want to get a good sample. If the water is particularly swampy or full of debris, we do not recommend sampling with a trawl at all, as it will be extremely time consuming to separate plastics from organics.
Speed of trawling
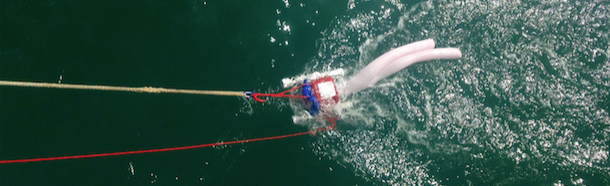
We have found that BabyLegs (Ketchup Container version) can easily handle up to 5 knots of speed in semi-choppy waves for over an hour. In high speeds, attach a "leash" to BabyLegs-- an extra line that does not take any pressure and is tied to the boat directly (red line in the image). If your pole breaks or the main line malfunctions, you can use the leash to keep the device from being lost at sea, or being sucked under the boat.
Step by step protocol for trawling
(This protocol assumes that you are interested in high-resolution, statistically-sound sampling. If you are just exploring an area, you can disregard all steps with a *)
Before starting your trip
- * From previous visits or a brief visual inspection, talking with local fishers or others, Internet research, consideration of recent wind patterns or a brief visual inspection, estimate how much debris will be on the surface of the water. This will help you determine how many and how big the samples will be. Accordingly, plan how long you want to trawl, how many trawls you will do, and how many sample bottles you need (for example, 120 minutes of trawling, rather than 3 trawls).
- The more trawls you do, the more representative your results will be. If you just want to see what kinds of plastics are in an area or if there are any at all (a qualitative analysis), shorter or fewer trawls are fine. *If you want to model how many plastics are in an area, you need to do enough trawls for lengths of time that correspond to the body of water you are sampling--over the open ocean, in a gyre, for example, you can trawl for over an hour and do 20+ trawls. In the latter case, ensure your research design includes _at least _90 minutes of trawling in any one area (can be one 1 x 90 min trawl, or 3 x 30min trawls). Less than this will not result in a sample that can be generalized to a region. Note that if there is a lot of debris in the water, you will need shorter tow lengths.
- *Plan your sampling design. If you want to see whether a sewage outflow contributes plastics to a river, for example, do several short samples, some directly around the outflow, some downstream, and some upstream. Then you can compare them. If you want to see whether a fairly small pond has plastics, you can probably do one, long trawl. IF you want to see if a river is contributing plastics to a lake, do some trawls in the lake, and others in the river, and perhaps visit the river immediately after a rainfall event to see if there are more plastics washing in from storm runoff.
- * If you are trawling using a vessel, ensure your boat has a way to record lat/long. Otherwise, obtain a handheld GPS tracker, or download a location tracker app that uses GPS, and doesn't require cell service (we have used MapMyRun by Under Armor, which is free on iOS and Android).
- If you are using a boat, check that that it has an arm for trawling that can keep the trawl out of the wake of the boat, or figure out how to McGiver your own (we have had success using wooden 2 x 4s lashed to the side of the boat.
- Check the weather and plan your trip, clothing, and departure time accordingly. Be safe.
- Remind people not to wear fleece, as fleece really contaminates samples. Really, really.
Materials List
- BabyLegs (see build instructions here)
- *Extra tights, one per sample plus extras
- nutdriver or screwdriver for plumber's clamp
- rope for the tow line (have more than you need; you can always coil what you don't want)
- rope for a leash if you are going on a boat
- large ziplock bag (big enough for the tights), one per set of tights
- *GPS device, either handheld or on your phone. Alternatively or additionally, you can have a flowmeter that measures the amount of water that flows through the trawl (these are rather expensive), in which case you also need two shackles or zip ties for attaching the flowmeter to the mouth of the trawl. We don't expect people will have a flowmeter.
- hydrogen peroxide (from the drug store-- a small bottle is fine)
- *permanent markers
- *pencil
- *petri dish or shallow jar with lid
- *double sided tape
- *log sheet for data, ideally on waterproof paper, but if not then copied with toner rather than ink. If not, stay dry! A link to a sample log sheet is here: Trawling_Field_Notebook.docx
Preparing the trawl_
* Skip this part if you are not using a flowmeter. Flowmeters are instruments that can be submerged in water that measure how much water flows by. You use one if you want to calculate the exact density of plastics in the water (#plastics divided by amount of water sampled). If you are going to use a flowmeter, attach it before you leave a building with potable water (flowmeters usually use clean water in the propeller house). Follow the instructions on your flowmeter to prepare it. Then mount it to the mouth of the trawl. The flowmeter below is on a pretty hefty trawl mouth because they are heavy.

If you are using a boat, attach a leash to the trawl. A leash is a thin, non-load bearing rope (that is strong enough to bear weight if needed). You can use an existing hole or make a new one. The leash ensures the trawl stays with the boat if you hit rough water, if something happens to the main line, or if it looks like the trawl will get sucked into the propeller. It's also extremely helpful for flipping the trawl over if it turns upside down or gets snagged. In the image below, the red line is the leash. It is attached directly to the boat.

*Preparing a contamination control
* Skip this part of you are not looking for a scientifically valid sample, and are just exploring. Scientifically valid samples need to account for all the extra plastic bits floating around in the world that do not come from the ocean. Clothing is a major contributor (especially fleece!!!), as well as the trawl itself--its ropes, the tights, its housing. To create a contamination sample, put double-sided tape in a petri dish or other shallow jar. Pinch samples of all mittens, gloves, scarfs, toques, jackets, inside of pockets, and other fabrics into it to ensure some microfibers adhere to the tape. If there is fleece anywhere onboard that will come in contact with any of the equipment, ensure that it is pinched (sampled) and placed in the dish, though it is better to avoid fleece when doing microplastic research altogether. Take small samples of the ropes and other synthetic fabrics that are part of the trawl. Write the date & trawl location on the dish and seal it. This must be repeated at the beginning of each trip (per day, not per trawl)Deployment
- Ensure the tights are secure on the body of BabyLegs. Give it some tough love tugs. If you're worried it will come undone, use two plumber's clamps (we call this "belt and suspenders")
- Tie the end of BabyLegs to your deployment arm, whether it is a bridge, an arm on a boat, a wharf, etc.
- Tie the leash to the side of the boat, bridge, shoreline, or a stable thing that is not going to go anywhere. This is an emergency line and shouldn't bear weight while the trawl is trawling regularly.
- *If you are using a flowmeter, record the number.
- *Fill as much information on the field data sheet as you can (
- Drop BabyLegs into the water. Ensure she is not in the wake of the boat, any branches, rocks, etc. Wake down wells plastics and you won't get a good sample. If you are on a boat, slow down to 1 knot to drop her in.
- Record the time, lat/long, etc on the Trawling_Field_Notebook.docx
- Ensure the mouth of the trawl is catching about 1/3 air, and 2/3 water. The surface of the water should always be in BabyLeg's mouth. If not, adjust the lines.
- If you are on a boat, you can increase speed, keeping an eye on the trawl to know when to slow down. Slowness will solve a lot of problems.
- Pull the trawl for the predetermined amount of time in your sample area. Keep an eye on it, since algae and gunk can fill it up-- then you have to stop.

The mouth of the trawl should have some air and some water in it at all times. A happy place is __⅔ water, ⅓ air, but waves and wind will shift that ratio constantly. If the trawl is "skipping" along _the surface and catching too much air, slow the boat and/or let out line.
Pulling the trawl out
- Slow the boat down if you're on a boat.
- Pull the trawl out of the water using the main line, not the leash.
- *The second her mouth is out of the water, record the lat/long, time, and other field notes.
- Using the nutdriver or screwdriver, loosen the plumber's clamp and take the tights off of BabyLegs.
- If you are concerned about insects, small fish, or other animals being caught in the trawl, gently turn the legs inside out until you can look inside them. Pull out any animals and put them back. The trawl has been tested extensively, and no fish have ever been caught. Insects and neuston invertebrates like plankton or krill can be caught, though.
- Put the tights in a ziplock bag. Be sure not to drag your sleeves, scarf, or beautiful flowing hair into the bag. That can contaminate the sample.
- Add a capful of hydrogen peroxide to the bag. Just dump it in. This will ensure that your sample does not become overly disgusting over time. It will still be a little disgusting, though.
- Label the outside of the bag with the date and location, and if you are doing more than one trawl, the trawl number that matches the data sheet. Note that permanent marker can rub off on bags, so store it in a not-rubby place.
- Seal the bag. The sample can be frozen or not. Plastics do not care.
- If you are conducting another sample, put a new pair of tights on BabyLegs, secure the plumber's clamp with the nutdriver or screwdriver, and repeat. _
_
 _
_
BabyLeg's toes after trawling. They might be very full or be sparse like this one. The tights may turn green if there is a lot of algea in the water.
 _
_
BabyLegs is exhausted.
2 Comments
Please note to users to not leave this device unattended as there is a potential for catching wildlife.
Reply to this comment...
Log in to comment
It's actually been tested for that-- it will certainly catch bugs, but anything larger has been able to successfully avoid it (ducks, fish, eels), and it can only be used at speeds where animals, even insects, can swim back out. If they are neuston insects that float around, they survive the netting and you can pick them out of the sample. Larger, faster trawls like the manta ray crush fish that are caught because of the pressure in the net at high speeds. BabyLegs is too small and slow for that.
Reply to this comment...
Log in to comment
Login to comment.