What we want to do:
We want to provide an open source and affordable CCD photodiode array spectrometer. The goal is to have 1 nm wavelength resolution and 12 bit intensity resolution.
Background:
An initial attempt (found here) lacked resolution due to no focusing element (mirror or lenses) after the diffraction grating. A second attempt (found here) showed promise, but lacked reproducibility. These attempts, and the awesomeness of 3D printing*, has led to the current design.
Attempts and results:
The spectrometers is made from a 3D printed base, a PublicLabs slit, a collimating lens, diffraction grating (1000 lines/mm), a focusing mirror, a TSL1406R 768 X 1 element photodiode array (pda), and a Tiva C series LaunchPad to read the PDA and send the data to a computer. A general schematic of the spectrometer is shown below.

In the figure above the light enters the spectrometer at the top right hand corner, passes through a sample in a cuvette, and gets attenuated by a slit. The attenuated light then gets collimated by a collimating lens. After being collimated, the light hits the holographic diffraction grating which diffracts the light according to its wavelength. After being separated by the diffraction grating, the desired wavelengths of light are directed to a focusing mirror. Once the light hits the focusing mirror it is directed to the CCD detector. The CCD detector converts the light that falls on each of its pixels to a proportional voltage. The LaunchPad mircrocontroller then reads the voltage on each of these pixels and sends the data to a computer.
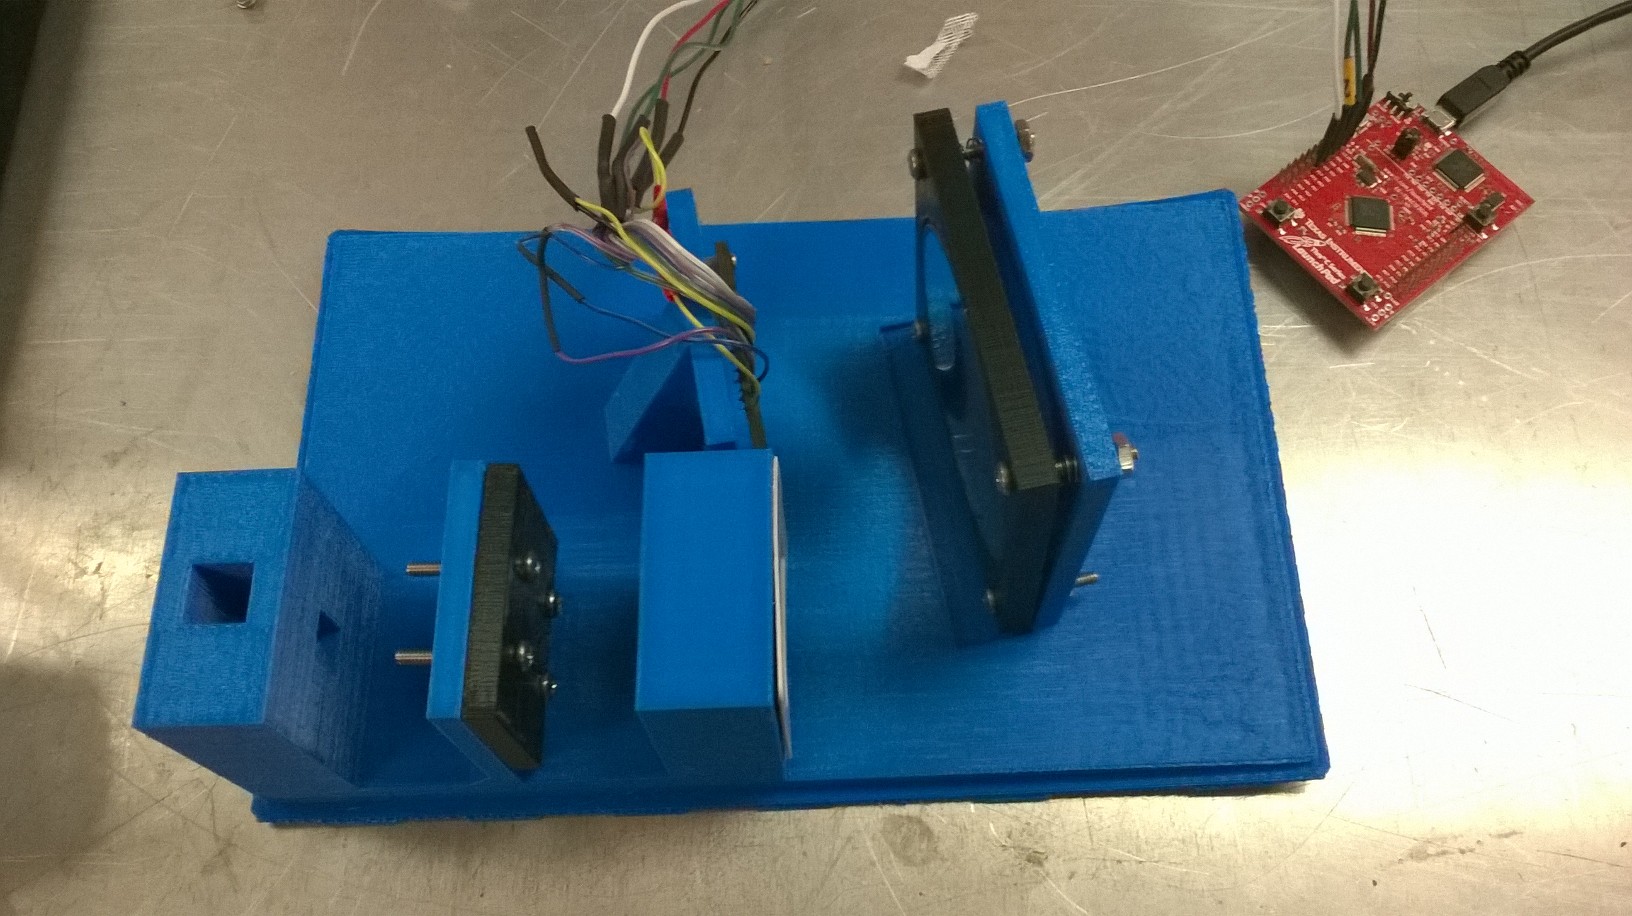
Design:
Overview of the spectrometer.

Light enters the spectrometer through a square hole in the cuvette holder.

Light passes through the sample in a cuvette (not shown) and gets attenuated by a slit. The slit is mounted on a 3D printed black plastic block which is bolted to the blue plastic stand.

After passing through the slit, the light gets collimated by a collimating lens. The collimating lens is mounted on a 3D printed lens holder which then fits into a square plastic stand as shown.

A holographic diffraction is mounted on the other side of the square plastic stand.

The focusing mirror is mounted on a 3D printed mirror holder (black plastic square shown). The mirror holder is then mounted to the blue plastic stand using springs as spacers. The spring spacers allows fine adjustment of the mirrors angle.

The CCD detector is bolted to a plastic stand.

Resolution:
Wikipidia fluorescent lamp spectrum:

WheeTrometer 3.0 fluorescent lamp spectrum:

A rigorous analysis of the resolution of the spectrometer has not yet been done. However a comparison of the WheeTrometer's spectrum to the Wikipedia spectrum shows that the resolution is pretty good.
Updates:
An untested lid in in the Thingiverse files. Having some printer trouble but hope to see how it works soon...
Acknowledgements:
I'd like to thank Brian Chee at the University of Hawaii for all his help with the 3D printing.
I'd also like to thank Dr. Summers at Western Carolina University for his never ending supply of good advice.
44 Comments
Very nice..! I threw something similar together last night actually.. As a test stand for the optics I'm using to build my raman spectrometer...
I'd love to see what you think! http://hackaday.io/project/1279
Reply to this comment...
Log in to comment
Thats pretty sweet flatCat. Did you print your slit?
Is this a question? Click here to post it to the Questions page.
Reply to this comment...
Log in to comment
Thanks..! I'm actually using two razor blades screwed into the print... I tried printing them previously, with mixed results... The blades seem to work much better..
Reply to this comment...
Log in to comment
Hello abaker1617. I got you questions in my email but for some reason they are not showing up here. First of all I was holding off on publishing the files on Thingiverse because I wanted to make some small adjustments, like adding a lid. Currently the lid is untested, so proceed at your own risk with that one, but here is the link to the files: http://www.thingiverse.com/thing:711557. Secondly, the measurements of the WheeTrometer 2.0 are a little different then 3.0. This is because I am using a different size mirror. Lastly, I have put the code for the microcontroller (written in Energia) and the GUI (written in Processing) here: https://github.com/SmokyMountainScientific/WheeTrometer_3.0
Reply to this comment...
Log in to comment
Hello, I met Brian at a recent 'geek day' event where he was talking about your design which sparked my curiosity in attempting to build one. Do you have a list of parts and sources? He said that it could be built for under $100. I assume that this does a better 'job' than the PL kit? I've never played with a spectroscope before (that I can recall) so it might be fun. I want to check for toxins in water. thx
Is this a question? Click here to post it to the Questions page.
Reply to this comment...
Log in to comment
Thanks for the info bhickman! (I don't know what happened to the old message). This is very helpful, i'll let you know how my project goes!
Reply to this comment...
Log in to comment
Hi Wbugar. I'm planning on writing a more coherent note on how to put this thing together and a parts list once I get a lid printed for the new design. But for now, the parts include a condenser lens, a focusing mirror, a diffraction gratting, a CCD array detector and a microcontroller. You will also need eight #8 screws for mounting the mirror and slit and two #2 screws for mounting the CCD detector.
Is this a question? Click here to post it to the Questions page.
Reply to this comment...
Log in to comment
Hi, forwarded this page to a friend with a printer and got this response: "Also, the stl file (3d object) loads as a very small structure. I think the scale is incorrect." Edmunds is pretty expensive, any cheaper sources? I see that he diffraction grating is a few bucks on Amazon. I'm thinking 'print' the little bits and mount on a wood board. ?
Is this a question? Click here to post it to the Questions page.
Reply to this comment...
Log in to comment
Hi Wbugar. The units of the stl files are inches. I can convert them to metric if needed, but most components/parts around here primarily denoted in inches so I kept the stl files in the same units for convince. And yes, Edmund is a bit expensive, but they are the cheapest I could find that will provide a reproducible product. I messed around with some real cheap educational mirrors, but the variation in each mirror were so large you would have to make a unique mount for each one. I would love for someone to point me in the direction of some cheaper, quality optics. As far as mounting on a board, that's kinda how I started, but the hard part of the spectrometer is alignment, and when you have so many degrees of freedom it becomes a bit of a headache. The current design provides a good alignment if you use all the parts specified. I could see some kind of paper template you could print for aligning the pieces on a board.
Thanks for the input. I think there are a lot of possibilities with this design, just have to find the time...
Reply to this comment...
Log in to comment
Hi, I was wondering what material you used for the 3D print? I'm planning on using PLA, and I'm having a service print the project because I don't own a personal printer.
Is this a question? Click here to post it to the Questions page.
Reply to this comment...
Log in to comment
Hello abaker, Would you mind keeping notes on your journey building this? I have no idea how to build this thing. Thanks.
Is this a question? Click here to post it to the Questions page.
Reply to this comment...
Log in to comment
Hi wbugar, I will keep notes on the project as it progresses. My construction doesn't begin until early April, but you can definitely expect detailed notes and pictures from start to finish.
Reply to this comment...
Log in to comment
Hi bhickman, I'm working on this project right now, and I'm kind of lost with the energia code and the processing code from your github page, mainly because I'm new to coding and i'm trying to figure this thing out. Could you assist me in finding a starting point to inputing the code you have on the github page for the processing GUI?
Is this a question? Click here to post it to the Questions page.
Reply to this comment...
Log in to comment
Hi abaker. Sorry for the delay, I was out in the field doing work for my real job... For you earlier question, so far I have been printing in PLA, although I would like to get one in ABS eventually. For the GUI code I'll try and make an instructional video, but for now you will need Processsing. Once you have downloaded the latest version of Processing there are a few external libraries that need to be installed. They are ControllP5, which can be imported directly in Processing by going to Sketch->Import Library; Graphica downloaded here (https://github.com/jagracar/grafica); and PFrame download here (https://github.com/shigeodayo/PFrame). There are instructions out there on how to add a library to Processing, but if you have any trouble let me know. After you have Processing and the needed libraries, its just a matter of downloading all the files from (https://github.com/SmokyMountainScientific/WheeTrometer_3.0/tree/master/Processing_Code/WheeTrometer_3_0_GUI) into one folder. Then opening WheeTrometer_3_0_GUI.pde with processing, the other files will open as separate tabs. Again, if you have any trouble, just let me know.
Reply to this comment...
Log in to comment
Hi bhickman, thank you for the very helpful info so far, Processing is all set up. (And I ended up using PLA for my 3D print.) Concerning Energia: I've set up the libraries from your Github page, and I don't know which to run first when I take the data with the CCD-PDA, or if there is a way to run the entire process all at once. I also don't know how to set up the wiring of the PDA to the Tiva C Series Chip. I'm going off of your pictures and various Energia/Tiva C Series Launch pad how-to guides, and I'm guessing the way the diode array is wired to the Tiva C Series Launchpad is specific to the code in Energia. Any advice on the set up of energia and the PDA to the Launchpad would be greatly appreciated.
Reply to this comment...
Log in to comment
Hi abaker, I'm a bit confused as to what you mean by which to run first, but I'll try and help. First of all, for the TSL1406R CCD wiring, I wired the CCD according to the "serial" configuration on page 8 of that data sheet. In the serial configuration in the data sheet there is an SI1/HOLD1/HOLD2 connection (pin 2, 3 & 9), a CLK1/CLK2 connection (pin 4 & 10), a SO2 connection (pin11), and a AO1/AO2 connection (pin 6 &12), as well as power (pin 13) and ground (pin 1 & 5). The SO2 connection is not necessary. I connect the power to the 5V pin on the Tiva, gound to ground, SI1/HOLD1/HOLD2 to PD_1 on the Tiva, CLK1/CLK2 to PD_0 on the Tiva, and AO1/AO2 to PD_2 on the Tiva. After that I upload the Energia code to the Tiva. After the Energia code is on the Tiva I use the Processing GUI to collect the data. Let me know if this is confusing...
Reply to this comment...
Log in to comment
Hi bhickman, this info is very helpful, thank you. In reference to my other question about which energia program to run first, what I mean by that is, when taking a reading from the Diode Array, which program do I run using energia? The D_array.ino, and then run Feb_9_2014_Stellaris_DA_Spec.ino, or do I run serial_input_variables.ino, or serial_variable_conversions.ino? Or is running one program from the GUI sufficient to get info from the diode array to the computer?
Is this a question? Click here to post it to the Questions page.
Reply to this comment...
Log in to comment
Hi Abaker, You don't really run the Energia programs. What you do is load them onto the microcontroller and they will be active for as long as the microcontroller is powered up. The Energia programs are the instructions for what you want the microcontroller to do when it receives instructions from the GUI. The different .ino files contain different parts of code that the overall program uses. The main part of the code is the "Feb_9_2014_Stellaris_DA_Spec.ino" file. This part of the code has lines that call other parts of the code. For example, line 62 says: "D_array();" this calls for a bunch of code from the D_array.ino file. That said, here are some suggestions; I think that you need to have all the files in a folder called "Feb_9_2014_Stellaris_DA_Spec". Then open the ino program with that name using Energia. You should see the main part of the program in one tab and you should have other tabs for the other programs (D_array, etc). Look for a button with a check mark that will allow you to see if the program compiles. If it doesn't, read the error message at the bottom of the screen. If you get an error message like "D_array() not defined" it means that the file containing the D_array function did not get into the folder with the Energia code.
At the top of the Energia window will be a button labeled tools. Use that one to select the com port your board is attached to, and the type of LaunchPad you are using. If there are more than one com ports listed, unplug your LaunchPad (or flip the power switch off) and see which one goes away. There are a few screenshots of Energia programs, along with a little text on getting set up at this site: http://publiclab.org/notes/JSummers/07-04-2014/getting-your-wheestat-set-up If you have trouble, just post another comment to this site. Best, Jack
Reply to this comment...
Log in to comment
Thanks JSummers, that is very helpful information!
Reply to this comment...
Log in to comment
Hi bhickman or JSummers, I'm trying to run with the processing GUI to get data, but i keep getting the following error message: "The file "wavelength_on_pda_element.csv" is missing or inaccessible, make sure the URL is valid or that the file has been added to your sketch and is readable."
This file is loaded in the data folder in my processing sketchbook for this code, and I don't know if it's the version of processing (2.2.1) or if it's the data, but the names definitely match. Should I move the data outside of the folder?
I also keep getting this underneath the previous error message as well: java.lang.RuntimeException: java.lang.NullPointerException at processing.core.PApplet.runSketch(PApplet.java:10713) at processing.core.PApplet.main(PApplet.java:10525) Caused by: java.lang.NullPointerException at WheeTrometer_3_0_GUI.(WheeTrometer_3_0_GUI.java:64) at sun.reflect.NativeConstructorAccessorImpl.newInstance0(Native Method) at sun.reflect.NativeConstructorAccessorImpl.newInstance(NativeConstructorAccessorImpl.java:57) at sun.reflect.DelegatingConstructorAccessorImpl.newInstance(DelegatingConstructorAccessorImpl.java:45) at java.lang.reflect.Constructor.newInstance(Constructor.java:526) at java.lang.Class.newInstance(Class.java:374) at processing.core.PApplet.runSketch(PApplet.java:10711) ... 1 more
Is this a question? Click here to post it to the Questions page.
Reply to this comment...
Log in to comment
How does the file look? You should be able to open it with excel or notepad. It looks to me like it should have one row of headings followed by hundreds of rows with values in two columns. It should start something like: element # ,waveln. At elem cent. 1, 400.3869669 2, 401.1610482 Are you able to get the GUI to launch when you click on the play button or does the error come before that? Jack
Is this a question? Click here to post it to the Questions page.
Reply to this comment...
Log in to comment
The file looks just like your example when I open it with excel, and the program launches, but if what you mean by saying the GUI launches is that the Java window opens after I press the play button, then no, the java window doesn't open after I press play.
Reply to this comment...
Log in to comment
JSummers, could the problem be that I'm using a Mac? Or is there a way that i should reset or reorder the system files when using Processing?
Is this a question? Click here to post it to the Questions page.
Reply to this comment...
Log in to comment
Hi abaker, I forgot about that wavelength file. The wavelengths in the file will be incorrect and a calibration will need to be done to get the correct ones. However, so the GUI will work, the wavelength file should be in the same location as your Sketchbook. In Processing go to File->Preferences, here there will be a path to your "Sketchbook," just copy and past the wavelength file to this location and it should work. As far as the Java error, I get those at random times, it's an issue with Processing. I just stop and re-start the GUI until it loads without the error.
Reply to this comment...
Log in to comment
Hi bhickman, that makes sense, but how do I take a calibration?
Is this a question? Click here to post it to the Questions page.
Reply to this comment...
Log in to comment
bhickman, also, copying the wavelength file to my sketchbook doesn't seem to make it work, but if what you're saying is that the file needs to be calibrated, then i guess i have to figure out how to take a csv file with the calibration data.
Reply to this comment...
Log in to comment
Hi abaker, I tried it on a Mac and was not able to get it to work, I'll have to look into this. For now, to use the csv file you can write out the complete path to the file. In line 36 of the main Processing code (WheeTrometer_3_0_GUI.pde) there is a piece of code that says: String[] wavedata = loadStrings("wavelength_on_pda_element.csv");, change this so that the path to the csv file is written out completely. It should look something like this: String[] wavedata = loadStrings("/Users/ben//Processing GUI/PDA_Spectrometer_Feb_9_2014/data/wavelength_on_pda_element.csv");.
Reply to this comment...
Log in to comment
HI bhickman, the filepath worked out and the GUI is working, which is great! But are you saying that the calibration doesn't work on a mac?
Is this a question? Click here to post it to the Questions page.
Reply to this comment...
Log in to comment
HI bhickman, could you just give me the step-by-step on how to calibrate this thing? This is a project I'm doing for a college class, and it's worth 10% of my grade, so I would like to get it up and running before next tuesday.
Is this a question? Click here to post it to the Questions page.
Reply to this comment...
Log in to comment
Hi abaker. Currently I'm using a third order polynomial to calibrate the spectrometer. I simply take a spectrum of a fluorescent light and save the output, then I match up as many peaks as possible with Wikipedia's fluorescent spectrum and fit the pixel number to wavelength using Excel. The you can go into the wavelength_on_pda_element.csv file and update the wavelengths with the calibrated ones. I should also mention that when you save the data using the GUI, it saves two rows of data, the current run is the first row and the previous blank is the second. Let me know if you need more help. I know the GUI still needs some work, so if you run into more bugs let me know.
Reply to this comment...
Log in to comment
Hi bhickman, do you think this would be able to handle the low concentration of raman scattering?
Is this a question? Click here to post it to the Questions page.
Reply to this comment...
Log in to comment
Hi bhickman,
I am glad I found your site this week. Well, I should have found your inventions earlier. Quite helpful instuctions, and bill of materials. Thanks.
As I am a total novice in this lab instrumentation, I would like to give it a try as your suggestions. However, I am not quite familiar with the TI evaluation kit, nor programming languages. Therefore I would like to try as almost exactly as yours. I have tried a series of Arduino product family. Is there any possibility for me to employ an Arduino family board instead of the Texas Instrument kit? Would the Arduino be compatible with all your github softwares. I am considering Arduino Due, which supplies 12 bit resolution AD conversion function. Thank you again for your contributions.
swkim789
Is this a question? Click here to post it to the Questions page.
Reply to this comment...
Log in to comment
Hey @bhickman, I get an error on the processing code that "The function controller(String) does not exist" on line 153 of WheeTrometer_3.0_GUI.pde have any ideas what could be wrong?
Is this a question? Click here to post it to the Questions page.
Reply to this comment...
Log in to comment
Hi, I attempted this set up in my instrumental analysis independent project.
I've included a link to the pdf below.
I ran into trouble when trying to utilize my mac for the software set up, and didn't finish (ran out of time). My main advice is use windows. I welcome any criticism.
Project PDF Link --> http://docdro.id/PEkWhlx
Reply to this comment...
Log in to comment
Hey @abaker1617 would you be willing to share your coding? Having some trouble with the processing code.
Is this a question? Click here to post it to the Questions page.
Reply to this comment...
Log in to comment
Hey @TUtam, sorry, but I don't think I find it. I did this project on multiple computers, and finished my work on a Microsoft computer at my college. I can check it out to see if there is a copy on my computer and let you know.
Reply to this comment...
Log in to comment
Hi @TUtam, I am not entirely up on this project but am somewhat familiar with Processing and am wiling to help. I downloaded the WheeTrometer GUI software and have found that there are a few things that are not working in Processing 3 (the newest version). I like the newest version and do not recommend going back to older versions. Anyway, there are some libraries that are required to make this run. One is controlP5, another is grafica. To import a library, open Processing, click on the "sketch" dropdown, then "import library", then "add library". There is another library(.com.shigedoyo) that I have not figured out yet.
It appears that the shigedoyo library is needed to run multiple windows, or frames. I am not sure that these windows are really necessary to get the spectrometer running. By commenting out the lines of code that call the shigedoyo library and making some other changes, I have been able to get the GUI to display but I have had to comment out a bunch of code and I am not sure it is running correctly right now. If you contact me at summers(at) wcu dot edu I will send you the code and keep you updated as I get stuff working. Best, Jack
Reply to this comment...
Log in to comment
@TUtam, I would like to run this on an windows 10 or Ubuntu 16
Reply to this comment...
Log in to comment
Hi, the collimating lens and slit links are not available. Can someone please tell me the alternative links for those. Thanks in advance :)
Reply to this comment...
Log in to comment
Sadly the diode array has also gone from "end of life" to obsolete to unobtainable. I'm getting the same problem with my design https://publiclab.org/notes/david_uwi/09-30-2016/homemade-spectrometer I have found an alternative the LFL1402 made by "ic Haus" available from symmetry electronics at reasonable cost.
Reply to this comment...
Log in to comment
Anyone interested in this project? I am working on code to use the Toshiba TCD1304 ccd in this project. I hope to have this to a point where I can write it up in the next month or so.
Is this a question? Click here to post it to the Questions page.
Reply to this comment...
Log in to comment
Hello @JSummers,
I'd be interested in your work on the project using the TCD1304 ccd. I hope you can keep us updated.
Reply to this comment...
Log in to comment
Yes, @JSummers,
I am interested. Please post results. Would love to beta test/advance the project!!
Reply to this comment...
Log in to comment
Hi @ONECore and @hmx, I just posted a research note on this topic. it is here: https://publiclab.org/notes/JSummers/06-03-2018/updating-the-wheetrometer-code-for-running-the-ccd?_=1528050099 Jack
Is this a question? Click here to post it to the Questions page.
Reply to this comment...
Log in to comment
Login to comment.