What I want to do
In an earlier research note (found here), we described how to make low cost reference electrodes for electrochemistry. The reference electrode contains a salt solution, so it has to be sealed at both ends to prevent spilling and evaporation. The earlier design had a porous ceramic ball glued to the bottom and a rubber septum at the top. We have found that the rubber septum is not the best material for this purposes. It gets gummy and brittle with age (photo below).

We have looked into other materials for this application and have decided that we like 5 mm plastic beads from the craft store best.
My attempt and results
For a while, we have been considering alternatives to the rubber septum. Desired characteristics for the alternative plug are: It must fit the top of the electrode (it has to be round and about 5 mm in diameter). It cannot be permanently affixed (any kind of glue plug is out). Since we have to measure a voltage inside the electrode, it must either be conductive, have an existing hole for a wire, or be easily drilled. Finally, it needs to be cheap, chemical resistant and widely available. We believe that craft beads meet most if not all of these criteria and we are reporting here our recommendations. In an early version, we simply slid a craft bead onto a silver wire and glued it in place. It occurred to us that the wire will be subjected to repeated bending stress at the point where it exists the bead and would eventually fail. While it would be possible to reclaim most of the broken wire, any silver above or inside the bead would be lost. We decided that a better design would have all of the silver inside the electrode with a solder joint to a more available (and less expensive) wire material. The cheaper wire would run through the bead to the outside. To make the new design, we stripped a short length of multi-stranded (aluminum?) hookup wire, bent the stripped part into a hook, bent a length of silver wire into a hook, then soldered the two hook ends together. The craft bead was then slid onto the insulated wire and glued into place with superglue (figure below).

Once the glue is set, the silver wire is slid into the body of the electrode, making contact with the salt solution inside. The top of the electrode is sealed using electrical tape as in the figures below (note, these show the earlier design with the silver wire through the bead. None of the later photos were in focus).


The last thing to do is to oxidize the surface of the silver wire to get a good coat of AgCl on it. Since there is a lot of chloride in the salt solution, you just need to hook the electrode to the positive terminal of a battery, immerse the end in a salt solution, and complete the circuit by hooking the other battery terminal to something inert (like a stainless steel spatula that is also in contact with the solution and let it run for a few min. In the figure below, the reference electrode is attached to the positive terminal of a six volt battery by the white jumper wire and the red wire connects the negative terminal to a spatula. You know it is done when you have a nice white layer of AgCl on the silver wire and you stop generating bubbles.

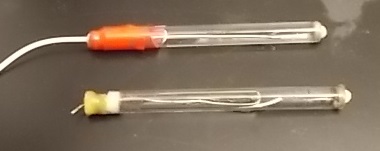
The main image at the top of this research note shows a finished electrode with the new design and the original design.
Questions and next steps
Q- will the aluminum wire and/or the solder joint affect the performance of the electrode? I don't think so. I guess that you could have aluminum oxide form at the surface, but I think the potential will be governed by the Ag / Ag+ half reaction. I recommend gooping the solder joint with super glue and keeping the joint above the level of the solution to prevent any chemistry from occurring there. If it turns out that the voltage of this electrode varies from the expected value over time, I will let you know.
Q-- How does the voltage of this electrode compare to a commercial reference electrode? Using my multimeter, I measure a difference of less than 20 mV,
Next steps-- do something about the bottom of the electrode. Superglueing the ceramic ball to the the bottom can sometimes have problems with either leaking or getting the whole thing gooped up so that there is no conductivity. Perhaps we can shrink-wrap the seive to the electrode body.
Why I'm interested
This stuff just has to be done.
1 Comments
I know that this project is a while in the past, but I hope it can be resurrected. Is it possible to contact you directly to discuss this? Thanks Doug
Is this a question? Click here to post it to the Questions page.
Reply to this comment...
Log in to comment
Login to comment.