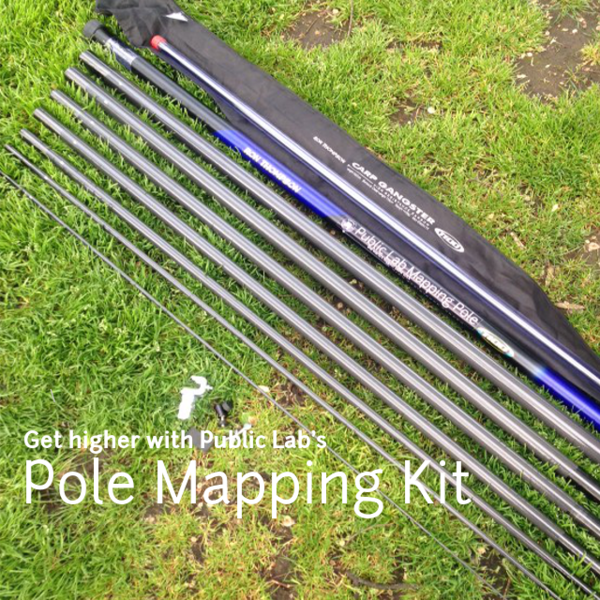
Pole Mapping Kit Instructions
Pole mapping Kit instructions v 0.0.1
What does this thing do?
The Public Lab Pole Mapping Kit allows you to obtain an image from an aerial perspective of up to 30 feet using a small, point-and-shoot camera. We sell it primarily as an aerial mapping tool, one that provides low-level coverage. Public labbers have used this to map gardens, sensitive wetlands, and many areas where you want more close-ups or detail or where flight is not an option.
Additional uses:
- event photography
- large group photos
- construction sites
- landscapes
- realtor property shots
- roofing and gutter inspection
- confounding selfies
- any other application where getting a camera 30' in the air would be a good thing.
Specs/Description:
Total Pole Length: 11 meters
Functional Camera Height: Dependent on weight of camera. A Mobius (http://publiclab.myshopify.com/products/mobius-actioncam) or similar style of "micro-camera" could be used on the 10 or 11 meter section. For a point and shoot camera of 100 grams or more you will need to be 3 or more sections down. For DSLRs it seems that 6 meters is max (once again weight dependent).
Carrying Capacity: Dependent on height and angle desired. The higher you go and the more extreme of angle the more stress on the pole. Lighter is better in all cases. Choose the highest quality camera that weighs the least.
Safety
- Carbon fiber is fragile! Be careful storing and taking it out and stepping on it.
- Do not use in electrical storms
- Do no use near power lines
- Secure items attached to pole to avoid falling objects.
- Carbon fiber splinters can cut you. If you break a pole, do not touch it with your bare hands. Wear gloves
- Pole has a lot of flex. Avoid sudden stops and starts with the pole, especially with weight of camera attached. Pole could snap, and camera could fall.
- ensure camera and payload is securely fastened to the pole before raising overhead
What's included
- 1 Ron Thomposon Carp Gangster carbon fiber fishing pole. Includes:
- 1 carrying bag
- 8 parts (nested, labelled segments 7a-1a, and unlabelled base segment)
- 1 replacement top kit (2 parts, Sections 1a, 2a)
- 2 end caps
Camera Mounting Hardware:
- 1 mini-ball tripod head
- 1 strip of foam tape
- pole mounting bracket (1 bracket, 1 1/4" thumbscrew screw, 1 1/2" thumbscrew, 1 wingnut)
- 1 8" thick walled pvc pipe
This pole consists of 8 parts, however you will only be using the 7 stoutest for the pole mapping.
Help! I can't get the poles out!
Sometimes nestled pole segments can become stuck, especially after transport. If you find the pole segments have become stuck inside one another, take the next smallest pole segement, and insert into the small end of the stuck pole segments, small end first. Push until stuck segment is freed, then pull all segments apart.
Example: 5a is stuck inside 6a. To get it out, take the smaller (non-numbered) end of 4a and push it into the smaller (non-numbered) end of 6a (the stuck pair). Push gently again the stuck segment (5a) to loosen and let it slide out.
Assembling the pole
We chose this pole specifically because it is a stacking design, which ensures the pole will not collapse with the weight of the camera, as it might with a telescoping design. This does involve having to manually assemble the segments.
We recommend fully unpacking and laying out the segments, ideally on a soft flat surface, such as grass or soft dirt. If you can, have a partner work with you to keep any part of the assembled pole from contacting the ground, as the carbon fiber poles are fragile and prone to chipping on hard surfaces.
If working as a pair, have one person take the thickest part of the pole and walk away, while the other person adds each segment in order. Add segments one at a time until you have added the 2A segment. This is the smallest segment you will use.
Then, slide on the grey PVC sleeve, with camera mounting hardware, and press gently down until it seats.
If working alone, you may find it easier to assemble the pole by first staging the segments on the ground. If you are working on a hard surface, you may want to place a towel or other cloth beneath the base of the stoutest pole to protect it as you work.
Breakdown and storage of the pole
If you've purchased a pole mapping kit, help populate this wiki!
Walking with the pole
If you've purchased a pole mapping kit, help populate this wiki!
Actually taking photos
Microsoft ICE (http://research.microsoft.com/en-us/um/redmond/projects/ice/) is a free Image composite editor and very useful in PAP. Below is an image exported at low quality taken from six 21 megapixel images.
123D Catch (http://www.123dapp.com/catch) is another option but cane be a bit troublesome to work with. This generates 3D models of your images.
Using Ground Control Points
If you've purchased a pole mapping kit, help populate this wiki!
