PET Bottle & Rubber Band Rig
This page replaces the Soda Bottle Rig.

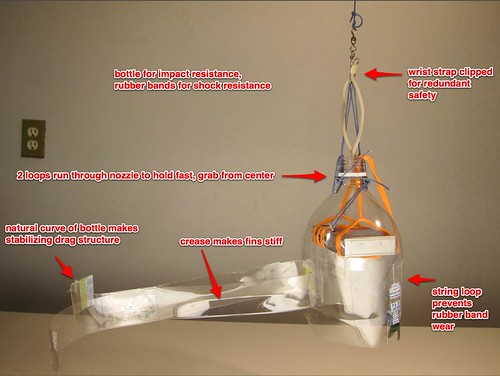
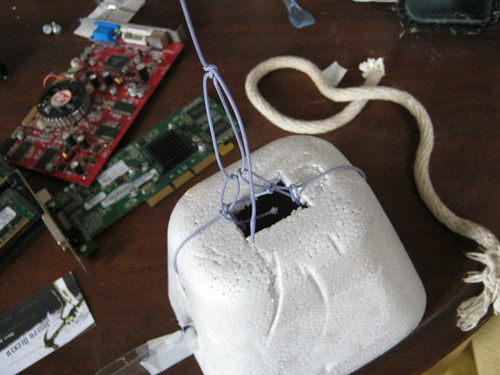
The PET bottle rig has two components-- the modified bottle and a rubber band harness for the inside. Small construction details differ for phones, small cameras, and large cameras which are explained in this video series:
Sizes of PET bottle and usefulness for types of cameras
We collectively maintain a google spreadsheet with different bottles and notes on their size and shape. You can add new bottles to the spreadsheet here.
Here are some common shapes you'll encounter at the supermarket:

Eustatic has a modification using a faucet cover to replace the PET bottle. It is lighter weight and provides flotation in water landing scenarios:

Picking a Bottle For Your Camera
Find and crinkle a PET bottle-- how thick or thin is the material? thin bottles are fine for very light cameras and phones, but heavier cameras deserve a heavier bottle. If you're at a store, remember that carbonated beverages pressurize their bottles and will appear extra hard.
Hold your camera up to the bottle sideways to see if it will fit inside, then flip the bottle upside down and look at how the camera matches up to the base of the bottle. Usually the base and the body of the bottle are the same dimensions. Look for any types of indentations or decorative shapes towards the spout of the bottle that might either hold onto or impede the camera's placement inside. 64oz containers and 2 Liter bottles work well for most small cameras. Large cameras and phones require bigger bottles, usually 96oz-1 gallon containers. With the camera phone, pay attention to the distance between the camera (usually in the corner) and the edge of the bottle-- the farther the better. With large cameras, look especially for thick plastic.
Making a Rubber Band Harness
Constructing the rig
Look at where the camera will sit and make sure the bottle will extend at least 2" down from the full extent of the lens. dent the bottle in and cut. 2-liter bottles can generally be cut right in the middle of the label. Smaller cameras may require trimming-- get the camera inside the bottle, turn it on, and look at the display screen-- can you see the bottle at the edge? if so, trim at that location.
Stabilizing the rig
There are two ways to stabilize a camera, by the line or by the wind. Using the wind is the simplest way, but h a Picavet rigging may get steadier results, and perhaps useable video.
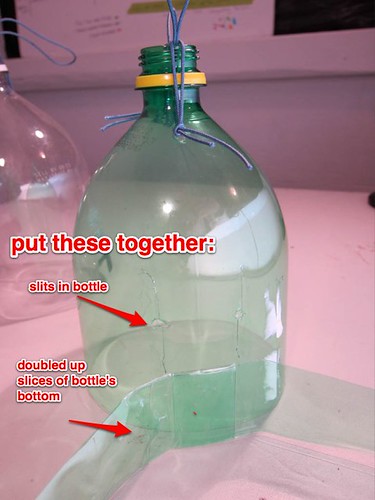
To catch the wind for stability, use plastic fins. Cut the bottom of the bottle in two and tape the pieces into a continuous strip. Put two small slits in the bottle's top and put the strip through the holes. crimp to stabilize. The video above takes you step by step through the process. This link will skip to fin attachment.

preparing for flight setting up your camera
look quickly at the research note on rubber bands for continuous shot..Or apps for your phone.
Why PET Bottles?
PET (#1) bottles make great camera protectors because PET is exceptionally resilient across a wide variety of temperature conditions. PET is very strong for its weight, and is abraision and impact resistant. All soda and most juice bottles are PET. Most other plastic bottles are HDPE (#2), which fatigues easily and can shatter, especially at low temperatures. PET bottles come in a wide variety of shapes and can be easily identified not just by the #1 recycling symbol, but also by their clarity PET is always transparent, even when colored green or blue. HDPE is not transparent (think milk and detergent bottles), and has a slightly waxy feel to the touch.
History of the PET bottle rig and major contributors
The idea for the soda bottle rig originated between Jeffrey Warren and Josh Levinger(not confirmed). Jeff added cardboard stabilizing fins. Cesar Harada added longer, PET wings cut from the bottle that weighed less and made the rig more stable, as well as internal re-enforcement made from the bottom of the bottle. Mathew Lippincott replaced the string and tape system of harnessing the camera with a rubber band-based system, and simplified Cesar's plastic wing attachment, and flies without the extra re-enforcement. Pat Coyle began branching out to juice bottles, and using multiple attachement points to the line instead of fins for stability. Stewart Long began taping his bottle rig to the balloon's line, and added a cap with a loop tied to it as an extra precaution and attachment point. Pat suggested using more than one attachement rubber band to attach larger cameras in larger juice bottles. Stewart, Mathew, and Pat synthesized and refined these techniques. Mathew then added the knot method for continuous shot and the string loops to prevent rubber band breakage, and compiled the notes and wrote/videoed this page.