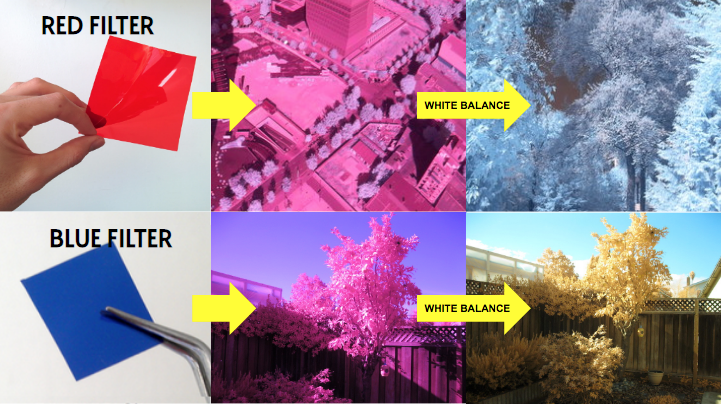
White balance can be critical to getting good results with infrared converted cameras. Images using a [red filter](/wiki/infragram-filters) should look roughly like the "GOOD" example below -- vegetation should appear generally pastel blue (for blue filters, see [this page](/wiki/infragram-filters)). An incorrectly white-balanced image such as the "BAD" example below may appear with an overall reddish tint. [](https://i.publiclab.org/system/images/photos/000/005/383/original/good-bad.png) For each type of filter, red or blue, you get a different initial image, and a different post-white-balanced image. For both filters, initial images may be quite red. But after white balancing, red-filtered images of plants will look very blue, while blue-filtered images of plants will look very yellow: [](/i/45516?s=o) ## Activities Follow these activities to learn how to set white balance properly, or add your own if there's one missing. For Canon cameras, [see the steps listed below](#Canon): [activities:white-balance] **** ## Research There's been a great deal of research on the best white balance for [Infragram](/wiki/infragram) use; browse some of it here: [notes:white-balance] **** ## Questions Ask or help answer questions about white balance here! [questions:white-balance] **** ## Mobius/Infragram Point & Shoot Mobius Action Cams require a custom config file; [here are instructions for using it to set the required custom white balance here](/wiki/infragram-point-shoot) ## Canon Many Canon Powershots allow custom white balance. This option is sometimes available only when the camera is in Program Mode, not an auto mode or auto preset. To custom white balance a Powershot (after removal of the internal IR block filter and with a red or blue filter in place): 1. Press "Func Set" (Function Set). 2. Scroll (up or down) to the white balance icon. 3. Scroll (left or right) to the custom white balance icon. 4. A message will display indicating which button to press to set a custom white balance. 5. Point the camera at a surface that is either blue or red and fill the frame with that color. A medium rich blue (between sky blue and navy blue) works well with many of the common blue filters that have been tested (see below). Ideally the blue surface should be in the shade but under a clear blue sky. A bright red surface works with red filters. For red filters the red surface should be in direct sunlight. 6. Press the designated button. 7. Press Func Set to return to camera mode. When custom white balance is done properly, photos of healthy foliage (in sun or shade) appear orangey yellow (with blue filter), or turquoise (with red filter). When custom white balance is not done properly, infrablue photos of plants appear gray. When custom white balance is not done, infrablue photos appear pink.  A blue origami paper that has worked well for white balancing a CCD Powershot with Rosco #74, #2007, and #2008 filters. More testing is needed to determine the best white balance process for different combinations of cameras and filters. Not all blue or red surfaces will reflect the same proportion of visible and infrared light, so some colors will work better than others. Add your observations here or at the infrared forum: https://groups.google.com/forum/#!forum/plots-infrared ...