What I want to do
Building on work by @viechdokter and @stoft, and related to their and @yagiz's work on interior rigidity, I wanted to try a design that could be lasercut and fit around the existing spectrometer, and/or one whose internals have been upgraded for added rigidity.
Check out their work:
- https://publiclab.org/notes/viechdokter/04-15-2016/thinking-about-a-more-stable-spectrometer
- https://publiclab.org/notes/stoft/03-02-2015/plab-3-spectrometer-upgrade-prototype
- https://publiclab.org/notes/ygzstc/08-19-2015/some-suggestions-for-spectrometer-v3-0-and-oil-testing-kit-otk-attachment
My attempt and results
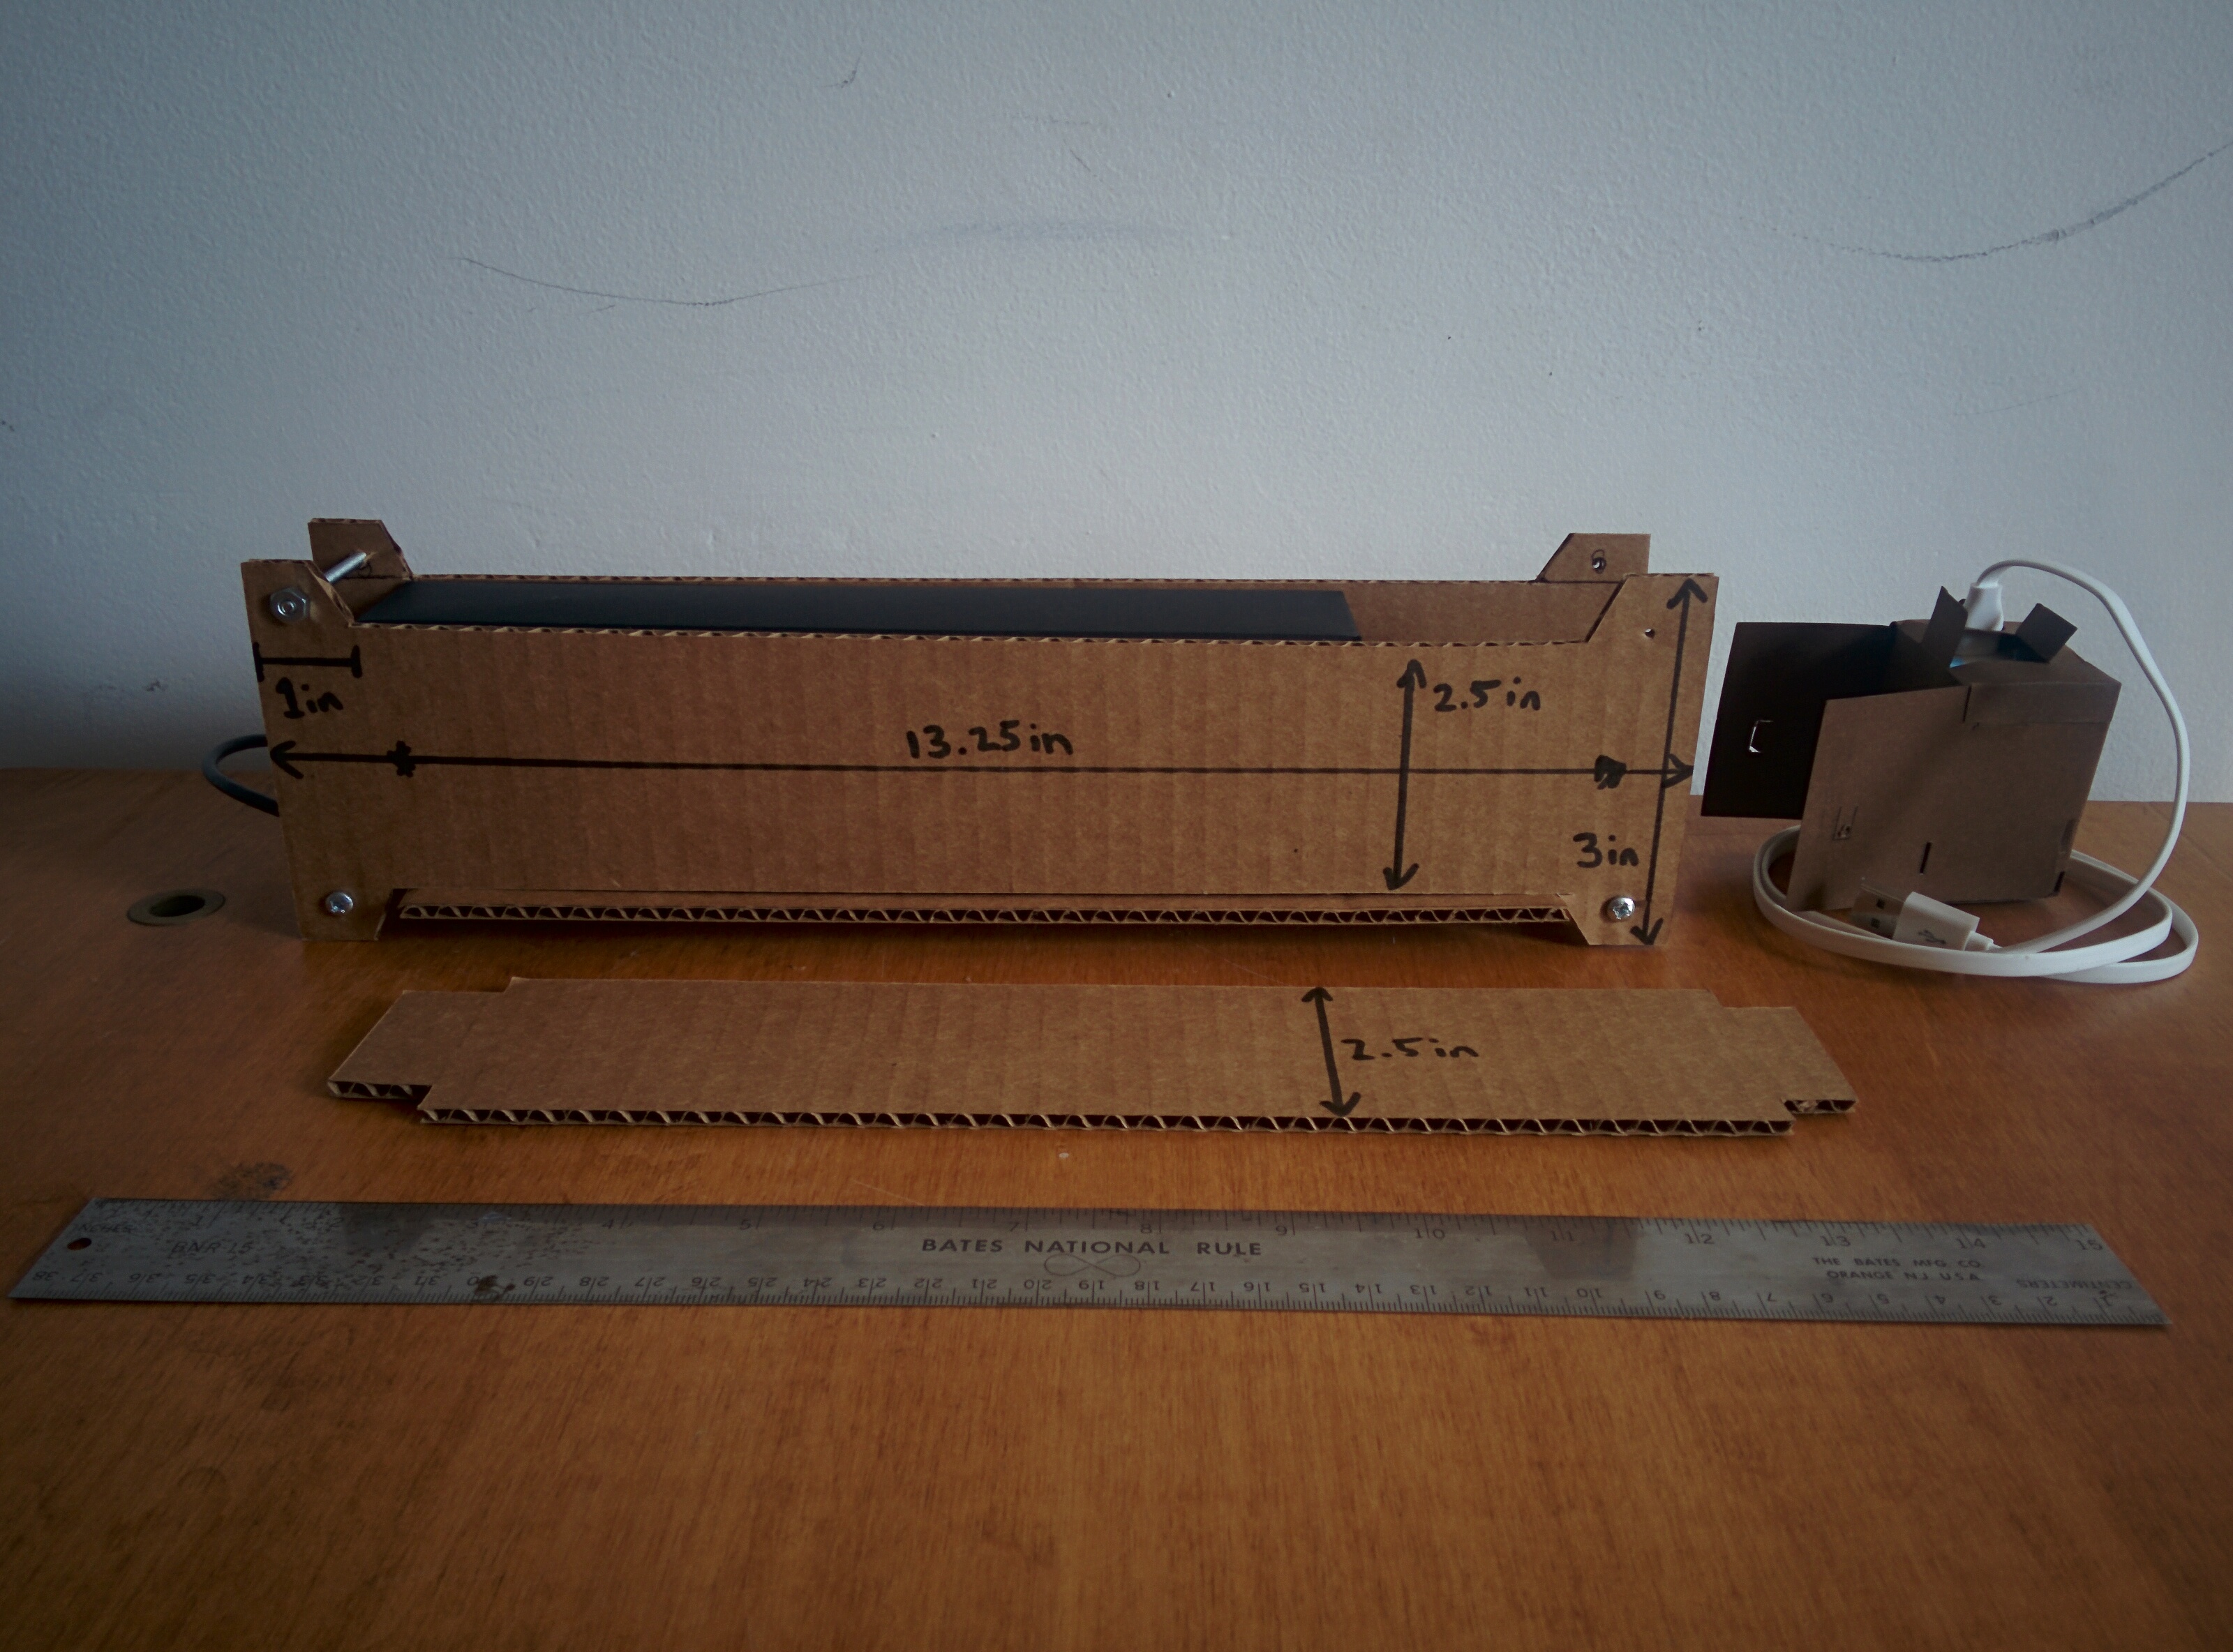
The above is 4 parts plus four bolts, and when all four are in place the bolts make it quite rigid. Acrylic will of course be more rigid than cardboard, but I'm doing the design work in cardboard for easy cutting/changing. Cardboard actually adds a lot of rigidity by itself though, and you could make it out of wood too if you like.

This one is 13.5 inches long and has space for an LED sample holding cuvette frame (see recent work on cuvette frames here) or some other thing you might add to the end.
Questions and next steps
I'd like to make a PDF or vector version of this and lasercut it and post the plans.
I like @stoft's idea of trapping the USB cable so that's another improvement to add.

Why I'm interested
I'd like to meet some of the specs @stoft and I have been developing for measurable rigidity, and while this only addresses exterior rigidity, it could be paired with some of the above refinements to provide overall rigidity. Also it's an exploration of whether we can get sufficient rigidity (which I hope we'll soon define more specifically) while building on the v3 Kit's design.
Update
I've made vector designs for these -- in various formats, with an attempt to make holes for cable threading, to relieve pressure on the cables.


19 Comments
Clever; only 2 part types. Since the internal components are still merely "trapped" by the paper housing, you might consider adding a couple holes in the top/bottom part design to add a couple screws which could secure the internal "base plate" to the external, more rigid housing (which is the part the user handles or mounts).
Reply to this comment...
Log in to comment
Good idea -- here's an updated version with small screw or bolt holes:
spectrometer-housing-2.svg
spectrometer-housing-2.pdf
Reply to this comment...
Log in to comment
I'm also interested in how this rigid frame allowed for additional scanning or sampling apparatus, for example for reflectance measurements off of a surface, like how photosynq is set up: https://publiclab.org/notes/gbathree/12-12-2014/measurements-on-the-multispeq-beta-soon-to-be-released
Reply to this comment...
Log in to comment
I'm not following the flap bit. Why does the spectrometer need to be blocked? Also, from some simple experiements, I found that I needed much much more light on a subject to acquire reflectance spectra so I have doubts that design extensions for an LED as shown would be commonly useful.
However, since experiments with fluorescence have been of much more interest what about adding a side extension (like a double in parallel) with 45-deg front surface mirror and laser-cut cuvette holder. (I know, that is what I built but it turned out to be quite flexible -- allowing for several modes.
Is this a question? Click here to post it to the Questions page.
Reply to this comment...
Log in to comment
I like the idea of side holes for different types of spectrometry!
The flap is to hold something like a leaf against the window so it's flat, and so no light passes through the leaf from the other side. Just borrowing from photosynq, really.
Reply to this comment...
Log in to comment
I'm going to try getting it lasercut at http://www.ponoko.com/ -- in part to test if Ponoko is a service others could use for prototyping lasercut parts.
They have an svg template, which I used to lay out the design for cutting:
spec-housing-2-24x12.svg
Reply to this comment...
Log in to comment
It's going to be $16.20, which is expensive for a cut but cheap for a prototype :-)
Transparent acrylic (although I could use matte black at 22.70) -- at approx 1/8" inch thickness.
Also, the first order is free up to $20, so that's a win. I only pay shipping - ~$12.
You can order your own from my stored design here: http://www.ponoko.com/design-your-own/products/prototype-rigid-spectrometer-housing-13401
Reply to this comment...
Log in to comment
Just checking .... what is the mechanical relationship between the dimensions of the paper module and the inside dimensions of the laser-cut cover? It appears that as the bolts are tightened, the top/bottom will ultimately determine the minimum interior width so do the paper tolerances stack up to guarantee a 'snug' but not compressed fit? I was just thinking about the extremes -- loose fit and then there's not enough stability, tight where the plastic warps a bit compressing the paper box and wondering if the tolerances on the paper might be a difficulty. The alternate is to make it slightly loose and require the base support in the paper box be screwed to the plastic -- which might be the more repeatable option.
Is this a question? Click here to post it to the Questions page.
Reply to this comment...
Log in to comment
I like the screw-in-the-base option, but I also wonder if good coverage of strong double-sided tape is a choice we can offer too. Good thoughts; I'll think about making it slightly wider than need be, or perhaps some narrow washers can help tweak the exact sizing.
Reply to this comment...
Log in to comment
Ponoko requested that I don't let cut lines overlap, so I adjusted the cut file:
spec-housing-2.1-24x12.pdf
spec-housing-2.1-24x12.svg
Reply to this comment...
Log in to comment
Ugh, i must've made some mistakes in unit conversions, and it came out quite wrong. Here's a new version, more carefully measured:
spec-housing-2.2-24x12.svg
Trying again on Ponoko.
Reply to this comment...
Log in to comment
OK, done! I just replaced the original file.
Reply to this comment...
Log in to comment
Really, almost there, I guess I must not have accounted for the loss of material by the laser, but it needs to be 1/16 inch taller and wider. Maybe 1/8 inch taller since that'd be fine to have a small amount of extra room on.
I'd also like to add another bolt halfway across the span, as I think it's sagging a little. Shouldn't affect the compactness of the cutting area.
Reply to this comment...
Log in to comment
What are the downsides of the acryllic like that? Cost is an obvious one, but besides that? Anything major?
Could we have the acryllyc lengthened and put in a laser holder built-in?
Is this a question? Click here to post it to the Questions page.
Reply to this comment...
Log in to comment
I'd like to put some screw holes in the side so you can attach things more easily, and a hole in the side so you can shine a light in without needing to cut into the acrylic more.
Acrylic isn't that expensive, but masonite could be even cheaper. I think the main expense is actually the cutting. But two layers of corrugated cardboard glued together might be enough -- it really depends on what you consider to be "strong enough" and if you need water resistance too.
This basic design is also pretty easy to modify in dimensions, using longer bolts, and by moving the screw tabs apart to make space for wider stock.
Reply to this comment...
Log in to comment
I think we could make cardboard, masonite and acrylic versions and set a test here to "load test" them for rigidity -- see what's the best compromise of price/material/strength. Maybe that could be the "replication" for this add-on?
Is this a question? Click here to post it to the Questions page.
Reply to this comment...
Log in to comment
Thoughts: 1 - Splash-resistant, maybe, (there are holes), 2 - Masonite does not cut nicely, 3 - Acrylic (even laser-cut) tends to have very sharp edges (it's a lot like glass in that respect), 4 - Polycarbonate is not quite as stiff but laser-cuts well and a little less sharp, 5 - most laser-cut plastics will require at least de-burr to minimize risk to users, 6 - Can corrugated cardboard be laser cut w/o burning?, 7 - If cardboard, perhaps a self-adhesive overlay (then trimmed)? if the added labor is ok.
However, designing the materials and details without first establishing the stress requirements is approaching the problems in reverse. Eg: If the product needs to withstand 25 lbs, then cardboard is not a consideration unless it has many layers. Defining the stresses means 1 - static weight and the direction(s) of force, 2) flexure, 3) vibration (and that coupling from outside to inside optics), 4) non-orthogonal force (eg. corner to corner), 5) assembly force (screw-tightening - i.e. acrylic likes to fracture, polycarbonate less so), etc....... Deciding these limits means defining the expected (and product-specified) environmental conditions. None of this has to be elaborate; but you do need to think about and make decisions based on specs you need or want to achieve. Eg: 1) can't easily over-tighten screws and crack the housing, 2) can drop it on the floor from 3 feet and it will survive, still work and not be out of alignment, 3) can put 3 lbs of books in a backpack on top of it, 4) can pull on the unit untill the USB cable comes unplugged and the cable, camera and alignment will not suffer, etc......
Is this a question? Click here to post it to the Questions page.
Reply to this comment...
Log in to comment
I def. agree -- that's what I was trying to get at with 'set a test here to "load test"' and @bsugar actually posted a request for a method to test out rigidity, which is listed in the "Limitations and Goals" section of the DSSK page. Part of this question if the cost/robustness question -- and we could in theory set several different "levels" -- more expense for more rigidity, say.
Could you repost your example tests there? I like the "3 foot drop" test and the USB unplug test (esp as it gets at my theorized challenges listed above). Thanks!
Is this a question? Click here to post it to the Questions page.
Reply to this comment...
Log in to comment
Done.
Reply to this comment...
Log in to comment
Login to comment.