
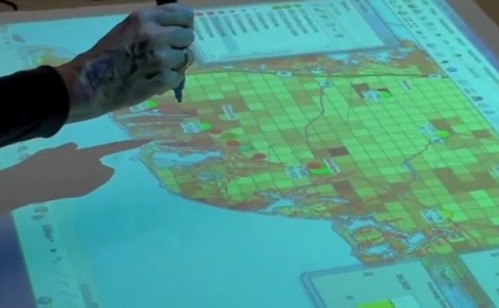
PlaceMatters has built and tested a variety of interactive touch screens and touchtables using Wii remotes and LCD projectors so participants can interact directly with maps, images, and brainstorming applications. Here is a video where we integrated the use of the touchtables with GIS and scenario planning tools as part of a pilot project on Cape Cod looking at the linkages between land use, transportation, and climate change.
The use of Wii remotes to create DIY "smart boards" was pioneered by Johnny Chung Lee (who started at Carnegie Mellon's Human-Computer Interaction Institute, moved to Microsoft to work on the Kinect, and now seems to work for Google). Teachers in particular have contributed to the development and refinement of these touch screens. We found the use of a reverse projection screen to work best for a vertical screen (see brief footage in our Walkshop video).
Given our work with maps and our interest in developing low cost tools for stakeholders to be able to work with digital maps on a table, we started experimenting with ways to use the Wii remotes with projectors shining directly down onto tables. In total, we made 7 variations of the touch table experimenting with different stands for the projectors, different surfaces for the tables, and different projectors.
 Two of the tables were made out of converted card tables with the middle replaced with Plexiglas and a mirror reflecting the image off the ground onto the underside of the table. We experimented with several white materials for reverse projection -- our favorite ended up being a plastic shower curtain from Target. The advantage of this design was that the image was unaffected by hands and objects on top of the table (no shadows). The main disadvantages were 1) the table wiggled too easily and with the projector and Wii attached to the table we found we had to recalibrate often; and 2) the entire contraption weighed just under 50 lbs (minus the projector) which meant we could check it as baggage without paying for extra weight but too heavy and bulky to be able to travel with it easily.
A second generation of prototypes involved stands that either clamped to the table or stood directly on the table. The main disadvantage of this approach was that the clamps would easily get bumped causing the image to rock back and forth on the table. The advantage was that the whole contraction could be made to be quite portable.
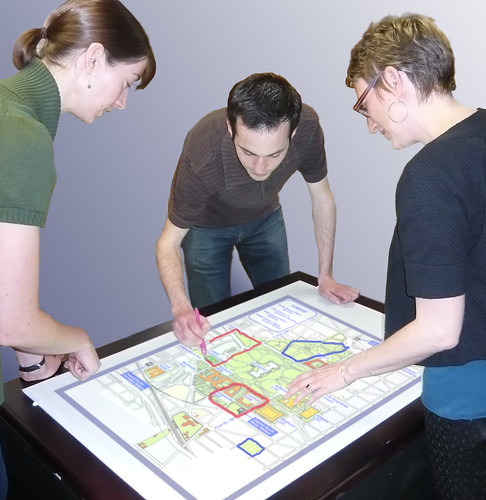
 The third generation of tables (as shown in the image above and the SketchUp rendering at the top) uses converted tripods that are placed a few inches away from the table so that they are less prone to getting bumped. We finally have a version that is our favorite. On Cape Cod participants quickly learned how to use the pens and the set up worked well.
Key components of a touchtable include:
- Altered camera tripod/monopod or photography light stand for mounting the projector and Wii remote. This takes some tinkering to figure out how to mount the projector and Wii high enough. I will post my version soon.
- Lightweight portable LCD projector (the new LED and laser projectors emerging in the market are particularly good for this applications). We found LED projectors like the LG have a wide angle lens which means you can get a larger image with the projector closer to the table (better for a brighter image). The trade off, however, was that we found we needed to mount the Wii a good 18 inches above the projector for the Wii to cover the entire image.
- IR Light Pens: irpens.co.uk in the UK make our favorites with tips that light up when pressed (just like a pen) but not too expensive. irpens.com provides a higher end design.
- Wii Remotes: Because the latest generation of Wii remotes have motion technology you don't need, best to buy used remotes from Amazon or eBay ($10 vs $30).
- Cloth or a cardboard trifold for a screen: Trifolds are available at most office supply stores and are nice and flat. The advantage of cloth is that the pens glide over the surface much more easily and the material is less reflective and therefore helps cut down on glare.
- Wii remote whiteboard software. Smoothboard is the best application we've tested on the PC. A dongle version means you can move the license from one computer to the next. For the Mac, we like WiimoteWhiteboard which has fewer features but is open source (free!).
- Computer: Finally, you'll need a computer with bluetooth or buy a bluetooth dongle (main advice here, avoid Targus!).
I will add more links and pictures to this site over time. Will also post lessons learned and a progress report on efforts to create a USB version of the Wii.
One warning: test the room you're going to use the table in ahead of time. Particularly if you are going to have a bunch of people to use the table in some sort of exercise. Natural daylight and halogen lights, for instance, can interfere with the infrared camera in the Wii and ruin your day.
If you’re short on time and/or are less inclined to pull out the power tools and epoxy puddy to make your own, PlaceMatters sells touchtable kits with all the equipment and parts collected and the necessary customizations done for you. I recently posted two videos on how to set up and calibrate our version of the touchtable for people who have bought the kit. The videos can also be a quick study on how the tables work so you have a better feel for what you’re building if you choose to go the DIY route.
Send me your comments/suggestions. Ken, CEO, PlaceMatters
3 Comments
Notes on Projectors We currently have 11 touchtables for large events and a consortium of touchtable owners making it possible for us to host events with up to 30 tables. We have experimented with a half dozen different projectors in our quest for the optimal combination of portability, brightness, durability, and cost. The latest laser/LED hybrids are our favorites. Currently we have 9 CASIO Slimline projectors (8 XJ-A235's and one XJ-A255V) and 2 EPSON 1760W projectors. 1. The Casio projectors are fairly nice for compactness and durability. They are a little quirky, however, around zoom and focus. If you ever find the projector unable to focus correctly, I have found you need to zoom in or out a tad and then use the focus. For some reason this fixes the problem. 2. Their highest end projector is 3K lumens (Casio XJ-A255V) with 1280X800 resolution priced around $1500. For PC's they have the option to show your slides wirelessly, without needing cables. I’m hoping this option will become available on a Mac soon. Several of our tables use the (Casio XJ-A235), which is only 2000 lumens but $600 cheaper.
Someone recently asked some comparative notes on the two projectors: 1. The CASIO is heavier (partly because it has a metal case, which means it is probably a tad more rugged). EPSON, lighter on the shoulder 2. The EPSON has better mounts on the bottom (better for the mono/tripod setup).
3. The CASIO has better remote functionality than the 1760 (which has manual focus/zoom only). Got the impression 1770 focus and zoom works with remote 4. the EPSON has a wider angle lens producing a larger image closer to the screen. 5. Both are about the same brightness but the EPSON seems to have trouble with the full picture being in focus if you use Keystone to its fullest 6. I get the impression the wireless feature of the 1770 works with macs, while wireless on the CASIO only works in PC mode 7. The EPSON built-in lens cap is better than CASIO’s magnetic slap on cap. 8. The carrying case for the CASIO is slightly higher quality 9. The CASIO fan is quieter than the EPSON fan (slightly) 10. The CASIO has a high altitude setting to make sure it does not over heat in the thinner air (don't know how important that is but nice to have given we're based in Denver) 11. The CASIO menu options are slightly more intuitive.
Final word – both are great projectors, you really can't go wrong.
Note: we have no connection to EPSON, CASIO, or any of the vendors links I provide above. If you're going to buy a projector, search around for the best deals. The review components of this write-up are not intended to be comprehensive, I am simply sharing my observations after experimenting with several projectors.
Is this a question? Click here to post it to the Questions page.
Reply to this comment...
Log in to comment
Notes on Building a Monopod/Tripod for the Touchtable: My favorite mono/tripod set up is now: 1. Rocektfish RF-MONO70C -- carbon fiber light and sturdy, attachments at head are most versatile. If you mount the camera mount plate onto your projector, attaching the projector to the tripod becomes really easy. 2. SUNPAK 9002TM -- short enough to fit in a carry on suitcase, sturdy enough to hold the monopod.
Note: we have no connection to Rocketfish, SUNPAK, or any of the vendors links I provide above. If you're going to buy any of these products, search around for the best deals.
Reply to this comment...
Log in to comment
Wanted to make sure folks also saw this posting by John Jacobs with the Texas Sea Grant and the Texas Coastal Watershed Program describing their experiences with the touchtable and the development of a scenario planning application focusing on coastal communities (CHARM). I like the name they choose, weTable!
Reply to this comment...
Log in to comment
Login to comment.