Adapted from the Statistics for Action Air Quality Manual and generously shared with permission.
Introduction to the Guide About This Guide | Terms You May Run Across | Expressing Concerns: Two Stories
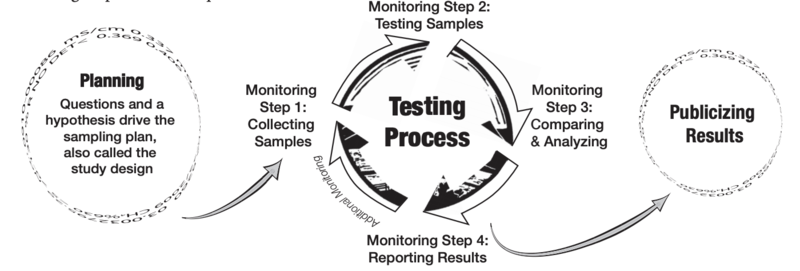
Preparation & Testing Planning | Observation | Research Emissions | Get the Right Equipment | Sampling Plan
Interpreting Results Sample Results Page | A First Look at the Results | Air Quality Standards
Other Topics Spotlight on Pesticides | Air Pollution and Health |
Taking Action Communicating the Results | Additional Testing and Next Steps | Take It to the Top
Resources Links to Helpful Resources
About this Guide
The purpose of this guide is to educate and support people with no special expertise or technical background as they plan their own air testing program, or give public input into a program run by others. We offer suggestions and activities to deepen your understanding.
Air quality sampling is a tool that communities can use to establish scientific evidence. However, testing can be expensive and may turn up nothing. Air samples can also be used to show improvements in air quality. This guide offers tips for simple observation, research on air emissions and air monitoring tools, and planning. Your project will be more likely to succeed if you do your homework before gathering air samples.
If you want to learn more about specific air monitoring tools, like a pesticide Drift Catcher, or to start a community air monitoring Bucket Brigade, see the back page for a list of internet resources.
Going Solo? Working with a Group? This guide tells the stories of community groups using air testing to monitor contamination from industries and agriculture located in their neighborhoods. Following the stories and examining the data will give you ideas for how to use the test results that you receive.
The Statistics for Action website has activities and resources for groups and individuals to use.These are meant to make it easier to use data from reports. The goal is for everyone in the group to feel more confident reviewing and talking about test results.Activities marked with the SfA icon are on the SfA website.Try the activities to deepen understanding and planning. sfa.terc.edu/materials/activities.html
This guide can help you think about:
✔️ your priorities and goals for air testing
✔️ terminology and ideas that may come up
✔️ pollutants for which you want to test
✔️ equipment needed
✔️ where and when to take samples
✔️ regulations and standards for comparing results
✔️ how to communicate results to decision-makers and the public
✔️ online resources and workshops for further help
This guide will NOT:
➖ teach you how to use specific equipment
➖ connect you with a lab to test your samples
➖ direct you to funding for your air monitoring program

Terms You May Run Across
Background Level The level of a contaminant that occurs evenly across a large geographic area. If you want to know if contamination levels are unusually high, compare them to background levels, not zero.
CFM Cubic feet per minute. Measures air flow through an indoor space.
Clean Air Act Regulates six contaminants (see NAAQS). Each state is required to monitor the ambient air. If air quality doesn’t meet standards, state must develop and implement strategies to meet that standard.
DL / LOD Detection Limit / Limit of Detection. The smallest amount a particular lab device can accurately measure. Think of trying to weigh a feather with a bathroom scale–it wouldn’t work. Different labs have different limits; they should be well below levels of concern.
µg/m3 Micrograms per cubic meter. A µg is a very small amount of a substance. There are 1,000 µg in a milligram. A m3 is the volume of air equal to a cube one meter (a little longer than a yard) per side. Solid particles in air (like lead and PM) are measured in µg/m3 .
NA or NT Not analyzed or Not tested.
NS/NL No Standard / No Level defined for this pollutant.
ND Not detected. Reports state “ND” when the amount of a contaminant is below a detection limit; that is, too small to be measured with the lab test used.
NAAQS The EPA’s National Ambient Air Quality Standards (NAAQS) for six “criteria” pollutants considered harmful to the environment and the public: carbon monoxide, lead, nitrogen dioxide, sulfur oxides, PM10, PM2.5, and ozone.
Non-Attainment Area An area of the U.S.A. that has not met air standards for human health set in the Clean Air Act.
Particulate matter (PM) Tiny particles in the air, usually from burning something. PM10 contains particulates with diameter less than 10 microns. PM2.5, also called “fine particulate matter,” is less than 2.5 microns.
ppmv/ppbv Parts per million and parts per billion by volume. A unit to measure the concentration of a polluting gas (like carbon monoxide) in air. There is no simple conversion between ppbv and µg/m3 .
QA/QC Quality Assurance / Quality Control
Risk Assessment A multi-step process in which scientists calculate the levels of contamination, and how and when people might be in contact with the contamination.
REL (California) Reference Exposure Level. Used for health risk assessment of exposure to chemicals.
REL (NIOSH) Recommended Exposure Limit. Federal recommendations for air quality in the workplace. Not legally binding
RfC Reference Concentration. An estimate of how much of a pollutant a person could breathe for a lifetime without ill effects. Used in risk assessments, but not legally binding.
Sample A small amount of air that you can test to see what might be in the air in general. One sample won’t tell you much, but many samples from different places or at different times will tell you more.
TWA Time-Weighted Average. The average concentration of a pollutant in air in a period of time (like an 8-hour work day or 40- hour work week.) Volatile Organic Compounds (VOCs) Carbon-based chemicals (like petroleum products and solvents) that evaporate (go into the air) easily. VOCs react with sulfur and nitrogen oxides to form ozone, which then combines with fine particulates to form smog.
Expressing Concerns: Two Stories
Eleven years ago, a galvanizing plant opened next door to Beverly and Julius Kerr’s home and child care business in Graham, NC. Galvanizing plants operate with almost no pollution controls, though the process uses lead, zinc, and chromium at high temperatures. After many complaints from the community, the North Carolina Division of Air Quality (NC-DAQ) set up air quality testing equipment to monitor the galvanizing emissions. The results of the air testing were “inconclusive.” The Kerrs said, “Later, we found out they were testing for particulate matter (PM), which is not the biggest problem with galvanizing plants. When we asked the state why they did that, they said that was the only equipment they had, and that the equipment required to test for galvanizing chemicals was too expensive.” The Kerrs eventually resorted to testing their soil, to see if galvanizing metals had settled out of the air over time.
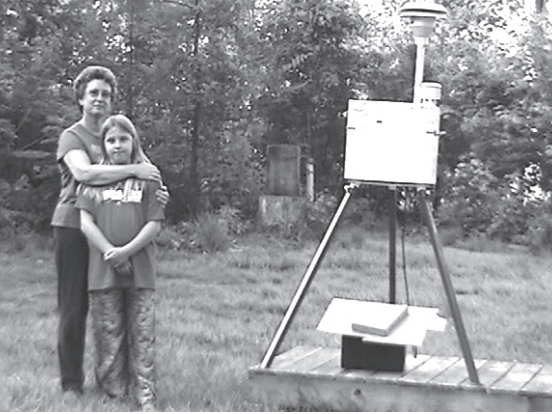
Beverly Kerr and her granddaughter by the particulate matter air monitor.
Breathing in North Providence can be unbearable. An asphalt company emits choking fumes. A group of neighbors formed to address the problem. They shared experiences in words and trend line graphs, looked at a map and identified streets where residents were affected and where children were exposed. They compared notes on responses to their complaint calls, agreed to make logs, and examined the company’s most recent annual report of its emissions. This planning helped them plan strategy for fundraising and testing.
Asking Questions
Understanding the air quality monitoring process can make a big difference in the success of a campaign. Campaigns like these started with people wondering, asking questions, and being actively engaged. Whether you’re considering your own air monitoring program, or commenting on a program established by agencies or industry, it helps to know your stuff and to be organized.
That starts with good questions.
Planning
Invite neighbors in the community to meetings to talk about their experiences and observations about pollution. Form a group. Read through this whole guide first, to get an overview of the whole process. Learn what air testing can and can’t do for you. Discuss your overall strategy and priorities:
What’s the ultimate goal? Creating pressure for ongoing monitoring? Trying to relocate a classroom or change local business practice? Make distinctions between short-term and long-term goals.
How does air testing fit that goal? Do you want to see if levels are harmful? Look for changes over time? Link pollution to a business or source?
Whose health are you highlighting: workers, children, pregnant women, elderly, families near a facility? Where do they live, work, go to school?
Who are the decision-makers you’re trying to convince? What will convince them?
Will there be opposition to doing testing? Are there powerful people, companies, or agencies who might object? Is your team ready to face those consequences?
Is this realistic? Does your group have the time, energy, skills, and finances for a sustained air monitoring campaign? Will they ask the right questions at the right time? What will they do if tests are inconclusive, or don’t support the cause?
After discussing priorities, decide on a question you want to answer. This question will help guide future decisions. Be as specific as possible. Will air monitoring help answer this question?

Air testing CAN help you:
✔️ Detect the contaminants most likely responsible for health effects like headaches or eye irritation
✔️ Show what people are exposed to
✔️ Show levels changing with time and wind direction
✔️ Give residents a sense of what contaminants are accumulating in nearby soil
Air testing will NOT:
➖ Reverse health effects
➖ Provide money for treating people with health problems associated with the contamination
➖ Stop the source of the pollution
Observation
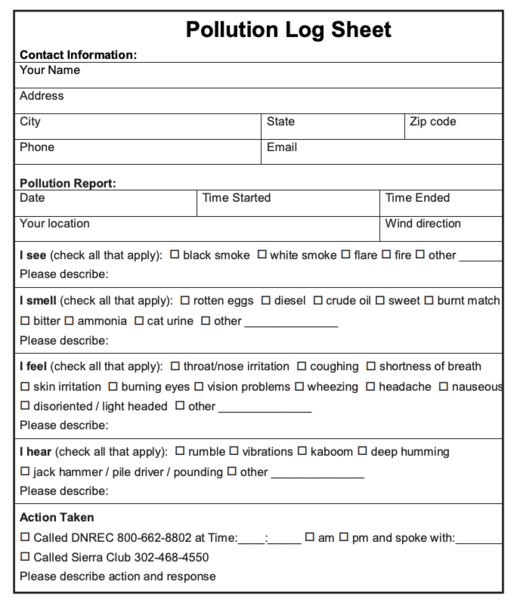
If you have concerns about air quality, observation is a great, low-cost organizing tool with the potential to engage the whole community. Make a standard pollution log everyone can use. Collect data and photos. Map the data and look for patterns. Now you’ve started a paper trail of evidence, with credible data and visuals to make your case, while spending very little money. If you do decide to do air testing, these observations will help you decide where and when to sample.
Odor Complaint Processes
Regulatory agencies often have formal ways for the public to make odor complaints. Unfortunately, some agencies lack staff or funding to adequately respond to complaints. The agency office may be far away from the industrial zone. Odors may come and go several times before an investigation is performed, if at all. This can be frustrating, but odor complaint hotlines are an important tool for communities to interact with agencies. When multiple people call about a facility or event, it highlights the problem and starts a paper trail. Record your complaint on your pollution log. Confirm that your state is keeping records. After time, request the record of your complaint and any action taken. Some agencies develop a relationship with communities, and coach them on how to record their data more effectively
 .
.
Sample log sheet from gcmonitor.org and DE Sierra Club

Community Member Checklist: Observations
🔲 Create a standard form for the community. Record what people see, smell, feel (physically), hear and taste during pollution incidents. Describe the weather, any visible conditions (smog, residue on leaves, mold, etc.)
🔲 Take photos and videos. Note date and time. Build a database with all the information. Look for patterns of industry behavior, or health problems in the area. It will help you decide where and when to sample.
🔲 Put observations and pictures on a map. Mark sources, like a power plant, highway, or construction. Show the direction that fumes and odors travel, where people live, and where children and the elderly are exposed. Bring the map to hearings, meetings with government agencies, legislators, media, and industry.
Research Emissions
While you have a team working on observations and getting community members to fill out pollution logs, another team can be conducting research. You want to find out what chemicals are in the air, and where they’re coming from. Do some searching on the internet, or consult with an environmental or public health expert.

If you suspect a particular pollution source, what’s the industry or source? What pollutants are associated with that source? Does the business have an emissions permit (see example below)? If so, it should be public. If it’s not online, request it from your state environmental agency. Find out what the business is permitted to emit, and if there have been any violations. If the smells were bad on a particular date, find out if there were any accidents that day.
If you’ve noticed a particular health problem or strong odor, what health effects are you noticing? What does it smell like? Rotten eggs? Ammonia? Sewage? Gasoline? One partner organization said the air smelled like “inside the greenhouse at the garden center.” Find out which chemicals and industries are associated with that problem or odor. Regulators may tell you, “We don’t regulate odors.” Every odor is associated with some kind of chemical, even if you don’t know its technical name.
Is Any Monitoring Already Happening? Are any of the contaminants you’re concerned about one of the six criteria pollutants regulated by the National Ambient Air Quality Standards (see p.13)? If so, you may not need to do your own testing. The state or federal government may already be collecting data. They may already have historical data available online that you can use right away. If not, call, email, or submit an information request to see if they have already monitored the air in your area.
Connecting Odors and Pollutants Parents of Meredith Hitchens Elementary School students in Addyston, OH were concerned about odors coming from the Lanxess plastics plant across the street from the school. Mothers and grandmothers met with the environmental engineer and the plant manager. Many ideas were discussed, but no action was taken by the facility. The engineer told neighbors and parents the odors were just a nuisance, and not harmful. The parents took an air sample near the school during an odor incident. They recorded burning eyes, nose, and throat while sampling. Their sample results came back with acrylonitrile, butadiene, and styrene – the three main chemicals used at the plastics plant. This shifted the debate for the community group. Now every time they smelled the odors, they knew what chemicals the plant was releasing. The group used this connection to get media attention. The school was eventually closed, and the students were relocated to another school.
Get the Right Equipment
Match Equipment to Emissions
After you find out what chemicals are involved, get to know a little more about them. Chemical type will determine the equipment needed.
- Air emissions can be gases or particles. Gas emissions include volatile organic compounds, nitrous/sulfur oxides, ozone, pesticides, herbicides, and fungicides.
- Particulate emissions (‘soot’) can be classified by the average diameter of the particle, like PM2.5 and PM10. The two particle sizes are regulated differently. Particulates may also carry heavy metals like lead or arsenic, polycyclic aromatic hydrocarbons (PAHs), and radioactive elements. These pollutants are regulated separately from the size of the particle.
- If the concern is about an increase in smoke, haze, or smog, you might want to measure opacity. Opacity is a measure of the amount of light blocked by particulate pollution in the air (clear glass is 0% opaque, a brick wall is 100% opaque.) If the smoke from an industry increases in opacity, it might mean its pollution control systems are failing.
Many contaminants can be measured through air quality sampling, but some can’t. Some state agencies can monitor a large variety of pollutants, some can’t or won’t. States usually only monitor ‘ambient’ air – the average air quality of a large area over time. Ambient air quality monitoring equipment won’t generally work for ‘hotspots’, like the fence line of an industrial facility, a field where pesticides are sprayed, or a power plant smokestack.
Types of Equipment What equipment will you (or others) need for testing? Unfortunately, there isn’t one kind of air monitor that can test all emissions. Different pollutants require different tools. See the list of air monitoring tools (below) for some ideas. All air monitoring tools have strengths and limitations. Make sure that the tool being used is the right match for the emissions you want to monitor. Consult with local environmental non-profits, or other community members who have dealt with the similar situations. Ask if they agree that your plan will yield usable results. Get advice on the benefits of do-it-yourself methods like grab samples or Drift Catchers, compared to hiring a professional.

Air Monitoring Tools
- Bucket or Canister: Can test for 67 volatile organic compounds and 20 sulfurs. Samples can be taken for 2-3 minutes (called a “grab” sample) or calibrated for 24 hours.
- Particle Monitors: Can test for PM2.5, PM10, heavy metals, PAH’s and diesel. Some of these monitors can also pick up radioactive elements.
- Real-Time Air Monitoring: Advanced technology that includes hand-held devices or UV monitors that can detect chemicals as you breathe them.
- Drift Catcher: A simple, inexpensive and scientifically robust device that collects air samples to be tested for pesticides. Farmworkers and community members use it to show chemical exposures. Learn more at panna.org.
- Badges: In industrial settings, workers wear badges that can detect specific volatile organic chemicals.
- Wipe samples: Similar to a baby wipe. Used to show the presence of heavy metals in a specific indoor area.
- Body burden: Not technically air testing, but blood and urine tests may show exposure to pollutants.
Make a Sampling Plan
Now bring all your research together and make a sampling plan. Decide with your group:
Pollutants: What do we want to sample for? Every possible pollutant, or just the most severe ones?
Methods: Will we hire a consultant, or take samples ourselves? What equipment/monitoring tools do we need? How much does that cost?
Analysis: What lab will analyze our samples? At what cost? Do they require us to follow particular technical guidelines in sampling?
Timing: When will we sample, and over what period of time? Do we just want one set of ‘incident-based’ samples on a day when fumes are very bad? Do we also want ‘background’ data on a clear day? Or do we want to build a large body of data, sampling one location repeatedly over a long period of time? Are we accounting for factors like weather, time of day, or car exhaust?
Location: Where does our pollution log data suggest we should take samples? Just near the pollution source? Near a home, park, or school where people are exposed? Do we want to sample a far-off location to show that it’s worse near us? Do we want to compare upwind versus downwind? How many samples will be enough to answer our key question?
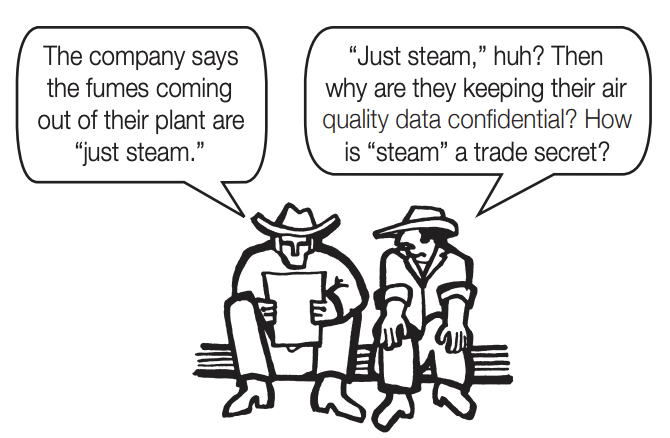
Not in charge of the sampling plan? Examine proposed plans critically! South Atlantic Galvanizing (SAG) in Graham, NC insisted there were no harmful fumes coming from their plant. Neighbors asked them to do air quality monitoring to prove it. SAG placed a single air monitor in a side yard, 900 feet from the plant. Data from that monitor were kept confidential. Said neighbor Beverly Kerr, “We think the location of the monitor was inappropriate – too far away from the emissions. There’s a cluster of trees between the plant and the air monitor acting as a buffer. Winds usually blow the emissions in the opposite direction of the monitor location. If those emissions are worth keeping confidential, we wonder what they would detect with a monitor actually located at the emissions site?”
Taking your own samples? Think about...
Equipment: Get the right equipment for the pollutants you want to measure, and ensure you can access it when you need it. Familiarize yourself with the equipment. Get an extra filter or sampling bag from the lab so you can make a practice run.
Lab: Contact the lab in advance and get all needed materials from them. They will send filters, bags, or appropriate sampling method containers plus a ‘chain of custody’ report that documents who is in possession of the samples at all times.
Shipping: Make sure you know what carrier you are using and how quickly the samples need to get to the lab. Some volatile organic compound samples need to be shipped overnight.
Timing: If you are doing incident-based sampling, be ready to go when the time strikes. Carry your necessary monitoring accessories and paperwork with you everywhere. Teamwork: Be part of a team. One person might not be able to operate the equipment alone, or get to all the sampling locations quickly enough. Observational Data: Use your pollution log form when you sample. Record wind direction, time of day, temperature, etc.
Community Member Checklist: Before Making a Sampling Plan
🔲 Agree with other community members about priorities and goals.
🔲 Make a paper trail. Record observations in logs and register complaints.
🔲 Map data so you know where to sample.
🔲 Figure out what to test for.
🔲 Research emissions, permits, compliance, and possible heath effects.
🔲 Be sure the right equipment will be used before testing starts. See what you can learn from other communities in similar situations.
What You Might See on a Results Page
After samples go to the lab, it may take several days (or months!) for the results to arrive. When you get the report, you might feel overwhelmed by the tables full of data. This sample page of test results shows the levels of VOCs in indoor air in a home. One good way to start looking at results like these is to make copies, and mark them up with questions and observations.
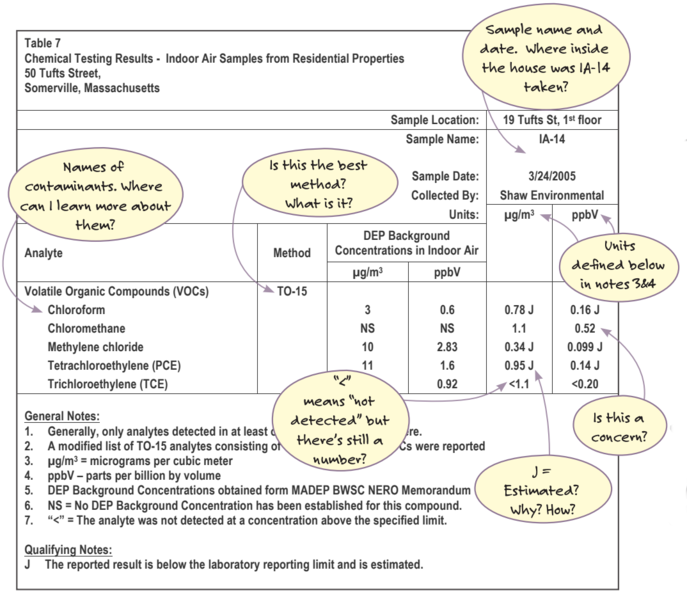

A typical page of results should have:
- One sample per page (or set of results.) Each sample will have its own name, like “IA-14”
- Date, time, and location of the sample. There should be a map somewhere in the report showing the locations of each sample
- A list of the pollutants tested, even ones the lab could not detect. Levels of each pollutant found and the units used for measurement (like ppb or µg/m3 )
- The detection limit of the equipment used (how much pollutant was too little to detect?)
- A key explaining any symbols used on the page
A page of results might have:
- An air quality standard or other comparison value for each pollutant
- A symbol like “<” or “ND,” meaning the level of the pollutant was less than they could detect
A First Look at the Results
Data analysis can be challenging, even for people with training. Don’t try to understand everything all at once. One approach is to start with one number, representing one pollutant, in one sample, on one page. See if you can figure out what it represents. Read the footnotes and keys. If you see unfamiliar terms, units, or regulatory limits, look them up.Have a friend join you, and talk it out together. Once you can read one page and explain it to each other, you can start on the other pages. Use the checklist below for ideas of what to look for.
The air monitoring may yield the results you wanted. However, data won’t always show high levels of pollution at the time of sampling. Still, even if data aren’t “perfect,” that doesn’t mean testing was a waste of time. Trained scientists get mixed or inconclusive results all the time. The data can still help you decide where and when to test next. With practice, you can start to tell a story about the whole picture.
Newsworthy Problems You may not need a total understanding of all the data to find something newsworthy. There may have been problems with the process itself:
- An inadequate sampling plan
- Failure to test for the right pollutants
- Wrong equipment used for sampling
- Detection limit higher than level of concern
- Misuse of averages to hide extremes
- Discrepancies between official and independent testing
- Missing data
- Mistakes in calculations
- Raw lab results not matching summary
- Mixup between units

Community Member Checklist: Analyzing the Data
🔲 Count the number of pollutants detected in the air samples. Learn about the health concerns they cause. If the results found “14 different carcinogens” or “5 reproductive toxins,” people will take notice.
🔲 Assess toxicity. If you’re unfamiliar with a particular pollutant, compare its RfC or other air quality standard to that of other pollutants that you know are harmful. If the standard for a pollutant is very small, that means it’s very hazardous; that is, even a small amount can be harmful.
🔲 Start comparing numbers! Compare results to appropriate air quality standards (p.13). The pollutant with the highest levels isn’t your biggest concern - it’s the pollutant with the highest levels compared to its standard. Compare to cities known for very dirty or very clean air (see stateoftheair.org for lists). Compare samples near and far away from the pollution source, or upwind to downwind. Compare over time, to when the industry wasn’t operating, or high-odor to low-odor days.
🔲 If a sample shows high levels of pollutants, check your pollution log for that sample. Were there also high levels of certain odors, health effects, or visible pollution? The next time you see/smell/feel those things, you’ll know which pollutant is in the air.
Air Quality Standards
National Ambient Air Quality Standards
The Clean Air Act sets air quality standards for just six “criteria pollutants”:
- carbon monoxide (CO)
- lead (Pb)
- nitrogen dioxide (NO2 )
- sulfur oxides (SOx )
- ozone (O3 )
- particulate matter (both PM10 and PM2.5)
Each state is required to monitor the air (especially in cities) to make sure levels of these pollutants aren’t higher than the standards. If levels exceed standards, the state must develop and implement pollution control strategies to reduce pollution levels. NAAQS have both “primary” and “secondary” levels. Primary NAAQS are set to protect public health, including sensitive people like asthmatics, children, and the elderly. Secondary standards provide protection against decreased visibility and damage to animals, plants, waterways, and buildings.

The Air Quality Index (AQI) is a number from 0 to 500 based on real-time levels of these pollutants (except lead). As air quality changes, AQI can tell you how polluted the air is. If you hear a warning on the TV or radio about a hazardous air quality forecast, it’s based on the AQI. You can learn more and view realtime AQI measurements at airnow.gov. Many states have their own standards for the six criteria pollutants, or for other pollutants. Check your state’s environmental department web site.
What about other pollutants?
Beyond the six criteria pollutants, there are thousands of unregulated chemicals and compounds emitted by industrial operations. Still, there are some ways to measure air pollution severity. The EPA publishes reference concentrations (RfCs) for these other pollutants. Ideally, RfCs are set such that if the concentration of a pollutant is below its RfC, it is unlikely to cause health problems, even for a very sensitive person. There are chronic RfCs (for people breathing a level of pollution their whole life) and acute RfCs (for people breathing an high level of pollution for a short period of time).
RfCs do not apply to carcinogens (substances that cause cancer) because there are no ‘safe’ levels. Cancer slope factors (CSF) and unit risk factors (URF) are used to describe cancer risk. These factors try to answer the question, “As the concentration of this pollutant in the air increases, how many more cancer cases (per million people) are likely?”
RfCs, CSFs, and URFs are not legally binding. There is no regular monitoring or enforcement of non-criteria pollutants. These levels are also based on animal research, and they may change with new research (or from business or political influence). Still, professionals use RFCs and CSFs as guides when they assess risk. If your community does air quality monitoring, you can compare your results to RfCs. Look them up at epa.gov/iris/subst
Other standards
- The Agency for Toxic Substances and Disease Registry (ATSDR) publishes toxicological profiles on many substances, including health standards. www.atsdr.cdc.gov/toxprofiles
- Some states have their own RfCs. California’s (called RELs) are at oehha.ca.gov/air/allrels.html
- The World Health Organization publishes standards: who.int/phe/health_topics/outdoorair
- The federal Occupational Safety and Health Administration (OSHA) has additional guidelines about air quality in the workplace at osha.gov/SLTC/indoorairquality .
Spotlight on Pesticides
Pesticide Drift
Communities near farms often want to test their air for pesticides. Pesticide “drift” happens when pesticides end up in places other than the crops. Drift can happen directly from spraying, or when pesticides volatilize (go into the air after spraying), or when pesticide-covered soil turns to dust in the air.
The Pesticide Action Network has designed a Drift Catcher: a simple, inexpensive and scientifically robust device that collects air samples to be analyzed for pesticides (see panna.org/drift) If you’re considering using a Drift Catcher, you need to decide first if the project is likely to give you results you can use. Sampling for airborne pesticides is time-consuming, and analysis is expensive. Plan ahead, but with the following pesticide-specific things in mind:
Location: Sampling should be within 300 feet of pesticide applications. Do you have access? Choose locations where pesticide drift is a serious problem.
Pesticide type: What crops are involved? Which pesticides are used? Are Drift Catchers™ able to detect those pesticides?
Timing: What time of year do they spray? It may be at a stage of crop growth, or a time of year when pests are harming the crop. Over what time period will you need to collect data?
Health: Who is exposed at your sampling location, how often, and for how long? If nobody is exposed at that location, people may dismiss your results.

What Is (and Isn’t) on the Label There’s more in a bottle of pesticides than just the pesticide itself. The label on the bottle will list:
- Active ingredients: The pesticides will be known by its brand name, but labs may be more familiar with these chemical names for the working pesticides.
- Inert ingredients: Inert ingredients are often protected as confidential business information. Many inerts can even be used as active pesticides, but aren’t listed here because they aren’t officially the active ingredient. Other inert ingredients help the plants absorb the active pesticide.
- Application instructions: How the pesticide can be used, when, and by whom. These vary by state.
 A Drift Catcher (lower left) is set up to detect pesticides applied on fields (right). Photo: panna.org
Air Pollution and Health
There are known health effects associated with certain pollutants. If people in your community are experiencing these effects, document their stories. You can also find people with the most exposure, and ask if they are having any unusual health problems. Even if there aren’t noticeable health effects yet, pollutants may be detectable in people’s bodies. Biomonitoring is the testing of human tissue or fluids (urine, blood, bones, hair, breast milk, etc.) for toxic chemicals or their breakdown products. Data from biomonitoring projects have led to more protective government regulations, and to industries reformulating their products. Combining biomonitoring with air quality monitoring can give you compelling data.
It is very difficult to prove a connection between a health problem and exposure to pollution. Without a formal health study, your conclusions probably won’t hold up in court. Unfortunately, such studies can be expensive, time consuming, and may not give you the results you want. Still, even without a formal health study, you can still influence your community and elected officials with the power of personal health stories. In the case study on this page, there weren’t enough people in the health study for conclusive scientific proof. However, people’s stories of health problems, combined with the hard data they collected, made for a powerful story that supported their campaign goals.
Air & Health: A Case Study (from panna.org)
Luis Medellín and his family woke one night at their home in Lindsay, CA with headaches, nausea, and vomiting. Pesticide applicators were spraying an orange grove near their trailer park. The Medellíns’ air system pumped fumes directly into their bedrooms. “It shoots it into the house, and it’s just like you were in the orchard, just walking around smelling the pesticides,” Luis said.
To make a “perfect-looking” orange, growers use chlorpyrifos to keep insects off the trees. The EPA banned chlorpyrifos in homes in 2001, because of severe health risks to children. But orange growers still use it. It’s common for people in Lindsay to feel sick when the oranges are sprayed. People report headaches, blurry vision, weakness, and vomiting.
During summer peak spray seasons, a group of community organizations monitored the air for chlorpyrifos using Drift Catchers. Results showed that levels in Lindsay’s air were 11 times more than the EPA’s levels of concern. In 2006, 28% of 116 air samples were above the EPA’s “acceptable” exposure level for a 1-year-old child.
Knowing the air contained high levels of chlorpyrifos, community members wondered if the insecticide was also in their bodies. Twelve Lindsay residents provided urine samples during the height of the 2006 summer spray season. The study found that 11 of 12 people had above average levels of a chlorpyrifos breakdown product in their urine. 7 of the 8 women had amounts above the EPA’s “acceptable” level for pregnant and nursing women.
These results would not have been statistically significant for scientific proof. Still, the testing engaged the whole community, and they were able to use the results to petition the state government for:
- no-spray protection zones near sensitive sites
- neighbor-notification before spraying
- an end to the use of airborne pesticides
- help to move industry away from synthetic pesticides
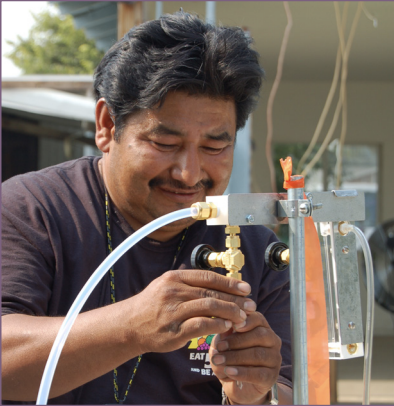
Above: Jorge Alvarado of Lindsay, CA sets up a pesticide Drift Catcher (Photo: panna.org)
Communicating the Results
You’ve analyzed the data and found the newsworthy facts you want to communicate. But reporters, politicians and the public probably don’t have the patience, interest, or time for a lot of details. You need to take the lead on turning data into information. Below is a checklist with suggestions for communicating tricky facts, as well as some concrete examples of these ideas in action.
Community Member Checklist: Communicating Tricky Facts
🔲 Think about your audience: Regulators? Legislators? Reporters? The wider community? Consider attitudes and education levels. Think about the setting and format of your message. Spoken testimony at a public hearing? A flyer or press release to hand out? An ad in the paper?
🔲 Find and highlight any problems with the process or reporting.
🔲 List the most interesting things you found from your analysis (p.12). Re-state each one a few different ways. Make graphs and visuals. Use analogies to familiar things and places. If emissions per year are too big to imagine, divide up by month, week, day, or hour, or by town population.
🔲 Use familiar units and round up or down to friendly numbers. Precision is less important than impact.
🔲 When you’re done, vote on which ones are most compelling for your audience and setting.
🔲 Be persistent. People often forget about a problem after an authority takes over. They assume everything is going as planned. If that isn’t the case, you’ll need to keep the problem in the public eye. Use new test results, a tally of smoggy days, new legislation, and anniversaries to get media attention.
Map it: Build on your pollution log maps. Global Community Monitor took samples at dozens of locations in the neighborhood around Pacific Steel in West Berkeley, CA, They mapped the data, showing that almost all samples exceeded air quality standards. (berkeleycitizen.org)

Summarize it: No need to report everything you found. Focus on what you think are the key findings: the most harmful pollutants, the highest levels compared with health standards, the biggest differences in readings.

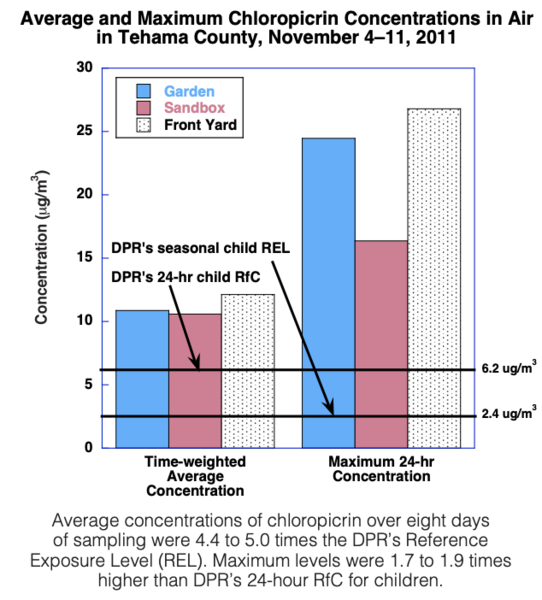
Graph it: Compare results to standards using a graph. Pesticide Action Network worked with local communities to test for pesticides using Drift Catchers. In reports, they graph the average and maximum levels compared to standards set by the California Department of Pesticide Regulation (DPR).
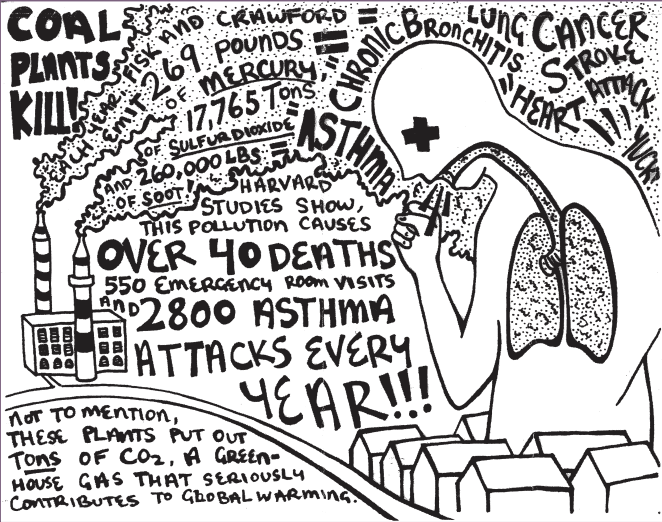
Say it another way: Make an analogy. Connect the fact to familiar situations and emotions. Residents of the Pilsen neighborhood in Chicago used the Clean Air Task Force database (catf.us) to estimate health effects from two nearby coal-fired power plants. The model predicted the plants cause 42 premature deaths and 2800 asthma attacks per year. With the help of the Little Village Environmental Justice Organization (lvejo.org) they made an artistic pamphlet incorporating the statistics.
Additional Testing and Next Steps
Additional Testing
After your initial round of tests, there are a number of reasons you may want additional testing:
- to monitor improvement after an industry promises to reduce emissions
- to spot-check testing being done by the facility or government agencies
- to test the soil or groundwater for the impact of years of air pollution
- to build a case for stricter regulations
Communities Keep Working
North Providence, RI residents called their local and state government offices to complain about conditions. Their objections to the asphalt company’s fumes, as well as their intentions to test for pollutants drew attention. In response, the state sent inspectors. Soon after, community members noticed an improvement in conditions. They believe the company improved pollution controls on its smokestack. The community members held off on testing during the company’s slow season, but were poised to begin testing when the weather turned warm, and any two members agreed the air was intolerable.
Community members in Somerset, MA celebrated when the coal-fired power plant in their town was shut down. However, the property owners requested permits from the city to retrofit the plant to burn trash and biomass to generate power. The community group fought back and slowed down the process. During the slowdown, they were recording public air quality data. Enough time elapsed that ongoing monitoring showed an improvement in air quality after the shutdown. The community used this data as part of their campaign against the proposed incinerator.
Community members near Charlotte, NC were successful in shutting down a local medical waste incinerator after publicizing the town’s high cancer rates. These incinerators emit high levels of extremely-carcinogenic dioxin. After the incinerator shut down, residents wondered how much dioxin had been left in the soil and in water near the incinerator. They plan to explore further testing to see what liability the company might have for cleanup.

Community Member Checklist: Next Steps
🔲 Hold a public meeting about sample results.
🔲 Create pressure for ongoing testing if needed.
🔲 Call the media about your results
🔲 Request a meeting with the people/source causing the pollution, and environmental agencies
🔲 Meet with or send a packet of information to your elected officials about the air quality in your area. Include logs, pictures, and sample results.
🔲 Spread the word in your community about conditions and how to get involved in the next campaign phase.
🔲 Submit comments to regulatory agencies, calling for more protective regulation.
Take It to the Top
Influencing Regulations

Do federal and state standards truly protect human health, or the health of streams, forests, wildlife and other ecosystems? There’s no simple answer to this question. However, if your community consults with trusted scientists, and you feel that a particular standard isn’t protective, you have options.
The Clean Air Act specifies 187 hazardous air pollutants that the Environmental Protection Agency (EPA) can regulate. Anytime the EPA considers a change to how these pollutants are regulated, there is a public involvement process. Public feedback can also initiate a change in regulation. Adding new pollutants to the list requires legislation from Congress. Find a list of chemicals currently under review at: epa.gov/oppt/existingchemicals/pubs/workplans.html
The EPA conducts the regulatory process for pesticides in “registration reviews”, which happen every 10 years or so. The review process itself takes about 5 years. During that time, evidence is collected for various health effects and reviewed by the EPA. In addition to this process, the EPA also has a Scientific Advisory Panel (SAP).
In order to get more clarity on the review process, you can also get in touch with the Chemicals Review Manager for the specific chemical. During the process, the EPA will open a public comment period online. It will be organized in “dockets” to allow for public access to all of the comments that are submitted. Comments might be highly technical and from research scientists, or they can be from ordinary people impacted by the pollutant. Even if you don’t submit a comment, you can go through a docket to see who else is working on the issue. You can find other allies and organizations who might be able to cooperate with you. You may also find which industries are trying hardest to loosen regulations. You can review an example docket (for the herbicide atrazine) at epa.gov/pesticides/reregistration/atrazine/
Assessing risk What if air quality testing finds high pollution levels, but the pollution continues, the regulations aren’t protective, or the process drags on? You can’t just stop breathing until everything is solved. Real risk assessment is complicated, and even people with Ph.D.s don’t agree on every method. However, experts will generally consider the following factors. As each increases or decreases, so does the risk to human health.
- Toxicity of the pollutant, compared with others Concentration of the pollutant in the air
- Frequency, duration, and intensity of exposure Bioaccumulation of the pollutant in the body
- Susceptibility Does your age, body size, health issues, or reproductive stage put you at greater risk?
- Probability and severity of various health effects
- Synergistic effects from other sources of pollution
Links to Helpful Resources
Note: A specific web address for a resource may change with time. If you can’t find a resource directly, do an internet search for the title (in bold).
- Global Community Monitor: gcmonitor.org, Pesticide Action Network, North America: panna.org These organizations (and co-authors of this guide) provide technical help, equipment, and guidance for communities who want to do their own sampling.
- National Ambient Air Quality Standards: epa.gov/air/criteria.html The EPA’s resource for the six most-regulated air pollutants.
- AirNow: airnow.gov An EPA site showing real-time and historical air quality monitoring data in major cities.
- State of the Air: stateoftheair.org The American Lung Association’s air quality site. Compare your air quality to other places. Find out where the best and worst air quality is.
- Risk Assessment for Toxic Air Pollutants: A Citizen’s Guide epa.gov/ttnatw01/3_90_024.html A plain-English overview of how the EPA conducts air quality risk assessments.
- Environmental Expert: environmental-expert.com Current info about technical equipment, testing methods, and companies.
- EPA Integrated Risk Information Sheet (IRIS): epa.gov/iris/subst ATSDR ToxFAQS: www.atsdr.cdc.gov/toxfaqs California Air Toxics Reference Exposure Levels: oehha.ca.gov/air/allrels.html Sites feature an A-Z list of toxic substances. Search for any pollutant, and learn about its toxicity, health effects, and applicable health standards.
- World Health Organization air quality resources Outdoor air: who.int/phe/health_topics/outdoorair Indoor air: who.int/indoorair
- OSHA Indoor Air Quality Page: osha.gov/SLTC/indoorairquality
- NIOSH Pocket Guide to Chemical Hazards: www.cdc.gov/niosh/npg Resources for air quality and chemical hazards in the workplace.
- Scorecard: scorecard.goodguide.com An independent source for information about polluters and pollutants near you. Created by former employees of the Environmental Defense Fund.
- Clean Air Task Force: Death and Disease from Power Plants: www.catf.us Use the Power Plant Pollution Locator to find estimates of the additional deaths and illnesses causes by each fossilfuel burning power plant in the United States.
- Pesticide Action Network’s Pesticide Database: pesticideinfo.org PAN’s Air and Pesticides Information Center (AirPIC). Visualize potential pesticide exposures by air in California.
- California DPR’s Pesticide Use Reporting: cdpr.ca.gov/docs/pur/purmain.htm California has the best pesticide reporting data in the country. Reports show which pesticides and how much are used on various crops. If you’re not in CA, this can still be a good place to start if your state doesn’t report on pesticide use.
- State Agricultural Extension Programs: extension.iastate.edu/CropNews (example from Iowa) State universities with agricultural programs often have crop management websites that track crop diseases and pests. This can give you an idea of when pesticides might be sprayed.
Adapted from the Statistics for Action Air Quality Manual. Originally published by TERC in 2014 with support from the National Science Foundation and shared with permission. Any materials posted on Public Lab are not endorsed by TERC or NSF and do not necessarily represent the views of either organization.
Co-authored by Ethan Contini-Field, Martha Merson (TERC) Denny Larson, Ruth Breech, Jessica Hendricks (Global Community Monitor) Emily Marquez (Pesticide Action Network, North America) in collaboration with Global Community Monitor;Pesticide Action Network/North America; Toxics Action Center; Blue Ridge Environmental Defense League; Little Village Environmental Justice Organization; Operation Green Leaves; Pesticide Watch; New England Literacy Resource Center.
With thanks to Statistics for Action advisors: Beth Bingman, AppalShop, Inc.; Andrew Friedmann, MA Department of Environmental Protection; Joan Gancarski, Massachusetts Department of Public Health; Alexander Goldowsky, The EcoTarium; Marlene Kliman, TERC; Jim Luker, Green Seal Environmental; Madeleine Kangsen Scammell, Boston University School of Public Health.
Many thanks to Rini Templeton’s estate for keeping her art alive by offering use of her illustrations at riniart.org.


0 Comments
Login to comment.