Through this manual you will learn how to perform the different steps of the process of subsoil sampling, extraction, selection, processing of samples and shipment to laboratory for heavy metals detection.
Guía en español aquí.
https://regist.ro/en/?underground
LIST OF MATERIALS
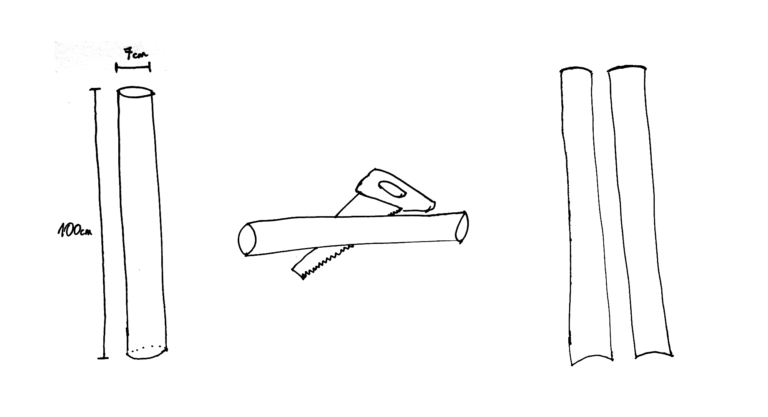
- PVC tube 1m long and 6.5cm in diameter.
- Strong duct tape (3 meters per tube).
- Cutter and saw.
- Striker with shock absorber (e.g. table with a buffer zone, to place on the tube and hit with the mallet to).
- Small shovel.
- Short hammer.
- Fhishing thread.
- Bags with hermetic closing.
- Plastic pallets or disposable knives.
- Tape measure or ruler.
- Permanent marker.
- Sieve (diameter from 1mm to 0.6mm).
- Scale.
- Work gloves.
- Nitrile gloves without powder.
- Respiratory protection mask (min. level of protection FPP2).
- Water boots.
- Protective goggles.
- Field notebook + pencil.
- Backpack for transporting the equipment to the extraction area.
- Cleaning kit (sprayer with ethanol, ballets or kitchen paper).
- Glass or Pirex bowls.
- Pestle.
BEFORE WE START
- Consider the space to be investigated as an a priori contaminated space and therefore potentially dangerous for your health.
- Protect your skin from contact with materials collected during sampling.
- Use protective items, mainly gloves, mask, goggles and rubber boots.
- Whenever possible, do this activity as a group to avoid being alone in a dangerous situation.
PREPARATION OF EXTRACTION MATERIALS
Cut the tube from 75cm to 1m long and then cut it lengthwise in two equal halves, from end to end.
Clean the tube with ethanol or soap and water.
Use the duct tape tape to firmly rejoin the two cut halves, reinforcing the edges of the two ends of the tube.

Wrap the tube in transparent film and keep it sealed until it is used on the ground.
Each time the tube is reused, repeat the cleaning and sealing process.
DETERMINING THE PLACE OF EXTRACTION
To determine the place of extraction we can use different techniques. In this manual, we use the simplest technique that requires the least number of extractions, but it is possible to make multiple extractions randomly (fig. A and B) or systematically using a grid (fig.C).
To learn about more advanced sampling techniques download the Environmental Protection Agency (EPA) Soil Sampling Guide.
https://www.epa.gov/sites/default/files/2015-06/documents/Soil-Sampling.pdf

We will focus on example D: choice of extraction zone due to previous knowledgeof contaminants in the area; jugdmental sampling according to EPA.
In the case of this manual, our research area is the Guadarrama River bed as it passes through Collado Villalba. The extraction was made next to the river, below a water treatment plant of the public company Canal de Isabel II.
During the investigation of rivers and other bodies of water prone to sedimentation of solid materials, it is convenient to choose the place in meander zones where the current is not so strong and allows a greater sedimentation of the waste.
It is advisable to carry out several tastings with the shovel before introducing the tube to avoid rocky areas.
Do not get too close to the river to avoid the presence of water in strata close to the surface.
EXTRACTION OF SAMPLES
Choose the place for the extraction and before beginning with the introduction of the tube in the ground dig a little with the shovel next to the area chosen to check the conditions of the ground: presence of stones, water a few centimeters from the surface…
Before starting, mark the tube with an arrow pointing upwards to avoid confusing the two ends of the tube.

Once the area has been chosen, clean the surface and dig five or ten centimetres before placing the tube to avoid surface roots that could push the sample.
Place the tube vertically on the surface of the ground and push, press the tube down so that it gets a little into the mud.
Once attached, place the wood on the tube and hit it with the mallet to sink it into the ground until it hits the bottom or is completely inserted.


Dig with the shovel around the tube until it is visible along its entire length so that it can be removed by tilting it horizontally to prevent sludge from escaping from the lower end of the tube.


Transport the tube horizontally to the sample preparation area.

Sample preparation can take place at the extraction site or in our laboratory/home. Both have pros and cons. If we transport the full tube to our laboratory we run the risk of displacing the contents of the sample and having it mixed. If the sample is very solid and does not move, we will have better working conditions in our laboratory.
On the other hand, preparing the samples at the extraction site avoids the risk of internal displacement of the sample but offers a less suitable working space.
SAMPLE PREPARATION
It is necessary to put on nitrile gloves and avoid contact with the potentially toxic sample and contaminate it with materials present in our hands.
With the tube in a horizontal position, cut the tape trying not to sink the metal of the knife in the sample so as not to contaminate it.


Cut the sample in two halves, crossing it longitudinally with a piece of fishing line or cutter.
Make a first observation and note differences in color and texture throughout the sample. Based on this observation we will choose the central samples of each differentiated zone to send for analysis. Once the results have been received, we can analyse the immediately lower and upper section of the zone where we find the presence of contaminating products.

Position the tape measure or ruler so that zero (0 cm) coincides with the top of the borehole or surface area.
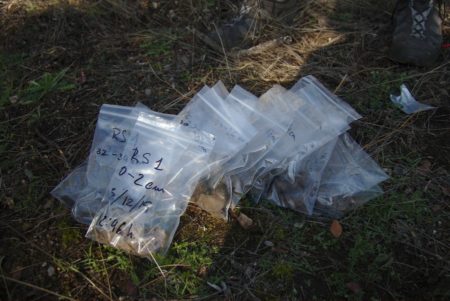
Using plastic pallets, cut sections of 2 cm and avoid removing the part of the sample in contact with the tube as it may have been contaminated with the cutter. Deposit each layer in the plastic bags.

Mark each bag with the name of the place, date, time and height of the layer.
Clean the pallets with ethanol between sections.


Keep the samples refrigerated until they are sent to the laboratory.

PREPARATION OF SAMPLES FOR LABORATORY ANALYSIS
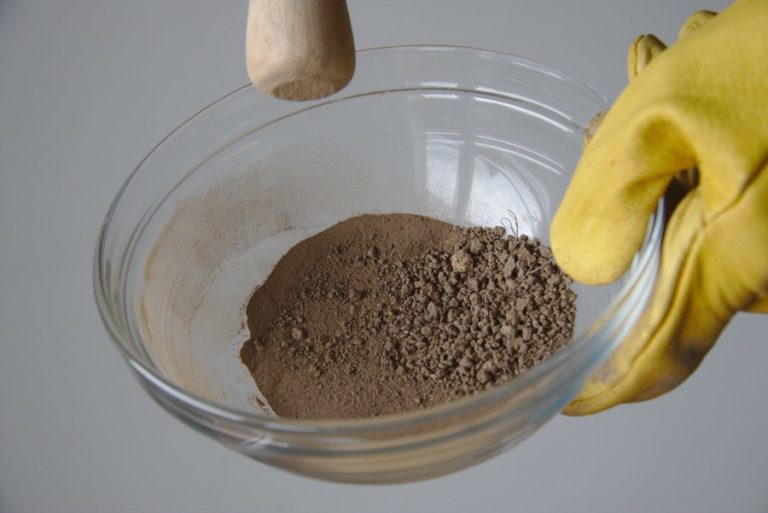
Samples should be dried and sieved as much as possible for better results and cheaper analysis. Chemical elements adhere better in small particles so we will send 3g of dry sample in particles smaller than 1 mm.

If we do not have an oven or microwave, we can dry the mud or soil samples in the open air in glass or Pyrex jars..
It is possible to accelerate the drying process using a kitchen oven or microwave following the following times and temperatures: - Oven: 8 hours at 50 degrees. - Microwave: 5 minutes A 600W.
Choose the samples to be analysed according to their depth or their different colour, texture... and place them in a glass or pyrex container to be placed in the oven. Undo the sample to facilitate the evaporation of the water.


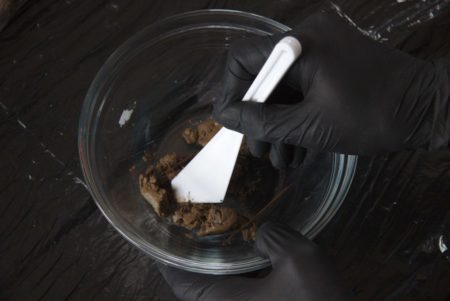

Place the sample in the oven and once dry, grind it with a pestle.

Dry sieving removing particles larger than 1 mm.


Select 3gr per sample for shipping.

Place the material in identified bags to be sent to the laboratory.

Repeat the operation with as many samples as you want to analyze and clean the material used with ethanol between samples.


SENDING THE SAMPLES TO THE LABORATORY
To send samples to the laboratory, as you have already learned, a pre-processing has to be carried out to avoid costs and facilitate the work of the laboratory. The cost increases if we do not dry, grind and sift the sample. It is possible to send it without drying, grinding and sieving but we do not recommend it. The laboratory will perform this process at your expense and shipping will be more expensive due to the greater weight of the contents.
1 Comments
@bhamster awards a barnstar to imvec for their awesome contribution!
Reply to this comment...
Log in to comment
Login to comment.