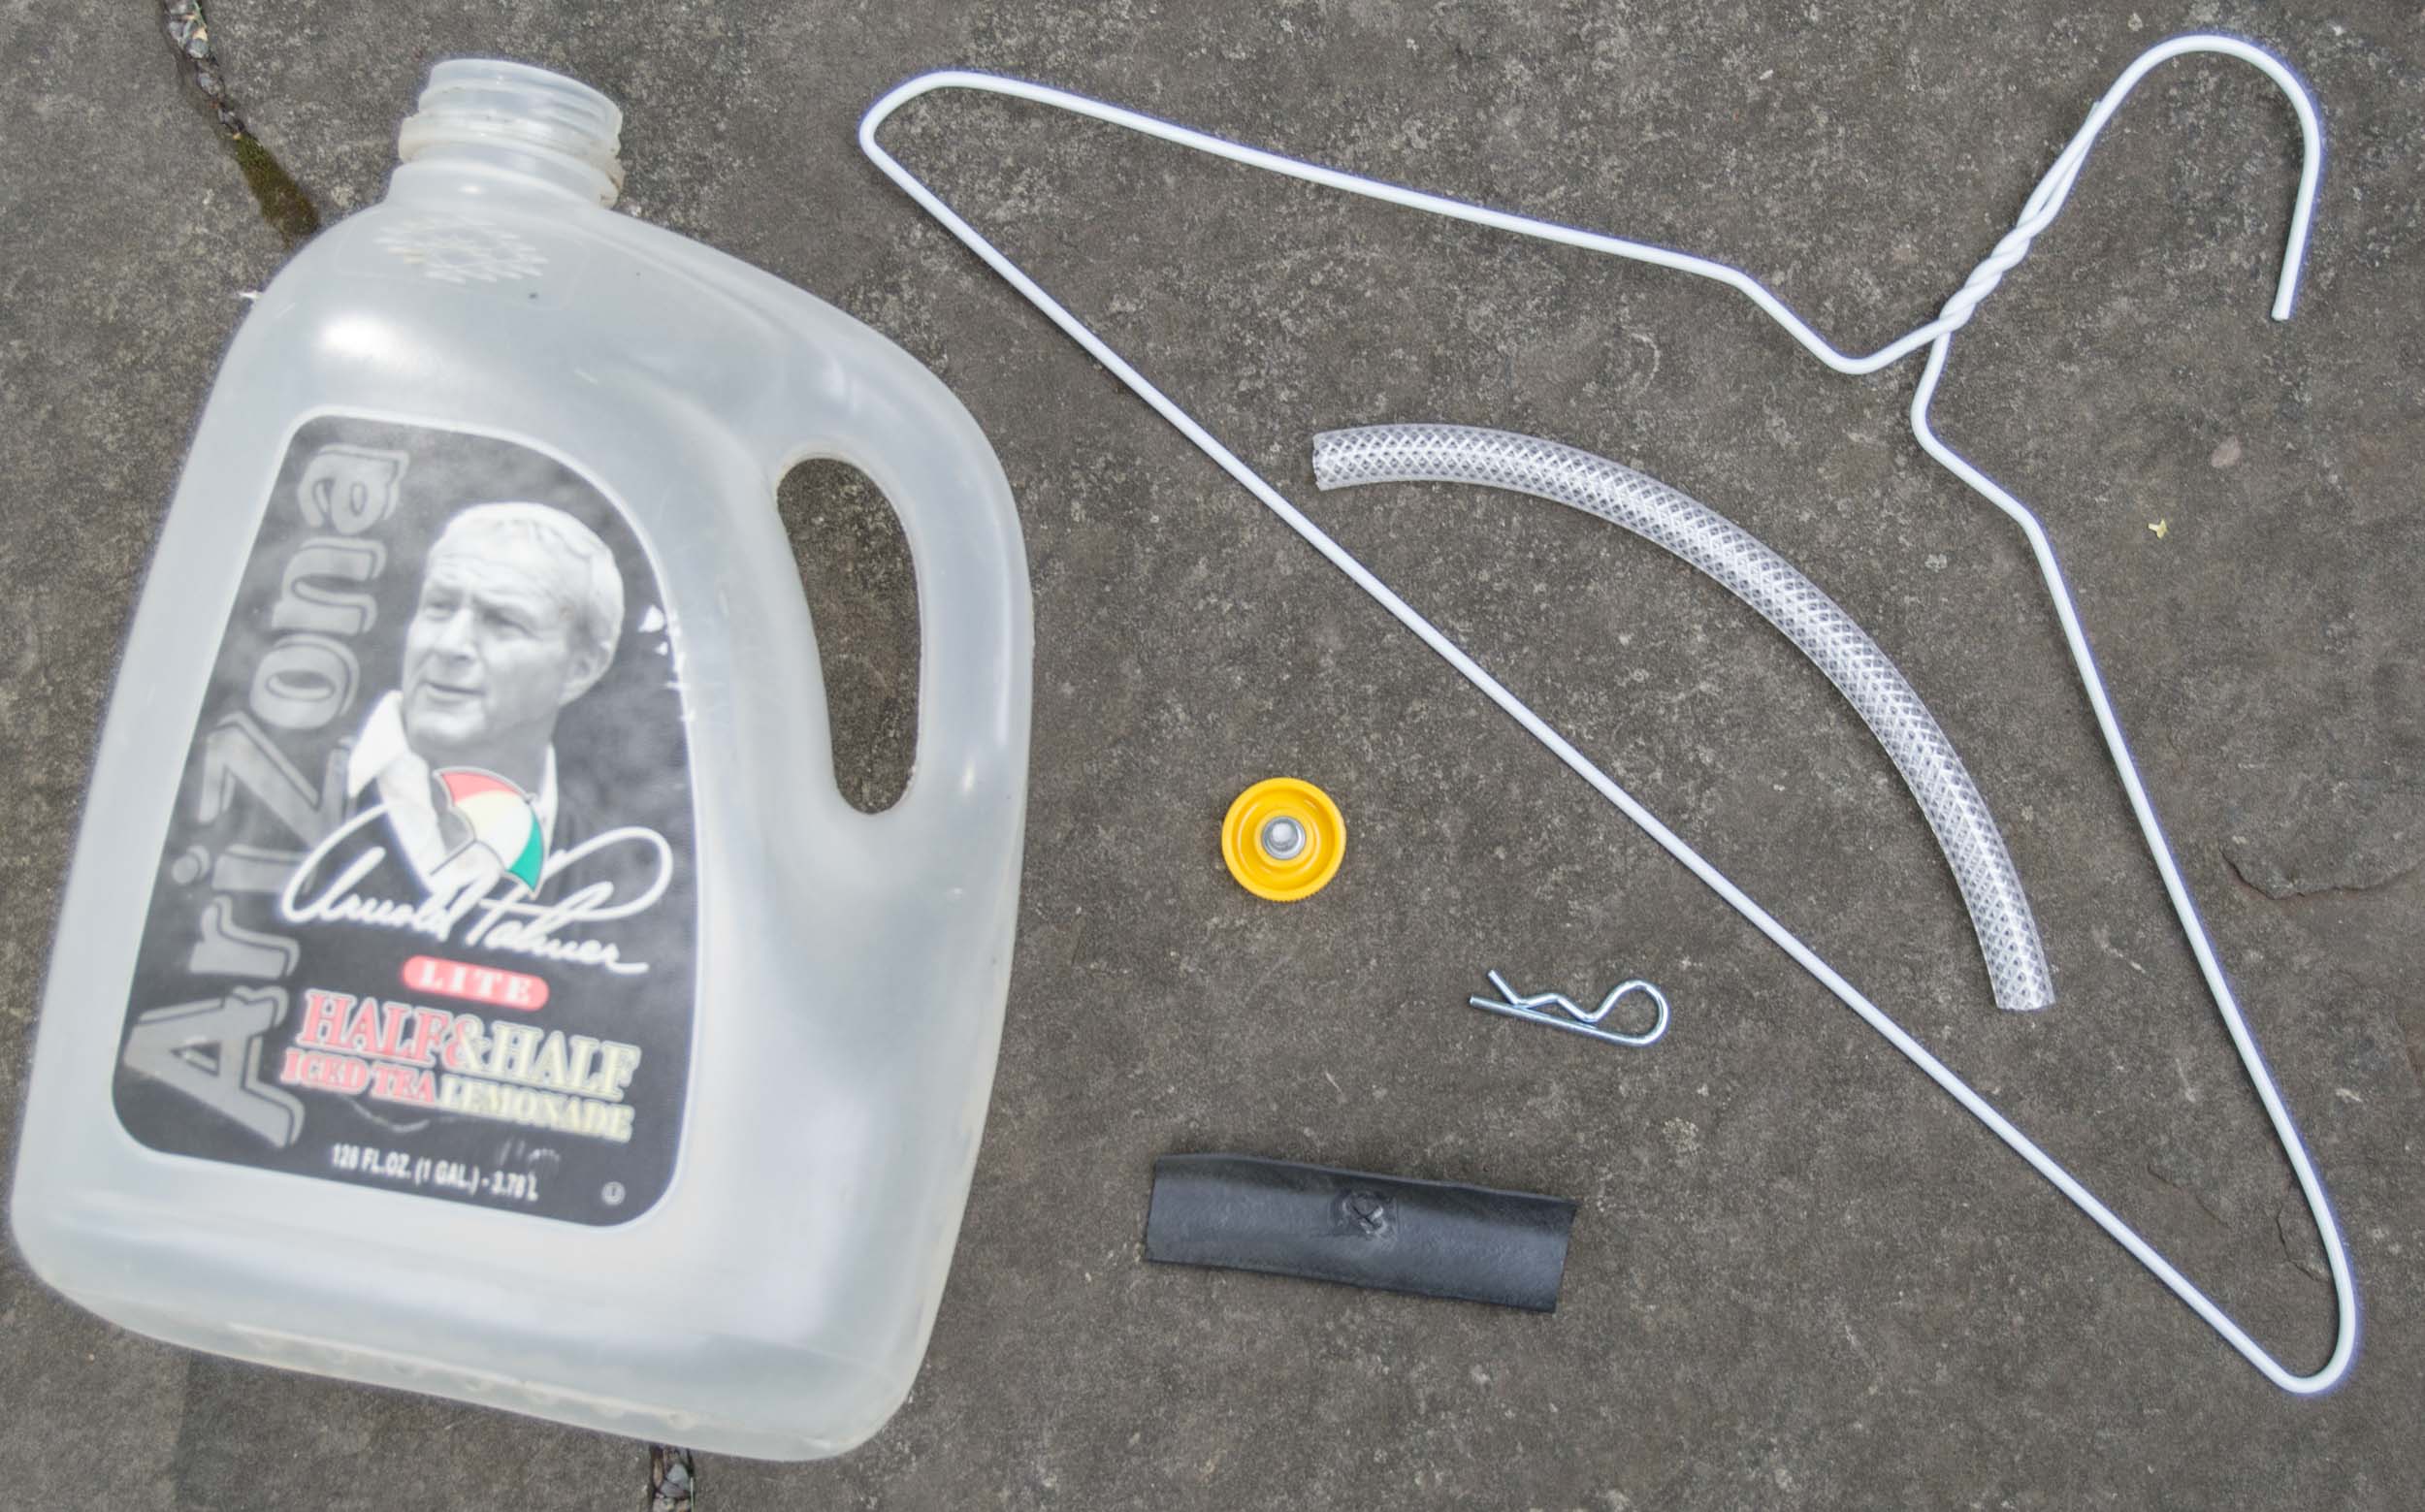
Above: All you need to make a good camera rig for aerial photography.
This is a really easy way to make a camera rig for kite or balloon aerial photography. It costs a few dollars, and the only part that is not in your hardware or grocery store is the yellow tripod thumbscrew (but you can use a regular 1/4" 20 bolt).
This rig has these benefits:
- Very cheap.
- Very easy to build.
- Very lightweight (100 grams, or about 43 grams without the jug).
- Good camera protection.
- The rig cannot twirl (spin).
- All of the camera controls are accessible when the camera is mounted.
- The flexible tubing dampens motion.
- The flexible tubing allows the camera to remain level regardless of the angle of the flying line.
- Easy to attach the camera to the rig.
- Easy to attach the rig to the flying line.
- Easy to switch from nadir to oblique photography.

Above: A Jug Rig deployed on a flying line. The flexible tubing allows 100 gram to 300 gram cameras to remain level regardless of line angle. Lighter cameras could require a longer piece of tubing.
Tools:
- drill and two bits -- 1/4" and 7/64".
- needlenose pliers -- for cutting hanger wire and bending tight loops in it.
- piece of fabric -- for protecting the vinyl coating on the hanger wire while bending.
- craft knife or other sharp blade - for trimming plastic jug, PVC tubing, and innertube rubber.
- ruler
Parts list:
- Iced tea jug -- these are bigger than soda bottles and tougher than milk jugs, but other jugs will work.
- Wire clothes hanger -- you want a thick, sturdy one, and vinyl coating is nice. Thin ones are not so good for this. The one I used is 13 gauge wire.
- 8 inch (20 cm) piece of high pressure PVC tubing, OD 17/32” or 5/16" -- dimensions are not critical, but it must be the type with the fiber reinforcing strands.
- Little piece of bicycle innertube -- other soft or textured materials could also work. It keeps the camera from rotating around the tripod screw.
- Cotter pin -- I used a 1 5/8" hairpin cotter pin, but a thin bolt and nut or piece of wire would also work.
- Tripod screw -- a nice yellow 1/4" 20 thumb screw is good, but any 1/4" 20 bolt that you can tighten into the camera's tripod socket can work. A 3/8" long bolt works great.

Above: These are the parts all prepared and ready to assemble.
Step 1
Cut the bottom out of the jug. Leave the rounded edges because they are very thick plastic and add strength and protection. Cut off the jug 4" (10cm) from the bottom.
Step 2
Cut two pieces from the hanger. One 8 to 10 inch (20 to 25 cm) piece to wrap the flying line around and one 13 to 15 inch (33 to 38 cm) to connect the PVC tube to the camera. Bend the pieces as shown with strong needlenose pliers.

Above: The long piece of hanger wire has closed loops at both ends. The loop on the left must be just large enough to pass the cotter pin through it. The ziggy bends near that end are intentional -- they make a tight fit inside the PVC tubing. The loop on the right must be just large enough to pass the 1/4" 20 tripod screw through it. The sexy curve of the wire can be adjusted later. The short piece of wire has one open loop, but after it is assembled, another loop will be bent on the other end.
Step 3
Drill a 7/64" hole through the PVC tubing about 1/2" (13 mm) from one end and right through the middle. The short piece of hanger wire will pass through this hole and it should be a tight fit. Drill a second hole through the PVC tubing 2 inches (5 cm) from the other end. The cotter pin will pass through this hole
Step 4
Insert the small loop end of the long wire into the PVC tubing from the end of the tubing with the hole drilled 2 inches from the end. Slide it until the loop aligns with the drilled hole. Insert the cotter pin through the PVC tube and loop.

Above: The cotter pin goes through the small loop at the end of the hanger wire. The pin "locks" onto the PVC tubing. If the hanger wire is loose inside the tubing, remove it and make the ziggy bends bigger.
Step 5
Insert the short wire into the drilled hole at the other end of the PVC tube. Bend the second open loop on the end of the wire.

Above: The short wire has been inserted through the PVC tube. Now another open loop must be bent on the end.
Step 6
Cut a small X in the middle of the piece of innertube rubber. Drill a 1/4" hole in the jug about 2 inches (5 cm) from the top in the middle of one of the long sides. Insert the thumb screw:
- into the free loop at the end of the long wire,
- through the hole in the jug,
- through the X in the rubber,
- into the camera tripod socket.
Tighten the screw very tight. Depending on the material (e.g, innertube rubber) you use, the camera may feel secure. If not, try another material or two layers.

Above: If the 1/4" loop at the bottom of the long wire is nice and tight, the thumb screw will tighten against it. You might need a thin washer there.
Step 7
Attach the rig to the flying line by wrapping the line around the upper (short) piece of hanger wire. Three or four wraps on either side is good, but more is also good. CAUTION: The flying line must be wrapped so that it forms a continuous spiral from one end of the wire to the other. If the two sides of the wire are wrapped in opposite directions, the entire rig can fall off!

Above: CONTINUOUS SPIRAL! CONTINUOUS SPIRAL! CONTINUOUS SPIRAL! Really, it will just fall off if it's not a continuous spiral. See it happen here.
Step 8
You might need to adjust the balance of the rig so the camera points where you want it to. Bend the long wire so everything is good.

Above: Depending on your camera and construction, you might need to trim the lower edge of the jug so it is not in the photos. Cutting away lots of the jug will save weight and reduce wind resistance, so consider removing as much as possible so only four "legs" of plastic remain. Also, trimming the "top" part of jug (the bottom edges of the jug) where the plastic is thick can save more weight.
It is a good idea to use a lanyard to make a redundant direct connection between the flying line and the camera. It's easy to do. Do it.

Above: This rig can be used without the jug, reducing the rig weight to about 40 grams. The camera will have no protection, so don't use a camera you really like unless it belongs to someone else. Note that the line forms a continuous spiral along the upper wire. Do you know why?
All the photos here show the camera pointed straight down. This rig also allows the camera to be tilted for oblique aerial photography. You can rotate the camera around the tripod screw for portrait mode obliques, or you may bend the wire for landscape mode obliques. What else could you ask for?

Above: The piece of rubber helps keep the camera from rotating around the tripod screw. That's important because that kind of rotation is how the camera is freed from the tripod screw and becomes gravity's plaything.
Although this is a good way to attach a camera to a kite or balloon line, there are even better ways. Most kite aerial photographers use a Picavet suspension, and most of the rest use a Pendulum suspension. These suspensions, when paired with a camera rig, offer some advantages over the Jug Rig described here. You can buy kits to build these suspensions at those links or at the Public Lab Store. These suspensions are not complete and require a rig to hold the camera.
3 Comments
wow awesome Chris! I tagged this as an activity for photo-rig so it will get even more visibility!
Reply to this comment...
Log in to comment
Super -- added this to the Kickstarter FAQ as well :-)
Reply to this comment...
Log in to comment
@liz awards a barnstar to cfastie for their awesome contribution!
Reply to this comment...
Log in to comment
Login to comment.