Description:
Aerial photography and 3D photogrammetry conducted while in residence at JTHAR, (Joshua Tree Highland Artist Residency Program). The project is an artistic investigation of the landscape but may be relevant to citizen scientists or others exploring balloon mapping and/or photogrammetry. Some ideas here were borrowed from HAB photography methods.
Materials:
- Public Lab Balloon Mapping Kit
- 8ft Cloud Buster Neoprene Balloon
- Helium (K Size Tank)
- Two Canon Powershot G10 cameras running CHDK
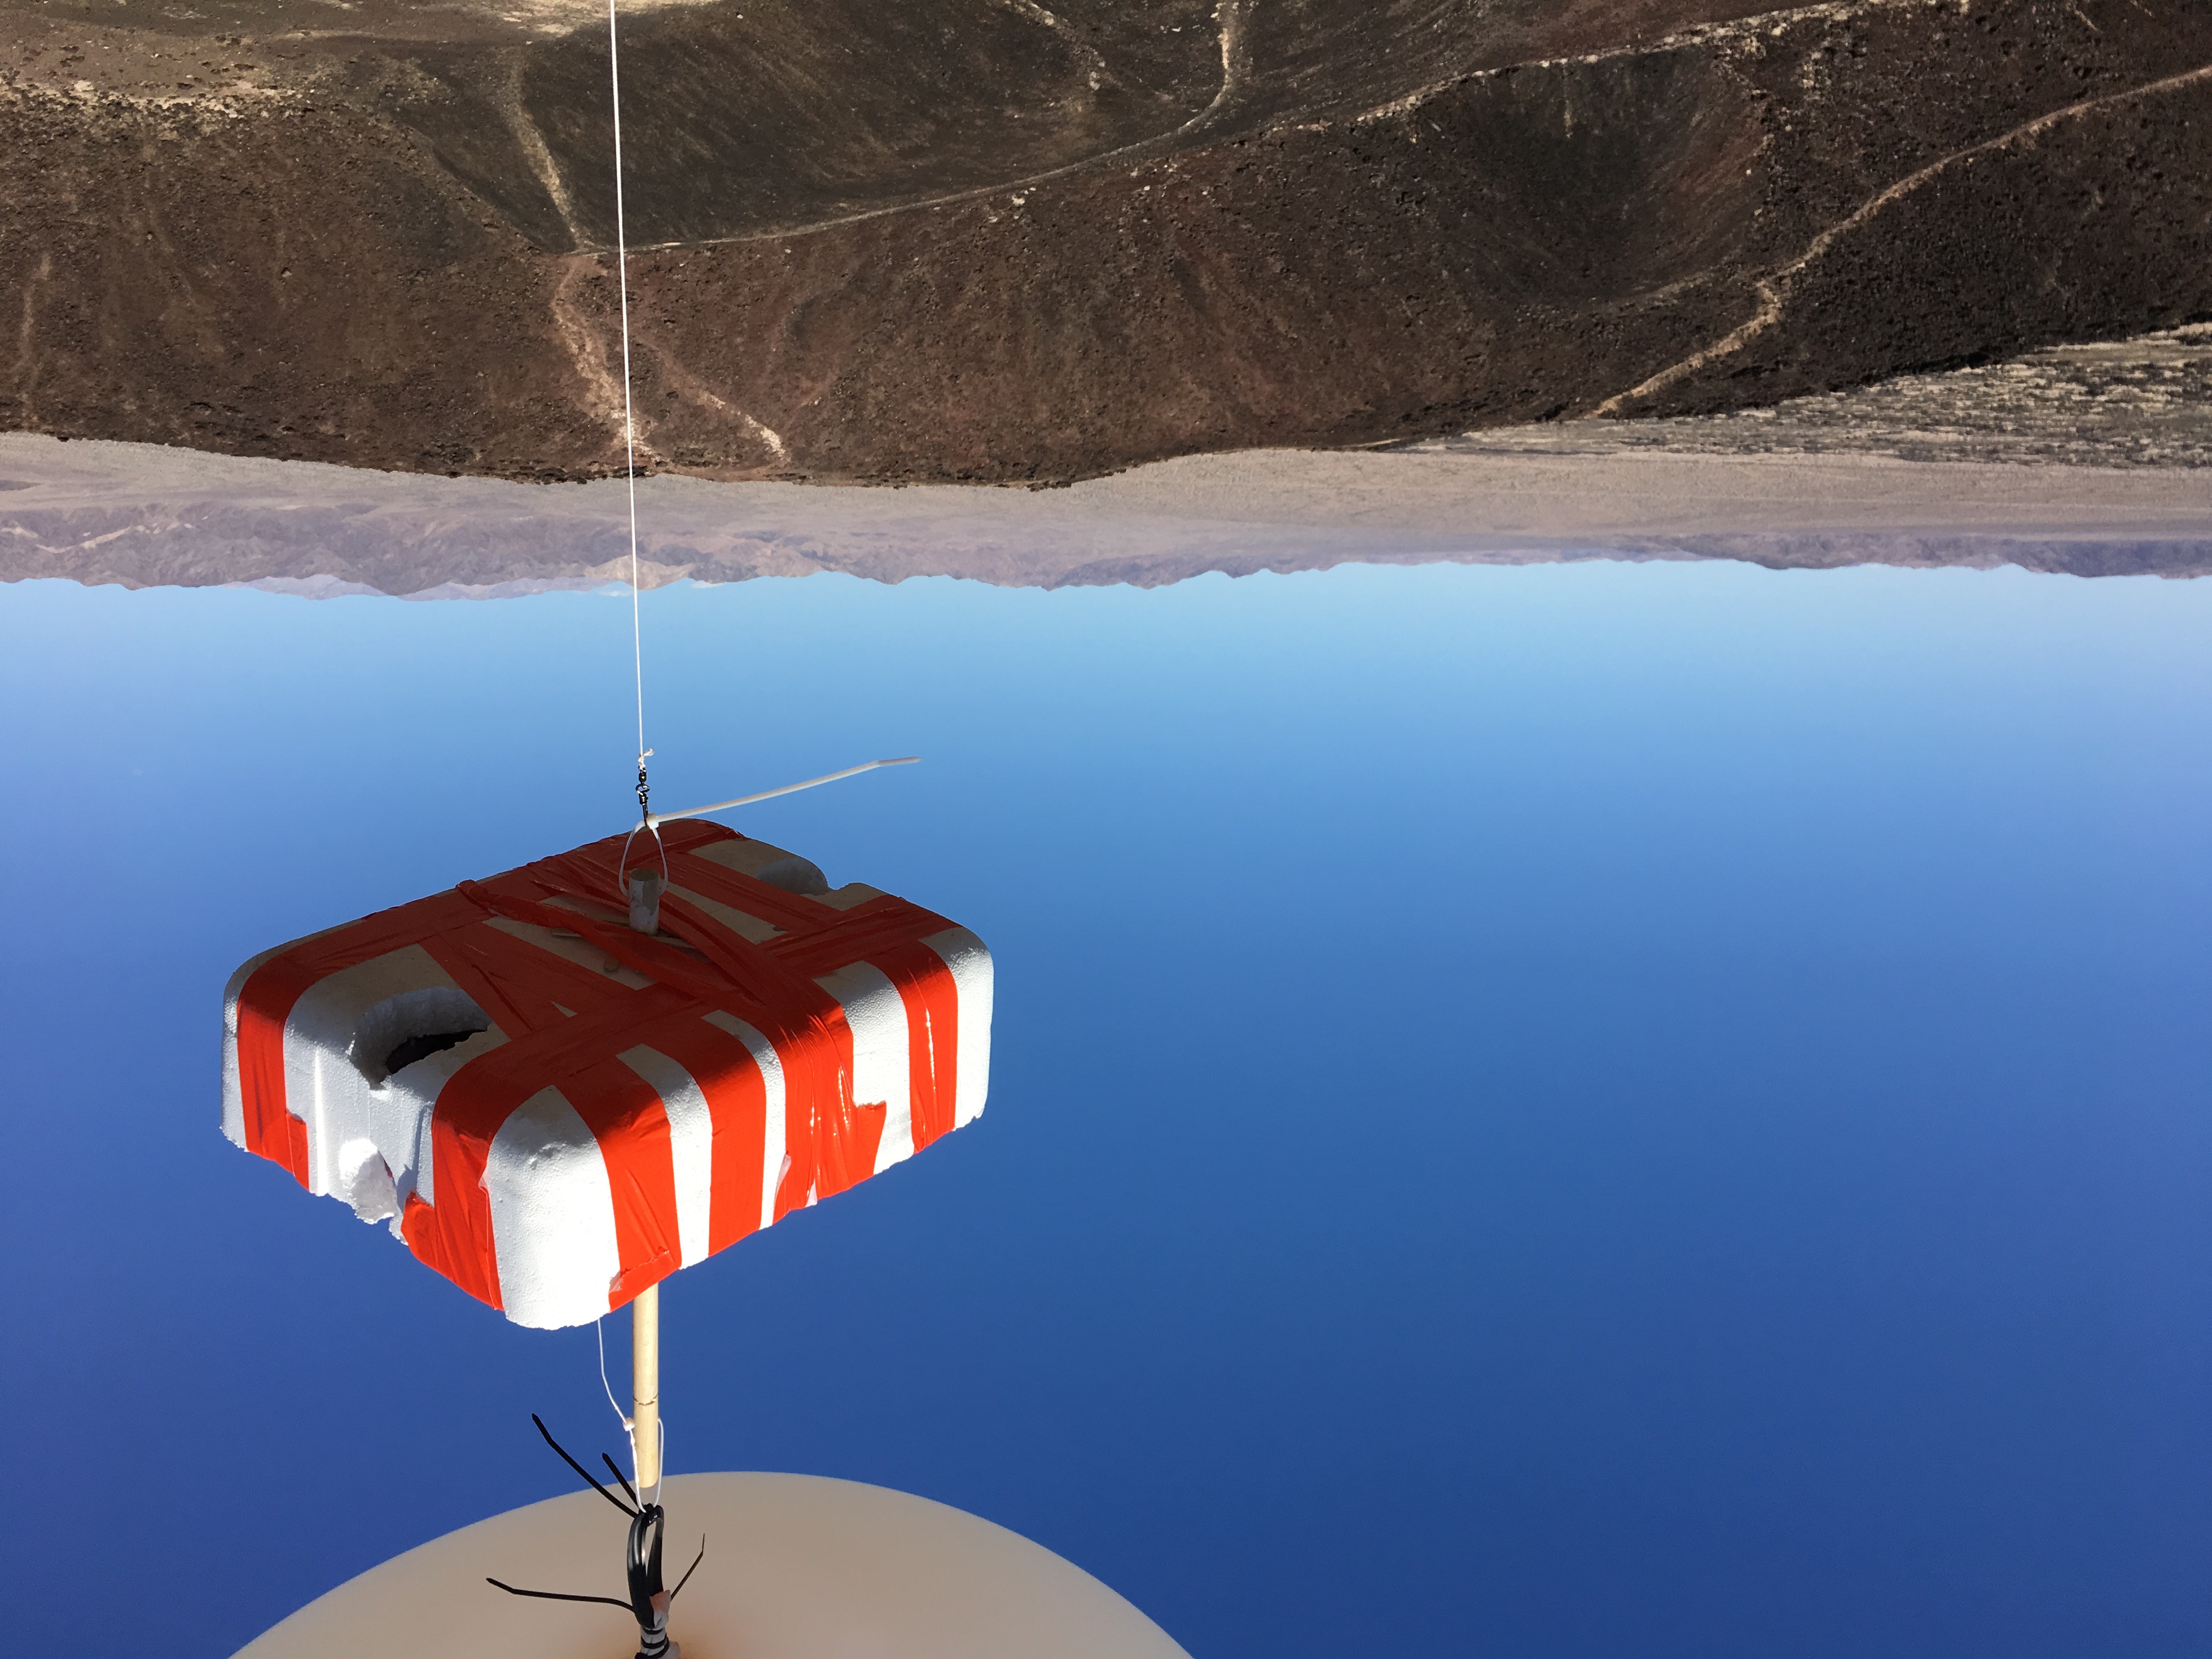
- Styrofoam beer cooler
- Duct Tape / Zip Ties
- Bungee cords / Tarp
**
**
**
**
Preparation:
I was working completely alone for this project, which I highly discourage. Regardless this was the method. The balloon was inflated from a K-Type Helium tank in the back of a rented U-Haul Pickup. Tarp and rubber bungee cords were used to hold the balloon down during inflation.

**
**
**
**
**
**
Camera Box:
I had originally mounted the cameras in a styrofoam cooler with a wooden dowel running through the box. Additional foam inside positioned the cameras on opposite sides of the box, at a roughly 25-degree angle to the ground.

**
**
**
**
**
**
Improvisation:
This worked fine on a previous flight test, but I had a problem. The helium tank had less gas remaining than I had estimated, so the balloon was not completely inflated. I tried to fly it anyway but after 30 mins the balloon was not able to make an ascent as the load was too heavy.
I cut down everything unnecessary from the foam box, including redundant carabiners, clips or line. This is the result and it actually worked out well:

**
**
**
**
**
**
Results:
The cameras were set to shutter priority mode at about 1/650 sec. Using CHDK they were set to shoot in interval mode every 10 seconds. The shots were clear and more than adequate for photogrammetry. I did achieve some nice photos and good results with the 3D models.
**
**
Failures:
- The cameras were not positioned in the styrofoam perfectly. All shots have white foam visible in the corners of the frame.
- Because of the lost time with the helium miscalculation and rebuilding the camera rig I lost about 45 mins of battery life on the cameras. This meant the camera batteries died precisely when I reached the crater and I did not get photography of the ascent to the summit. If I had been aware at the time there are settings in CHDK to optimize the battery life. Better luck next time.

**
**
**
**
**
**
3D Photogrammetry
The assembled map below is a 3D mesh produced using Autodesk Remake (now Autodesk Recap Photo). The model is automatically UV textured with the original photography. Here are a few orthographic views rendered in Cinema 4D with Physical Sky lighting.


10 Comments
This is a terrific result for one of your first flights. The photography is very high quality because of the good decisions you made. If this is your second flight it might be the most successful second flight I have seen.
Flying two cameras to get twice the coverage with oblique photos is a clever idea. But those are heavy cameras and the payload weight handicapped you. I hope you try this again, and maybe consider something like a Saturn V Rig to point and shoot one camera.
Chris
Reply to this comment...
Log in to comment
Chris, Thanks for the notes, appreciate that!
I should clarify, this was my second flight with this rig and these cameras. A year prior I had done 3 shorter balloon flights with cheaper cameras and rigs including an iPhone. I got a few good snapshots but poor photogrammetry.
I had seen the Saturn V Rig, and perhaps I should reconsider it. I was trying to keep the equipment as simple and inexpensive as possible, but with a lighter load I might save money on helium over multiple flights!
I also have an artistic goal here, simply to produce nice photographs, and the cheaper cameras simply did not have adequate sensors or resolution, the Canon G series seemed like a good compromise between quality and weight.
Reply to this comment...
Log in to comment
@stevie awards a barnstar to DevanHarlan for their awesome contribution!
Reply to this comment...
Log in to comment
Great post. Where was this mapping exactly? It would be great to tag it with the new location feature!
Is this a question? Click here to post it to the Questions page.
Reply to this comment...
Log in to comment
Hi @stevie, thanks for the star :) added a location tag, but this may be helpful also: https://goo.gl/maps/5pWD6UEu2y42
Reply to this comment...
Log in to comment
hi @DevanHarlan , would you say that the second pair of location tags you added is more accurate? if so, please delete your first pair in order to "activate" your second pair. Thanks!
Is this a question? Click here to post it to the Questions page.
Reply to this comment...
Log in to comment
@devanharlan thank you for outlining such a fun experiment and the photos are great. One question--you mention Public Lab's Neoprene balloon, but was this white balloon the one from the kit? Thanks!
Is this a question? Click here to post it to the Questions page.
Reply to this comment...
Log in to comment
Hi @zengirl2, you're correct, this was not the original balloon that came with the kit, I had used that one a few times already and got new one for this flight. It's the 8ft Cloudbuster balloon which you can get here: https://www.balloonsdirect.com/giants/cloudbuster-weather-balloons/8-foot-cloudbuster-weather-balloons
I had found an even better price here, but now they appear to be sold out: https://www.bargainballoons.com/10Browse.asp?Search=cloudbuster&Page=1&Display=High&quickSearchType=AnyWord
These balloons say "chloroprene" rather than neoprene. Not clear on the difference as they appeared to work exactly the same for me. Cheers!
Is this a question? Click here to post it to the Questions page.
Reply to this comment...
Log in to comment
@DevanHarlan ah okay. TY so much for the details as I'm blogging you now on Adafruit. BTW, I think you should add a photo of your finished art as part of the post. I found your finished rock to be amazing! Hope to meet you some time in NY or maybe the NJ Barnraising? :)
Is this a question? Click here to post it to the Questions page.
Reply to this comment...
Log in to comment
Hi @zengirl2, thanks for the reblog! The rock artwork you may have seen isn't related to the photogrammetry, those are casting of small boulders using latex molds... thematically related of course :)
Yes I will keep the next Barnraising on my calendar. Also I do have an exhibit coming up in NY if you're interested I can send an invitation, send me your email address.
Reply to this comment...
Log in to comment
Login to comment.