Purpose
This research note is part of "Investigating Water with Seeds"
Images, illustrations and photographs will be added soon
Describe a short procedure that can be implemented in a kitchen (of an apartment for example), allowing any motivated person to practice the handling of "Bioassay" and to better understand the issues involved in each step of this experiment.
Safety first!
We ensure that we keep our well-being in action (Holistic Security, Tactical Tech. 2017). The holistic approach integrates self-care, wellness, biosafety and security, and information security into traditional safety management practices.
Safety and security are not protective products on a shelf. It is a mindset, which is maintained by training and experience -- and by regular redesign of applied procedures.
For this exercise we are using only products that are likely to be present in your kitchen.
If you decide to test chemicals that are more hazardous than table salt, you will need to take additional safety precautions.
And always practice before you handle! Small step by small step.
Don't work while tired, sick, or doing 10 things at once.
Always read the entire label carefully before using a chemical. Make sure you understand the hazards involved, what safety equipment to wear, and what to do in case of a spill or contact with your skin.
Basic safety equipment you should wear includes safety glasses (splash proof type), chemical resistant gloves and a chemical resistant lab apron.
Work in a clean, well-ventilated, uncluttered area where you can quickly wipe up spills.
Always keep chemical bottles tightly closed, except for the short time you are measuring the product.
The following procedure is to perform a bioassay to determine what concentration of salt (NaCl) is toxic to the seeds. It is derived from middle and high school biology courses.
Procedure

Why/How start a Bioassay?
Probably cause we want to learn and/or expose something invisible in the environment
Investigation and scientific experimentation very often begins with questioning. Let's start to see what question we want to explore.
Question: At what concentration does a given product become toxic to seed germination? Is a certain amount of it beneficial to seed germination/growth?
Lettuce seeds are very common, Lactua includes at least 50 species, distributed worldwide; and they work well because of their sensitivity, but other seeds (such as radish seeds or hale cress, mouse-ear cress or arabidopsis' seeds) will also work. Hopefully this training can be easily modified to test for toxicity in your direct local environment.
- If you live near a construction site, you may want to know the presence or absence of pollutants in the water flowing from the site to the street, the cutlass field, or the sewer.
- If local refineries or factories release waste into a river, research the types of chemicals in that waste and conduct a bioassay to determine what concentration of chemical becomes toxic to local plant life.
- If you live in an area with a lot of snow and ice, try testing different concentrations of a solution containing de-icing substances used in your town.
You can also research methods for performing adaptations of these bioassays on soil/mud samples.
Observe/Collect Data Research everything you can about how high concentrations of a product in your kitchen (or any other chemical you decide to test) may end up in local water or groundwater.
Then find out what data exists on how a particular product affects germination and plant growth.
The more details you gather in your research, the more informed your hypothesis will be.
Make a hypothesis.
Hypothesis: Based on this research, write a detailed hypothesis predicting the answer to the question.
For example, "Salt concentration in the direct environment affects the morphology of lettuce root development."
Let's move on to experimentation
Materials and Equipment
- balance
- Spray
- paper towel
- ruler calibrated in centimeters (~20 cm)
- or paper based Photomacrographic Ruler in milimeter , here is 2 files under free licence for printing
- 6 shallow glass containers or 6 Petri dishes or equivalent (~ 8 or 9 cm diameter)
- filter paper (Bleached paper may contain dyes or chlorine, avoid it.)
seeds
- The choice of the type of seeds is important: the size (for easy or difficult handling, the time of the cycle of germination, the period in the year, etc). We detail it here to help to choose.
- for example: if Arabidopsis seeds are good candidates for bioassays, because they are very well known and reference in biology, they are also very complicated to obtain and very difficult to handle (they are like dust)

1000 ml beaker (or other 1 liter container)
- 100 ml measuring cup/cylinder
- pipette or straw (not obligatory)
- NaCl (table salt)
- distilled water 1 L.
- bleach 10ml
- A device to monitor the temperature and humidity/hydrometry of the room would be a plus

Plastic cups (Smaller than typical 100mm dishes but very functional. Made of polypropylene and can be re-autoclaved many times, online buying), glass cups (glass containers for crème brulée bought in supermarkets), and petri dishes. These are 3 examples of containers you can use
"Cooking" this experimentation
Experiment: To test your hypothesis, conduct a bioassay to test the effect of solutions containing varying concentrations of salt (NaCl).
The following procedure uses three different concentration levels.
Depending on your results, you may want to test more different concentration levels to get the most accurate result (e.g., try a few solutions concentrated between 0.1 mole of salt per liter and 0.2 mole/liter or a solution higher than 0.2 mole/liter).
- Have a look: [Mole] (https://en.wikipedia.org/wiki/Mole_(unit))) in wikipedia
The more samples you have to test, the more accurate your results will be: try to multiply this experiment so that you have several seed containers for each concentration level.
The first part of the experiment is to make solutions of several different concentrations. The easiest way to do this is to make a very concentrated solution, then dilute it for your other solutions.
Grams of chemical = (molarity of solution in mole/liter) x (molecular weight of chemical in g/mole) x (milliliter (ml) of solution) ÷ 1000 ml
In our case, we choose to use 11,69g of salt for 1 liter of water (Environmental Inquiry, Cornell University and Penn State University. 2009. http://ei.cornell.edu)
- Have a look: NaCl properties in Wikipedia
We want to obtain, for this training, 0,2 mole of salt per liter of water : 0,2M NaCl
1. Start by preparing one liter of 0,2M NaCl solution
To do this, find the molecular weight (MW) of NaCl by adding the atomic masses of sodium (Na) and chloride (Cl). Since the atomic weight of Na is 22,99 and Cl is 35,45, the molecular weight of NaCl is 58,44. Now that you know the molecular weight, enter it and the molarity of the desired concentration (0,2M) into this formula to determine the number of grams of chemical you need.
that is: 11,69 g = (0,2) x (58,44) x (1000) ÷ 1000 ml/liter.
2. Prepare a series of beakers with decreasing concentration
Now, label a series of beakers with the following concentrations: 0,2M, 0,1M, 0,075M, 0,05M, and 0,025M. This is the beginning of your set up, each one will to de used to fill one marked plate containing 1 seed in order to have an experiment with comparisons
You already have 1 liter of 0,2M NaCl solution. We shall proceed by dilution.
Do not forget: Label each container: Control, Box 1: 0,2M ; Box 2: 0,1M ; Box 3: 0,075M ; Box 4: 0,05M ; Box 5: 0,025M
- 1st container: 100 ml 0,2M Nacl
- 2nd container: 50 ml 0,2M NaCl + 50 ml deionized water = 100ml 0,1M NaCl solution
- 3rd container: 37.5 ml 0,2M NaCl + 62.5 ml deionized water = 100ml 0,075M NaCl solution
- 4th container: 25 ml 0,2M NaCl + 75 ml deioniezd water = 100ml 0,05M NaCl
- 5th container: 12.5ml 0,2 NaCl + 87.5ml deionied water = 100ml 0,025M NaCl
- Control: 100ml deionized water
Carry out the bioassay:
- Treat the lettuce seeds in a 10% bleach solution (10ml bleach in 100ml deioniezd water) for 20 minutes, then rinse, with gloves (Do not touch seeds , No direct contact between the seeds and the skin of your hands) four times with deionized or distilled water. This kills fungal spores that can interfere with seed germination.
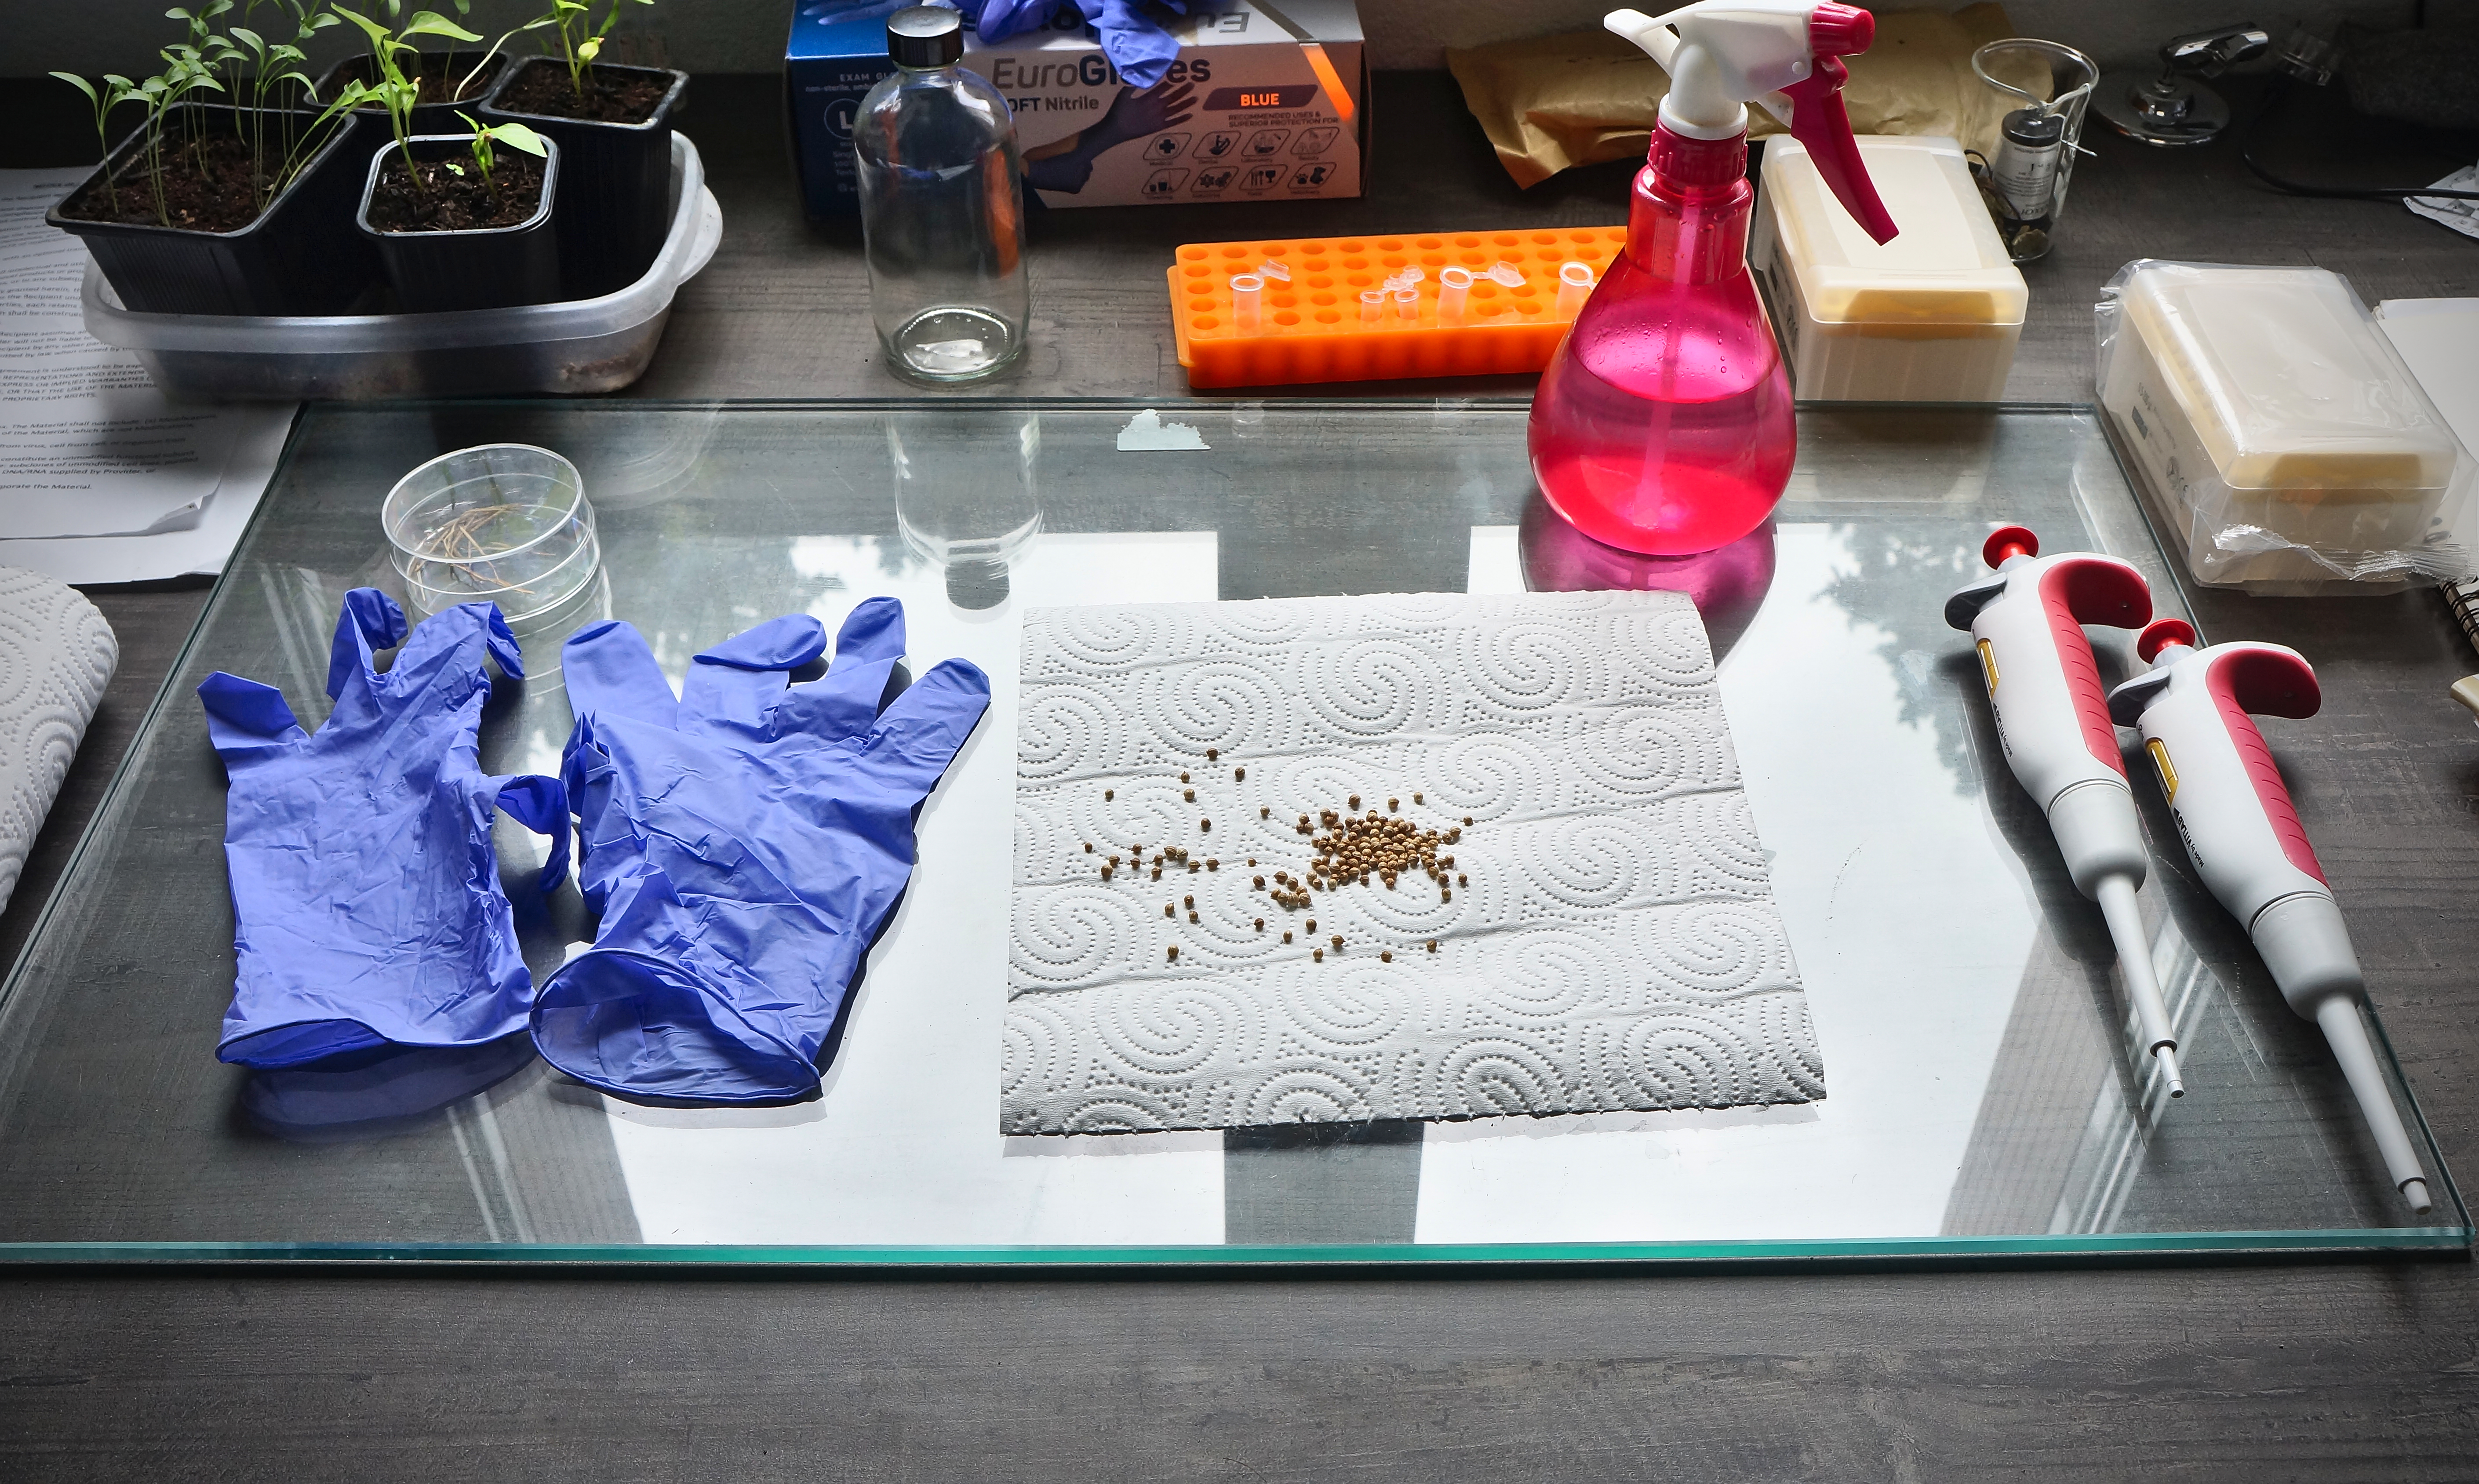
- Note 1: Surface sterilize radish seeds. Place a paper towel under a clean laminar flow. Sprinkle the seeds. Spray with a spray of 70% isopropanol on the seed area and the edges of the towel. Allow to dry until the towel moves freely with a finger. Repeat two or three times. Now your seeds are ready for your test!
- Note 2: Tap water can be used if you do not have access to deionized or distilled water, but it will introduce more variability into your experiment because of the varied minerals and other compounds it contains.

- Label the containers according to the column in the following table.

| DAY | Control | Box 1 | Box 2 | Box 3 | Box 4 | Box 5 |
|---|---|---|---|---|---|---|
| 1 | root cm | cm | cm | cm | cm | cm |
| 2 | root cm | cm | cm | cm | cm | cm |
| 3 | root cm | cm | cm | cm | cm | cm |
| 4 | root cm | cm | cm | cm | cm | cm |
| 5 | root cm | cm | cm | cm | cm | cm |
| 6 | root cm | cml | cm | cm | cm | cm |
| 7 | root cm | cm | cm | cm | cm | cm |
- In each container, place a 7.5-cm diameter paper filter to the inner.
- Note: Absorbent paper towels or coffee filters can be substituted for the filter paper, as long as they are not chemical processed . (The use of chlorine dioxide as bleach in the paper-making process, Bleached paper may contain dyes or chlorine.)
- To each shallow glass containers (or petri dishes), add 2 ml of the appropriate test solution. In the control container/dishes, use deionized water as your test solution.
- To shallow glass containers (or petri dishes), add 4 seeds, spaced evenly on the filter paper so that they do not touch each other or the sides of the dish.
- Place the shallow glass containers (or petri dishes), in a plastic bag and seal it to retain moisture. Incubate the seeds in the dark ( cupboard, for example) at constant temperature (preferably 24.5°c degrees or ~ ± room temperature) for 5 days (120 hours).
- Check them each day and record how many seeds have germinated in each container. Take notes, and, if you can photography
- At the end of this time, count how many seeds in each container/dish have germinated, and measure the root length of each to the nearest mm. Look carefully at the plants to make sure you are measuring just the root, not the shoot as well. Take photo if you can / want.
Write up the results, Analyze the data, Form conclusions
For this germination test, where we put, 4 seeds in a container and make daily inspections. At each inspection, we count the number of germinated seeds (and if we take pictures, we can have a history to compare morphological aspects).
What have we learned about the germination time of each seed? It is easy to see that we do not have a precise value, we only have an uncertainty range.
- Note: If you want to tweak your observation and results, you can use this formula: After incubation, germinated seeds were counted (
G) and root growth (L) measured. Germination index (G i) calculated:G i = G / G 0 x L / L 0 x100, whereG 0andL 0(radicle growth of the 100% dH2O control. en cm) are values, germination percentange, obtained using distilled water (control) andGis Number of seeds germinated per box
Let's take three examples.
- If we find a germinated seed at the time of the first inspection, we only know that germination took place before the inspection.
- If we find a germinated seed at the time of the second inspection, we only know that germination occurred somewhere between the first and second inspection (interval measurement).
- If we find an un-germinated seed at the end of the experiment
- we only deduce that either
- its germination time, if any, is longer than the duration of the experiment,
- or the conditions that we set up are not adapted to germination,
- or an error, a contamination, could have occurred.
- we only deduce that either
Visual (empirical) observation involves a great deal of uncertainty, which is added to other more common sources of uncertainty, such as individual variability from one seed to another or random errors in the handling process.
Moreover, as we have various environments of germination, with various dosages (here of salt NaCl) calculated and known, we can also carry out a description since our visual observation (increased by photographs if possible) for each type of environment.
Then to write a synthesis of graduated comparison (since the environment Control, then 0,025M NaCl until 0,2M NaCl).
| Box n° | number of seeds | Number of seeds germinated per box (G) |
Average Number of seeds germinated per box (Number of seeds / G) |
|---|---|---|---|
| Control | |||
| 1 | |||
| 2 | |||
| 3 | |||
| 4 | |||
| 5 |
Let's add a measurement with a double decimeter
Let's evaluate Root growth by measurements of taproot length, number of secondary roots formed.
(To go further we could also measure the fresh and dry matter mass. Actually for this training session it's not in the track (Understanding Root Systems to Improve, Seedling Quality. Silvana Nicola (1998). ; Waisel, Y., Eshel, A., Kafkafi, U., eds. Plant roots -- the hidden half (1991, 1996, 2002))
Form conclusions
To do this, we need to answer some questions, answers based on our experience and observations and results. Here is an indicative and general list:
- How many seeds germinated in each container?
- Did the seeds in the control container germinate faster than the others?
- Did the seeds in the control container grow longer roots than the others?
- Did a minimal concentration of salt actually aid growth?
- Can you determine what concentration impedes seed germination?
- What concentration is toxic enough that the seeds don't germinate at all?
(If none of your concentrations seemed to affect germination negatively, you might try the experiment again with more concentrated solutions.)
- Did your results support your hypothesis?
- Why or why not?
- What do your results tell you about the effects of salt toxicity on seeds and germination?
- How could you develop this project further to test the toxicity of herbicides or de-icing chemicals in your area?
Congratulations! You have implemented your first Bioassay, you have conducted a scientific experiment. Your training will help you to share your knowledge with others and also to go further in the investigation of water.
Acknowledgement & Thanks
@bhamster (Research Manager at Public Lab) ; Sebastian S. Cocioba (independent Researcher at Binomica Labs)
External resources
- Big Chemical Encyclopedia, Seed Bioassay & Seed bioassay germination
- Bioassay Test for Toxicity Learning Center Home Science Tools
2 Comments
Please tell me if this is correct. Is a double decimeter also called a ruler calibrated in centimeters?
Is this a question? Click here to post it to the Questions page.
Thank you @Ag8n for pointing it. Yes, it is. I wrote it in the list. I hope the upcoming images will help illustrate the documentation more clearly.
Reply to this comment...
Log in to comment
Login to comment.