Wednesday night I started from scratch (piles of 3D printed parts, electronic components, and other hardware) and built the sixth and final Saturn V Rig with SkyShield v0.4. The other five have been shipped to beta testers who have started to report. It took about six hours to get it working, from soldering the SkyShield to lacing the Picavet. On Thursday, I put it in the air.
.

I was thinking of printing all of the Saturn V Rigs from this color filament, but now the supplier is out of stock. Check out the availability of these rigs for beta testing at The KAPtery.
.
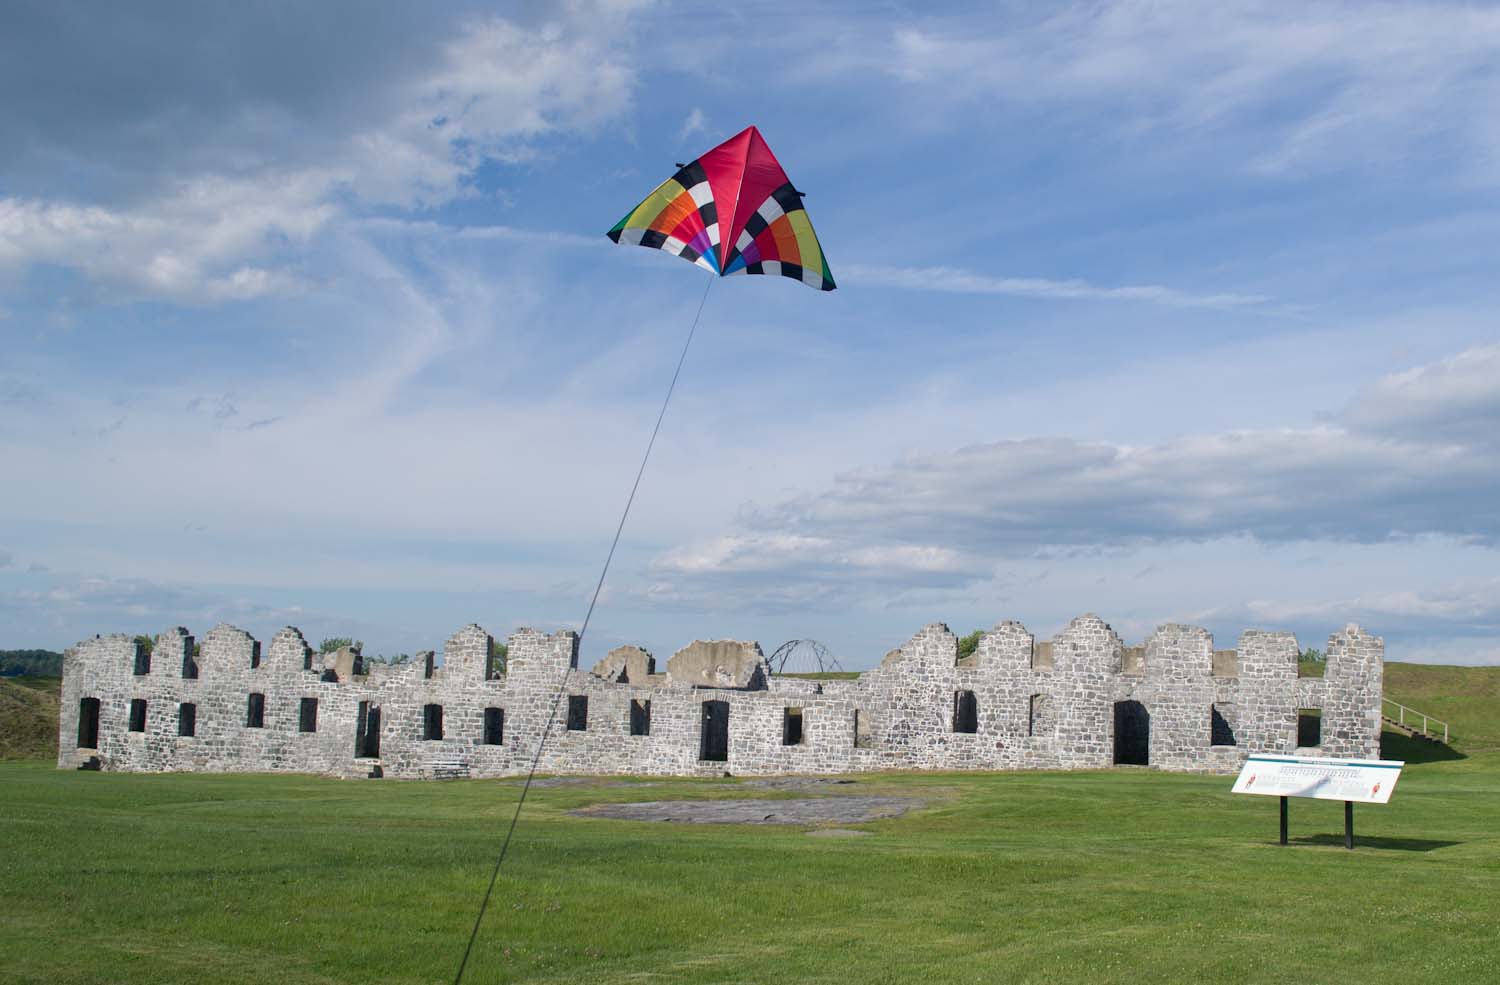
I flew the Levitation Delta over the British Fort at Crown Point, NY across Lake Champlain from Vermont. The British began construction of this fort in 1759 when they expelled the French from the adjacent Fort St. Frédéric. It is one of the largest British forts in America and controlled traffic on the water route between Montreal and Albany, NY.
.

An advantage of autoKAP over radio control is that all you have to do is fly the kite. And sometimes take photos.
.
The wind was fairly steady, so sometimes the rig stayed in more or less the same place for the time it took for the SkyShield autoKAP controller to signal the PowerShot S100 to take 32 photos in different directions. I used a shooting regime that panned 360° in eight steps and took a photo during each pause, and repeated that at four different tilt angles (Mode 0). The lowermost angle was pointed straight down. It takes about a minute and forty seconds to complete one cycle. The flight lasted an hour and 1159 photos were taken, so about 36 complete pan/tilt cycles happened. There was still room for 100 more photos on the 4GB SD card, and the S100 battery was at 56%.
.

Summer in Vermont (New York).
.
I asked Microsoft ICE to stitch together the 32 photos from a few different full cycles but it never figured out the uppermost row which was mostly sky. So I gave ICE just the 24 photos in the three lower rows, and on the fourth or fifth set it included them all in a half spherical panorama. As usual, the horizon has lots of stitching errors. There is nothing that can be done about that in ICE, although other programs allow manual correction.
.
Chrome no longer supports Silverlight which is required to view Photosynth embeds properly. For the full experience you can use another browser. Viewing the panorama at Photosynth helps a little.
.
After the S100 was retrieved, I flew a PowerShot A2200 on the same rig for 30 minutes. The A2200 had a Wratten 15 filter replacing the internal IR block filter. The A2200 lens (28mm eq.) is not as wide as the S100 lens (24mm eq.) so I used a different pan/tilt regime. It was really hard to see which LEDs were lit, but I think I selected Mode 2 which has nine pan steps and five tilt angles. After ICE stitched together the four lower rows of one pan/tilt set (36 photos), I used Photoshop to swap the blue and red channel to make a false color IR image of the panorama.
.

Thirty-six of the bluish photos from the Wratten 15 camera were stitched in ICE, and the resulting half spherical panorama (projected as a flat image) was put into Photoshop to swap channels and make this false color IR image. The ramparts and banquette are not as red as the lawn and fields because the rank herbaceous vegetation had just been cut and was lying dead on the ground.
.
If I make CIR images from each of the 36 individual photos of this pan/tilt set, I can try to stitch them in ICE so the CIR panorama can be viewed at Photosynth.net in the nice spherical viewer (done!).
I am really pleased that the Saturn V Rig and SkyShield worked as intended. In addition to selecting all the CHDK variables and setting all the camera functions, the rig itself has a lot of moving parts. So there is a very high number of potential failure points. That number will decrease as the design improves, but I think the secrets to success with this rig will always be practice and luck.
There is more information about the development of this rig at the KAPtery.
.
.
Technical Notes:
PowerShot S100 settings
ISO: 125 (raised from 80 to keep the aperture smaller)
Top dial: “C” (custom settings saved, including some of those below)
Shutter: Shutter priority at 1/800 seconds
Aperture: determined by camera, varied between f 2.8 and f 8
Focus: manual, locked at infinity
White balance: sunny
Image stabilization: off
GPS: off
Review: off
LCD brightness: 2 (out of 5)
Focus assist light: off
CHDK: used only for remote shutter via USB (One-push, Quick)
ShyShield: used Mode 0 which is the slow version of the 8x4 (pan/tilt) regime. The shutter was triggered about every three seconds, and I have not noticed that any shots were missed.
.
PowerShot A2200 settings
ISO: 80 (higher ISO on cheap PowerShots introduces noise)
Top dial: “P” (Program mode, which makes some manual settings possible)
Shutter: I forgot to use CHDK for shutter priority, so the camera selected the shutter speed. It did an excellent job, and most shots were 1/400 to 1/1000 second (with the aperture wide open at f 2.8). However, some shots had slower shutter speeds (1/200 second) and are definitely blurry.
Aperture: determined by camera, mostly f 2.8 except when the camera decided to use a slow shutter speed.
Focus: infinity mode (auto focus that never searches for focus closer than 10 feet away)
White balance: custom on red origami paper in direct sunlight
Image stabilization: NA
GPS: NA
Review: off
LCD brightness: 2 (out of 5)
Focus assist light: off
CHDK: used only for remote shutter via USB (One-push, Quick) because I forgot to turn on shutter priority
ShyShield: used Mode 2 which is the slow version of the 9x5 (pan/tilt) regime. The shutter was triggered about every 3.3 seconds, and I have not noticed that any shots were missed.
0 Comments
Login to comment.