PurpleAir monitors measure particulate matter (PM), both PM2.5 (fine particles) and PM10 (coarser particles). They can also connect to a local wifi connection, allowing for remote access of data, which is particularly useful for long-term monitoring.
See the PurpleAir Installation Startup Guide for more info.
What you need:
- PurpleAir monitor
- Reliable power
- A reliable wifi connection and access to the wifi
- Zipties or some other fastening device
###How to Install the Sensors:
(1) Put the sensor in place. There are a few requirements for physical sensor placement:
- The sensor can be plugged in to a power outlet,
- The sensor is protected from the weather by being placed top-side up (the PVC dome needs to keep the internal electronics mostly dry,) and
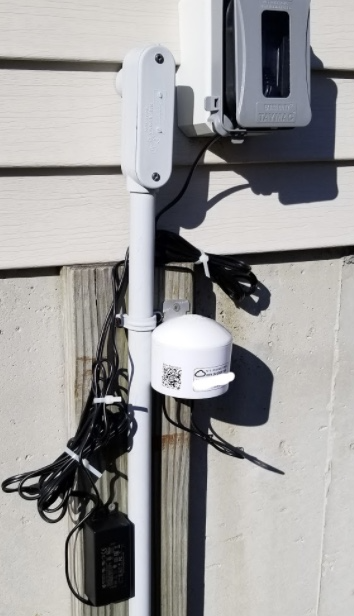
- That the sensor is exposed. Ideally the sensor will be elevated away from any surface below the sensor, and away from any foliage or local sources of pollution such as a car exhaust or a BBQ grill. The bottom of the instrument cannot be sitting on a surface, and air has to be able to flow beneath it, as shown in the photo above.
(2) Power the device. The sensors have a top and bottom. The top is a PVC dome and the bottom has a small microUSB plug that is installed on the side of the two monitors (blue). Attach the cord to the device and plug it in. Be careful with the microUSB plug, as it can break off in the unit if not handled carefully.
(3) Set up communication. The device communicates with other devices by Wi-Fi. For the device to communicate with the Wi-Fi network at your home, use a phone or laptop to first connect to the new PurpleAir Wi-Fi network. Then, select the home Wi-Fi network you want the PurpleAir to connect to. Detailed instructions are as follows:
- Connect another wifi device (like your phone or a computer) to the sensor: The sensor has a wifi network of its own called "PurpleAir-xxxx). Connect to this network with your phone or laptop. It does not require a password but you may need to disconnect from any other Wi-Fi network to do so. (You can reconnect to your home Wi-Fi network again, after you set up the monitor)
- Connect the sensor to a home Wi-Fi network. The sensor must be connected to a Wi-Fi network in order to work. Once you connect to the PurpleAir-xxxx network, a window will come up. Select your home Wi-Fi network. This step will require you to enter the wifi password, so have that handy.
- The machine is running. That's it! Now, your sensor works, but a few steps remain to collect the data in the Purple Air database.
Registering the sensor
- Reconnect your phone or laptop to your home Wi-Fi network so you can use the internet. Then, using a web browser go to the registration website at www.purpleair.com/register and input the following information:
- Device ID: The MAC address is printed on the PurpleAir sensor by the barcode.
- Associated Email: This is the email address for the person who bought the devices.
- Installed inside or outside. Check the appropriate box, depending on if you have put it outside or inside.
- Location Name: The location name appears on a public map and will be useful to know that the sensor is ours but not too much information is needed. For instance, Public Lab 001.
- Visibility. Set to "public" so we all can see the data.
- Set a location on the map. The website will then ask you to select the point on the map where your device is located. Instead of putting the exact location, in order to protect the privacy of volunteers, place the location in the middle of the river closest to where the sensor is deployed.
- Data processor: (Optional) Share your data from one of the sensors with WeatherUnderground so that it can be used by citizen scientists.
- Device Owner Information. Include the email address for the owner of the device.
- Check the box and hit register.
2 Comments
Location
Most protocols require that the unit be installed 2x to 4x as far, from the highest, closest structure. However, Purple Air's form factor seems to be designed to attach to a building--and, having lost and damaged several units that were established independently of buildings --mostly through lawnmowers--I must agree.
Similarly, most protocols call for units to be 30m away from roads (unless you are measuring traffic pollution) . This is a bit absurd for a household unit, because most people live on roads, but don't own or rent that much land.
Having compared a few units in St John Parish with different proximities to roads, road pollution is recognizable as regularly and generally elevated readings from 7-9am, as well as 4pm-6pm. (i.e., not usually spikes, per se, but a significant general increase during particular times for heavier traffic). I should work to document this in St John Parish.
I will site the unit on a corner of the building that is facing the pollution source you are most interested in learning about, and try to avoid any part of the building closest to traffic. This usually gives 270 degrees of airflow and limits traffic pollution in the readings, without situating the unit contrary to its design--which inevitably leads to loss of data and even destruction of the unit.
Reply to this comment...
Log in to comment
P.S. I dig your photo. I have independently come to the solution of mounting the unit to wood that is stuck into the ground. This is alright for short term applications where the homeowner wants as few holes in their vapor barrier as possible.
Recognize that wood in the ground can be a vector for termites and rot, but usually, purple air deployments are short term enough to avoid those concerns. If the homeowner is concerned about such, metal flashing, or distancing the wood mount slightly away from the building structure avoids the moisture connection.
Reply to this comment...
Log in to comment
Login to comment.