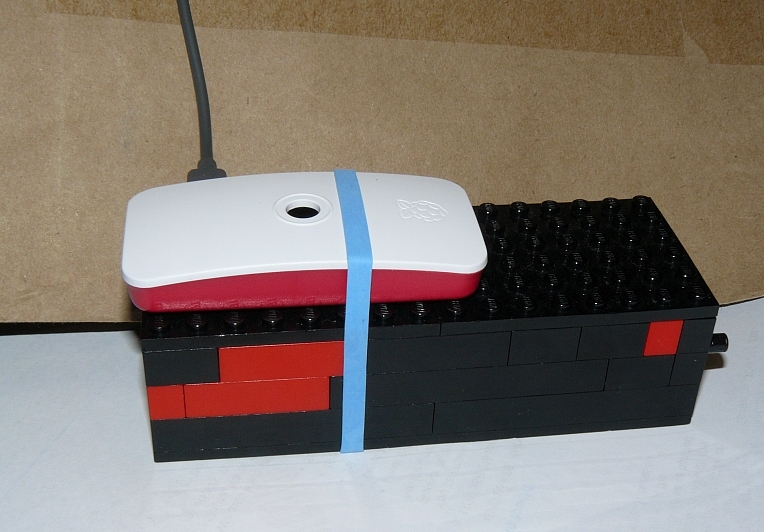
Sorry about the ridiculous thumbnail - I assumed it would be reduced!
I used the instructions provided for the build phase.I raided the (grown-up)
kids Lego(tm) trove for the pieces and now have a tasteful red and black
Lego(tm) spectrometer.

- I have a set of Publiclab acetate collimation slits, and I'm currently using a 0.12mm slit which is the second narrowest in the set.
- I had a mini/phone paper spectrometer, so I cannibalised that for a Grating mount and liner. The liner is a necessary part, as I noticed a good deal of flare when testing (with an LED torch).
Hardware: Raspberry pi zero wifi version and the v2 (8M pixel) picamera.
Software:
Raspbian Stretch - updated regularly - using the Core-electronics and
Publiclab install notes, and RPi Cam Control v6.4.21, via a direct HTML
interface. I have changed the default settings very little - just a
90degree rotation and turning on titles. I will try out the cedarlodge
GUI when I organise a usb mouse/keyboard combo.
Below is an image for the CFL calibration test. I'm reasonably pleased at this result.
However, the image looks a little out of focus, and I would like to improve this - would a longer body (more Lego(TM)) help?
 Followed

11 Comments
This is the best. Thanks for posting, and great documentation!!! 🎉 😀 👍
Reply to this comment...
Log in to comment
I think you can use a very fine pair of tweezers to slightly rotate the Pi Camera lens for a focus change. Do post if that works for you! But yes, a longer lego case may also work. I would like to know if focus changes are needed, though, as we can modify the kit or instructions. Thanks!
Reply to this comment...
Log in to comment
Hello! Nice work on the raspberry pi version of the spectrometer!
A question, for @Warren , does PublicLabs provide the NoIR version of the Camera? I'm currently working on this spectrometer for my college's Civil Engineering department. We originally started with the webcam, but found its limited range unhelpful for our desired applications (testing for metals in drinking water). As such, we've switched to a NoIR Raspberry Pi Camera which seems to be working alright (assuming I can replicate what was done up above. I didn't know there was a control program!). I was just wondering whether or not PublicLabs provides that specific camera in their kit.
Is this a question? Click here to post it to the Questions page.
Reply to this comment...
Log in to comment
We don't by default but probably should list that option as we do stock them. Can you email kits@publiclab.org to place an order?
Is this a question? Click here to post it to the Questions page.
Reply to this comment...
Log in to comment
I bought one independently, though I do recommend that you offer that option. The stark contrast between the webcam's spectrum range and the NoIR Raspicam's is striking.
Reply to this comment...
Log in to comment
OP again. Mine is the standard (IR filtered) V2 camera, as I wasn't sure how the software would handle the non visible end. I've started investigating the focus issue and find that its quite a topic (thanks @warren) https://www.raspberrypi.org/forums/viewtopic.php?f=43&t=145815&start=200 and my version (2.1) is affected most - the lens has to be loosened and then it can be adjusted. Solutions are;
Is this a question? Click here to post it to the Questions page.
Reply to this comment...
Log in to comment
OP Focus tests completed, with and without grating, and both show out-of-focus problems at all distances from about 80mm to over a meter - which is a little disappointing, but hopefully solved by the key I've ordered.
Reply to this comment...
Log in to comment
That's too bad - we can possibly start shipping keys with these if this affects everyone. A meter is pretty bad! We couldn't lengthen the case that much...
Reply to this comment...
Log in to comment
OP check in. The focus tool arrived - its very simple, easy to use and ... works.
Quite effective. Before focus on left, after on right. The only other change was a quick clean-up of the DVD grating with isopropyl alcohol. The improvement is actually better than the reduced size image suggests. Recommended.
Reply to this comment...
Log in to comment
Awesome 🎉 did you find that the lego piece also worked? Obviously we have legos in the kits already 😛
But if not, we can run off a large # of the adapters and put one in each. Thanks so much! Would you be willing to post a new note with a few more photos illustrating the lens focusing steps? The comparison is very encouraging!
Is this a question? Click here to post it to the Questions page.
Reply to this comment...
Log in to comment
HI @warren I did not try the Lego hack, as I had no details of what to do and I had the key on order. No pics as I had my hands fully occupied.
I adjusted the lens in situ, just removing the top and a few blocks for access. You have to remove the DVD grating too, of course. Getting the key on the lens surround is a bit fiddly but once the lugs are aligned the adjustment is easy.
I left the cam connected and the camera image up in the RPiCam web page so I could see the effect of changes. I adjusted about a quarter turn at a time, because there's a slight lag getting to the web image.
I held a pen at about 80 mm from the lens (that's the approx distance to the collimation slit) and once it looked in focus, I cleaned the grating and rebuilt. As you can see, quite an improvement.
Reply to this comment...
Log in to comment
Login to comment.