Introduction:
In this manual, I would like to include the necessary information on the devices and software that I have worked with and to share my understanding and approach to fulfill the goals of this project. I also split the contents into different sections for different parts of the device.
IC
board & TI Lauchpad:
We
start with the WheeStat kit from Smoky Mountain Scientific. The kit has
built-in functions for electrochemical analysis, e.g., cyclic voltammetry, differential
pulse voltammetry, chronoamperometry, etc. It comes with a self-designed IC
board and a TI Lauchpad EK-TM4C123GXL. The IC board has the necessary circuit
for our experiment, e.g., the current emitter follower, the voltage emitter follower,
a few noise filters, etc. Also, it is designed to work with several types of voltammetry,
so it is possible to redesign the circuit to make it smaller and cheaper.
Unfortunately, due to the lack of knowledge and time, I wasn't able to fully
understand the mechanism of the IC board. Therefore, we will leave this to someone
who specializes in circuit design in the future.
The TI Lauchpad is originally an interface between the user and the IC board. It takes inputs from a computer, e.g., the type of voltammetry, the starting and ending voltage, the steps, the current gain, the scan rate, etc. Then, it sends the corresponding signals to the IC board and collects the output (the analog voltage and current reading) from the IC board. On the Lauchpad, we notice there is a switch at the corner. We need to make sure the switch is on the debug mode and we are going to use the micro-USB port right next to the switch.
Energia:
The programming language used on the Lauchpad is called Energia which is based on Arduino. To install it, we go to their website and download the software. We need to make sure the name of the file with the main functions (setup() and loop()) matches up with the name of its parent folder so Enegia would open the entire project correctly.
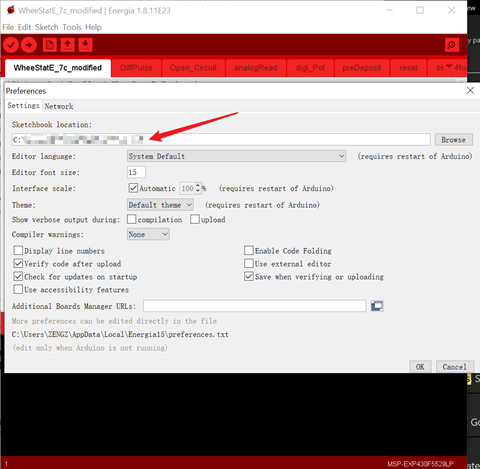
To compile the source code from WheeStat, we also have to introduce an external library called altSPI. It is a bit tricky to include external libraries in Energia so I will provide the steps below:
1)

Go to
File->Preference. The sketchbook location is provided at the top.
2) Go to this directory and create a folder called "libraries" if not already exists.
3)
Put
the altSPI folder inside the "libraries" folder we just created.
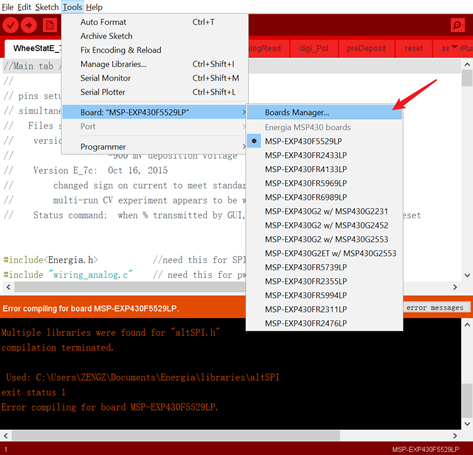
Another issue we might encounter is the software doesn't choose the correct board automatically. For our TI Lauchpad, we need to go to Tools->Board->Boards Manager. Then, we search for "TivaC" and install the "Energia TivaC boards". After these steps, we can try to verify the code and it should successfully compile. At this point, we can connect the Lauchpad to our PC and upload our code.
During this summer, I cleaned up the original Energia code from WheeStat to make it more readable and to get rid of the features that we don't need. The modified version has 8 classes and I will briefly explain what each class does.
1) analogRead: This class provides the current and voltage analog read function. Since the output of the Lauchpad represents the current and voltage in scale, we need to convert the scaled values into human-readable values.
2) DiffPulse: This class provides the differential pulse method for stripping voltammetry. However, it only sweeps the voltage in one direction without closing a loop. Therefore, we still need to modify this method or create another class to accomplish the full cycle for stripping voltammetry.
3) digi_pot: This class sets up the digital ports according to the resistors used on the IC board. We need to modify it if we come up with a new IC board design in the future.
4) Open_circuit: The name of this class is misleading. Instead of measuring the open circuit potential, it cuts off the current after each run.
5) preDeposit: This class provides voltage to deposit the metal ions onto the electrode.
6) reset: This class could reset the Lauchpad when needed.
7) setupRun: This class deals with the serial connection between the Lauchpad and the external device. It reads and stores the input parameters.
8) WheeStatE_7c_modified: This class contains the main functions. It integrates the classes mentioned above and calls the functions when needed. After the clean-up, it has two features which are the stripping voltammetry and open circuit potential measurement.
The behavior of the Lauchpad follows the code very well. However, the voltage on the electrode sometimes doesn't seem to be reasonable. For example, we measured the voltage across the working and counter electrode without putting them in solution or starting any experiment. The result was 14V whereas we set it to be 0V in the code. We haven't resolved this issue yet, but we suppose that it originates from the IC board because the output pins on the Lauchpad work as expected.
Python & Machine Learning:
The original analysis code is written in Processing which is a programming language based on Java. Since our ultimate product will use machine learning to optimize the parameters, the user doesn't need to see the graphical interface of our analysis software. Therefore, I choose to rewrite it in Python so we can integrate it with any ML algorithm easily. There are three classes so far:
1) connect.py: It uses the Pyserial library to set up a serial connection. It can send the parameters to the kit and reads the experiment outputs with the correct format.
2) dataTools.py: It is very empty now, but this will be an interface between the ML algorithm and the control code in the future.
3) Main.py: It contains the main function to run the program.
Also, we are missing a class to set up a Bluetooth serial connection because we can't make the Bluetooth work on the raspberry pi.
In stripping voltammetry, the two most important parameters are the scan rate and the current gain. We usually adjust them manually in the chemistry lab. In our project, we use a ML algorithm to solve this problem. We will use the convolutional neural network to find a relationship between the values of the input parameters (the scan rate and the current gain) and the goodness of the output datasets. Also, we want the software to adjust the input parameters accordingly to get a better output. However, we are not able to come up with a trained model because of the lack of datasets.
In the end, we will transfer the Python control code and the trained ML model to a raspberry pi. Therefore, the user could connect to our kit through Bluetooth. And our kit can conduct the experiment and analyze the data by itself so that anyone can use our product without any prerequisite knowledge in science.
Raspberry Pi:
We use a RPI (raspberry pi) as another interface to make our kit more user-friendly. The first step is to install the operating system. The official RPI website provides a handy tool called "Raspberry Pi Imager". I choose the Raspberry Pi OS Lite because we don't need the graphical interface. However, lots of the python libraries and packages must be installed manually for this lite version. We also need to use the SSH connection to communicate with the RPI and it requires the RPI to connect to a WIFI in advance. I will show the tutorial below:
1) Go to the SD card directory after the OS is installed.
2) Create an empty file called "ssh" and save it.
3) Create another file called "wpa_supplicant.conf" and paste the related scripts from additional information into it.
4) Modifies the country code, network name, and network password and save the file.
5) Boot the RPI and wait for a few minutes.
6) Find the IP address of the RPI.
a) Use "Angry IP Scanner" on Windows or Mac.
b) Log onto the admin page of your router and find which devices are connected.
7) Open any SSH terminal on your PC and use the IP address to connect to the RPI. The default password the "raspberrypi".
We can easily transfer the files through SSH connection by using the "scp" command. The last thing I want to mention is the Bluetooth setup. Though I still couldn't make it work after desperately trying to solve the issue, I would provide the link with expected instruction: https://scribles.net/setting-up-bluetooth-serial-port-profile-on-raspberry-pi/. My issue was that I could pair the phone with the RPI successfully, but the connection dropped after 1 or 2 seconds every time. And my suggestion is to install the full version of Raspberry Pi OS. Then, we can try the Bluetooth tool in the graphical interface.
Conclusion:
This manual includes most of the handy resources which I have used and some of them take a long time to find. So, I wish it could help people who want to reproduce these steps or to develop this project. It also has a few unresolved problems and we welcome anyone's suggestions. Last but not the least, I would like to thank Jose Castro and Advanced Water Testing for providing such a great opportunity, and it's a pleasure to work with you.
Additional Information:
wpa_supplicant.conf
country=US
ctrl_interface=DIR=/var/run/wpa_supplicant GROUP=netdev
update_config=1
__
network={
ssid="NETWORK-NAME"
psk="NETWORK-PASSWORD"
}
Reference:
https://www.smokymtsci.com/project
https://www.ti.com/tool/EK-TM4C123GXL
https://desertbot.io/blog/headless-raspberry-pi-4-ssh-wifi-setup
https://www.raspberrypi.org/documentation/remote-access/ssh/scp.md
https://publiclab.org/notes/JSummers/07-04-2014/getting-your-wheestat-set-up

0 Comments
Login to comment.