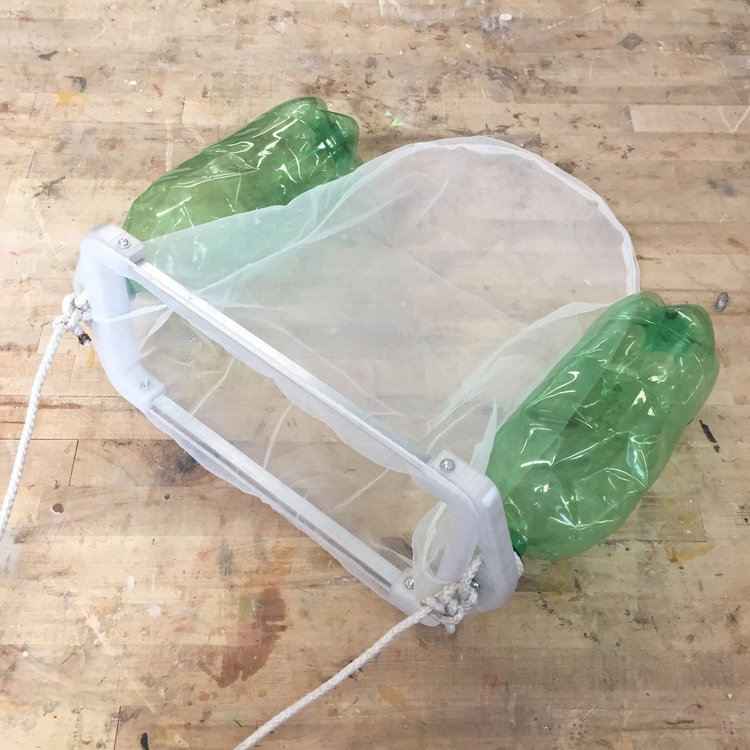
The Trawl
The Re3DP Trawl is a DIY Trawl for Citizen Scientists to begin testing for plastic pollution in local waterways. Once the Trawl is assembled it can pulled behind a boat, dangled from a bridge or towed along the shoreline. Pollution collected can be shared to the TestingOurWaters.net website to help identify the source of pollution and ideally prevent it from entering the water in the first place. The Re3DP Trawl is made from repurposed PETE plastic beverage bottles, framed by a 3D Printed Connector, preferably printed using recycled or reclaimed filament (made from either recycled PETE plastic beverage bottles, or reclaimed fishing nets) an inexpensive filter used as a net, and various screws and hardware holding it all together. Our trawl can be assembled for around $15 and the necessary materials include: 2 3D printed connectors (preferably using recycled plastic filament)
Use the source CAD file from Fusion360 or the STL file to 3DPrint the Connector. Re3DP Connector Fusion360 FileRe3DP Connector STL File 2 two-liter bottles (preferably recycled/from post-consumer waste stream) 6 screws 6 nuts 8 washers 1 net 2 frames (12" Length x 1/8" Thick x 1/2" Wide) 1 net (20' suggested at a minimum)
A full list of all the materials and link to where to buy them is here: Re3DP Bill of Materials.
Recycled PETE 3D printing filament for the 3DP connectors available from 3DBrooklyn.comRecycled Fishing Nets 3D printing filament for the 3DP connectors available from Fishy Filaments.
Assembly
Step 1: Inspect 3DP Connector 
- Remove any support material
- Clear frame cavity on 3DP connector
- Clear net groove on 3DP connector
- Clear bottle cap cavity on 3DP connector
- Clear frame attachment hle on 3DP connector, repeat 1x
- Repeat entire process 1x
Step 2: Drill Hole into 2L Bottle Cap 
- Insert bottle cap int 3DP connector
- Use hole in 3DP connector to determine where the hole location should be in the bottle cap
- Drill ⅛" hole into bottle cap
- Repeat process 1x
Step 3: Secure Bottle Cap into 3DP Connector 
- Insert screw through washer and 3DP connector into bottle cap hole
- Insert washer and nut under bottle cap onto screw
- Tighten screw
- Repeat 1x
Step 4: Assemble Frame - First Time 
- Insert aluminum frame into 3DP connector
- Repeat 1x
- Attach remaining 3DP connector into the 2 frames already attached to the first 3DP connector
- Ensure that bottle caps are on the same side
Step 5: Drill Hole into Frame 
- Use hole in 3DP connector to determine hole location on frame
- Remove frame from 3DP connector
- Drill ⅛" hole in frame
- Repeat 3x
Step 6: Assemble Frame - Final Time 
- Insert aluminum frame into 3DP connector
- Repeat 1x
- Attach remaining 3DP connector into the 2 frames already attached to the first 3DP connector
- Ensure bottle caps are on the same side
Step 7: Assemble Net 
- Arrange net on net groove around 3DP connector
- Align net seams besides bottle caps
- Insert net through center of frame
Step 8: Secure Frame and Net 
- Insert screw through washer and 3DP connector
- Puncture net with screw
- Insert screw through net
- Thread nut onto screw, securing the net
- Tighten screw
- Insert nut into hexagonal nut cavity on 3DP connector
- Tighten screw completely
- Repeat 3x
Step 9: Screw 2L Bottle onto Bottle Cap 
- Remove beverage label (to ensure it will not detach during trawling)
- Clean bottle
- Remove bottle cap ring (if still attached)
- Screw 2L bottle into 3DP connector
- Repeat 1x
Step 10: Tie Rope onto 3DP Connector 
- Cut rope to desired length
- Seal end of rope (using flame, glue, a crimp, etc) this is to make sure it does not unravel and no fibers get into the water
- Tie rope through holes in 3DP connector (double square knot works well)
- Repeat 1x
Step 11: Go Trawl! 
- Put trawl in water: Behind a boat (at a speed of 4 knots or less), Over a bridge or pier, Along a shoreline
- Record your results: Process your findings: RE3DP example, Alternative Example
- Analyze the plastics: Basic, Forensically
- Take lots of pictures and Document your results!
0 Comments
Login to comment.