Note: this system has been found to have some cross-reactivity when other VOCs are present that might artificially inflate results. This method is can be a good general indicator of your formaldehyde exposure but as it requires individuals to buy a box of tests its not recommended for those that are interested in a single low-cost test. For more information on cross contamination see this research note: https://publiclab.org/notes/gretchengehrke/10-07-2015/formaldehyde-measurement-testing-public-lab-s-kit-with-doh-s-equipment
###What I want to do
I am in pursuit of an inexpensive means of testing formaldehyde levels down to very low levels. The most common way that formaldehyde is inexpensively measured is by way of a passive sampler ($39 plus shipping both ways) that is placed in a room for 24 hours and then sent to a lab of analysis. This advantages of such a method are that they have no moving parts, are very easy to use, they can detect formaldehyde down to 3 parts per billion, and the results are produced by an accredited lab. The disadvantages are that the samples can become contaminated in during shipment back to the lab, they demand extended sampling time, and rely on black-boxed expertise and expensive instrumentation.
Much of the cost is a result of the expensive lab equipment and expert analysis. Fifty or so dollars (including shipping) can feel prohibitively expensive for those in precarious financial situations, which are the populations that face the wost exposures due to poor housing conditions. Consequently the interests of environmental justice and open science both point towards a method that avoids the costs and other shortcomings of the send-it-to-the-lab paradigm.
Last year a paper was published in the journal_ Indoor Air_ that outlined a very low cost testing method. In their study they conducted 70 formaldehyde tests for approximately $500, which yields an average cost of $7.14 per test. The sampling method utilizes a colorimetric detection tube and a hacked aquarium pump as a vacuum. In the study they validated both the readings of the formaldehyde tubes and the flow rate of the pump. The paper is available here and the citation is below.
Dannemiller, Karen C., Johnna S. Murphy, Sherry L. Dixon, Kelly G. Pennell, Eric M. Suuberg, David E. Jacobs, and Megan Sandel. "Formaldehyde Concentrations in Household Air of Asthma Patients Determined Using Colorimetric Detector Tubes." Indoor Air 23, no. 4 (2013): 285--94. doi:10.1111/ina.12024.
The lead author, Karen Dannemiller, has been very helpful in talking me through how to modify the aquarium pump and how to monitor the flow rate of the air flowing through the system. Every morning before they would conduct their testing they would measure the flow rate with a $1000 flow meter. Karen recommend the less expensive flow meter that I use below but also cautioned that perhaps a more accurate flow meter should be used to double check the values of each meter.
###My attempt and results
I used the following in my attempt:
- 1 Kitagawa 710 Formaldehyde tube (1 box of 20 tubes costs $129 + shipping).
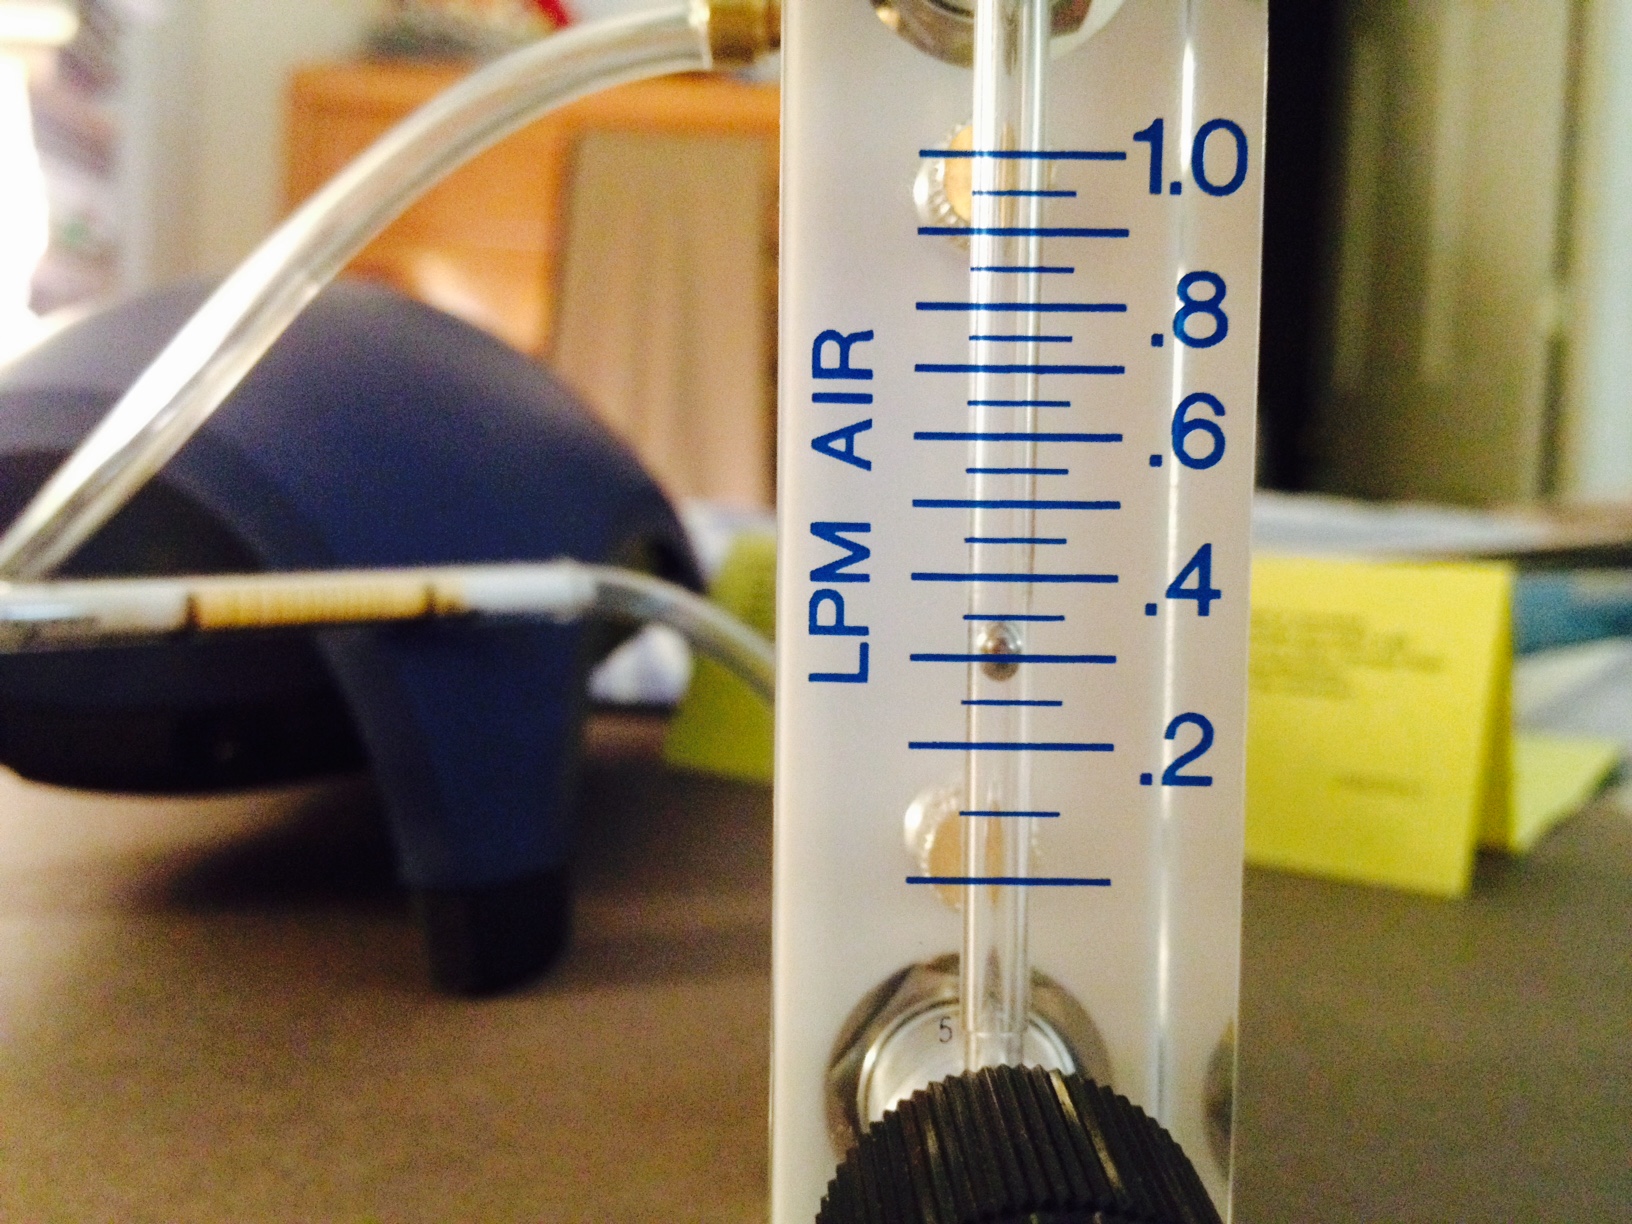
- 1 VWR FLOW METER ACR 2IN.1-1LPM ($74.62 + shipping).
- 1 Tetra 77855 Whisper Air Pump, 100-Gallon ($19.22).
- 2 small segments of ordinary aquarium airline pump (very inexpensive).
- 2 1/8-27 MPT to airline conversion valves ($4 for two).
(Note: this technique will also likely work with the 740 NO2 tube, just dial the air flow down to 200 ml per minute and run for 20 minutes as opposed to 30 at 300 ml/min for formaldehyde.)
The first step is to reverse the diaphragm in the pump to convert it to a vacuum. Open up the four Philips head screws on the belly of the pump. Lift up, rotate 180 degrees, and then replace the diaphragm as indicated in the below GIF.

Attach a small segment of airline tubing from the pump to the top of the flow meter (which you have equipped with the conversion valves at both openings) and then attach another small section of tubing to the bottom of the flow meter. You will have three points where you can adjust the flow rate (the meter, and both conversion valves). Open all valves to their most open--while still sealed--position. Once you've started the pump, use the large valve on the flow meter to regulate the flow rate down to .3 liters per minute (or 300 ml per minute).

Using the heart-shaped scoring stone included with the tubes, score and then crack off both ends of the tube so that airline tubing can snugly attach. Attach the tubing so that the "HCHO ->" arrow is pointing in the direction that air is flowing (ie towards the pump). Set an alarm for 30 minutes (don't just look at the clock and hope you will remember). Place the kit on a level surface at least three feet above the floor and plug the pump in and start your timer.
After 30 minutes turn off the pump and inspect the length of stain by eye and take a photo of the tube in medium light with a black background. The reagent in the tube will begin with a yellowish waxy color and will discolor to pink to indicate the level.

In my preliminary test of a room that had been renovated 20 years ago, in a old somewhat drafty house, I found .01 ppm or 10 ppb. The thermostat was set to 69 degrees F, which corresponds to 20.56 degrees C, which gives us an actual formaldehyde concentration of **9.85 ppb. ** Which is about average for a US conventional home.

This test cost over $230. But over the course of the entire box of 20 tubes the average test price will drop down to $12.10 (+ the shipping costs of all the parts) and as we continue to use the flow meter and pump for many boxes of tube the average cost will continue to drop. This method becomes very cheap if a large number of tests are required as each formaldehyde tube, which is the only one-time-use part of the system, costs $6.45. Setting up a system to share the pump and flow meter will make this method readily affordable and concerned people will be able to take four tests of their home at different times of day (to understand the dramatic oscillation of formaldehyde in a home due to temp and humidity changes) for the same cost as a single formaldehyde badge. Results from this method are immediately available, whereas the results from the badge are delayed by 2-3 days of shipping and 2 days of analysis.
This method only requires a short duration of testing and doesn't require external lab analysis (which adds the possibility of contamination during return shipments). The detection limit is 5ppb which is 2 ppb higher than the badge method described above. Both detection detection limits (the lowest concentration that the kit can detect) are below the ATSDR Minimum Response Level for chronic (greater than 1 year) formaldehyde inhalation, which is of 8ppb (.pdf), and therefore seem to be able to document formaldehyde down to a concentration that is not likely to cause any non-cancerous health effects in humans. I would suspect that this level is lower for companion species, but the Canary Database doesn't have any entries for formaldehyde.
You can see how your sample compares to various regulatory standards by entering your findings into the report generator at http://www.myairsample.org/
###Questions and next steps
If you do find elevated levels of formaldehyde, then you could think about remediating you air. We've begun development of our remediation kits here. Longer term solutions include identifying the source(s) and removing them which may be very costly and the sources may be the very structure of the home itself in the form of pressed woods.
- Obtain many aquarium pumps and access to a high quality digital flow meter to validate each analog flow meter. Testing the decline in pump performance over time across a number of pumps could allow us to predict the pump flow rate depending on duration of use and allow us to not need a flow meter, which would decrease the cost of each kit.
- Figure out the best means of demonstrating the length of stain in a photograph (background color, lighting and smart phone camera). Maybe an index card with time, place, temperature data fields on it so all the meta data would be in the image?
- Develop a Fahrenheit temperature correction table. Or just encourage the thermostat to be set to 68 degrees F so that no temperature corrections need to be done.
- I propped my first test tube up on the meter-to-pump airline so as to sample the air above and not the air directly on the sampling surface, but because of vibrations the tube moved around a lot and needed to be monitored and rearranged a couple times. How can we develop a simple stand so that the tube can be securely vertical so as to not be drawing air across a potentially formaldehyde emitting surface? This could be as simple as a rubber band to old the tube in place.
- We will be further workshopping this kit and performing multiple tests this Friday and Saturday in Boone, NC. Further refinements and observations will be posted soon.
###Why I'm interested
I have been studying residential formaldehyde exposure for the past five years and am the lead researcher of the Public Lab Where We Breathe project that focuses on domestic chemical contamination and mitigation.
59 Comments
The commercial air flow meters are easy to use and come with NIST traceable certificates but you can make your own air flow meter for lab use that rivals the $1k meter performance.
There are many variations to this method but essentially you need a graduated cylinder column with a hose barb fitting. Attach the air intake line to the column then time how long it takes a soap bubble to travel a portion of the column. Calculate the flow rate as volume / time.
For the column, you can buy a cheap plastic graduated cylinder and then drill a hole in the base, tap the hole, then screw in a plastic barb fitting and goop on some silicone water sealant. OR, you can use a graduated burette tube (like a pipette tube). Wet the inside of the column with soapy water and then mount it in a lab stand with the open end facing down and the air hose fitting facing up. Attach the air intake tube from your pump sampling apparatus to the column. With air flowing in the open end, take a cup of soapy water and briefly submerge the open end of the column in the soapy water to make a soap bubble (alternatively, for higher flows you can blow bubbles in the cup with a straw and just touch the bubbles to the column). With a stop watch, time how long it takes the soap bubble to pass a certain distance (volume) in the graduated cylinder. The flow rate is then calculated as ( [end vol.] - [start vol.] ) / [time]
You may want to add a water knock out to prevent any soapy water from entering the tube and fowling anything upstream. For a knock out you just need any air tight container (e.g. mason jar, tupperware) with a couple hose barbs.
You also need to size your column appropriately for your flow rates. If measuring 0.1 to 1.0 lpm, I would consider using a 500 ml column. If the bubble travels 400 ml in the column then it would take 240 to 24 seconds at 0.1 and 1.0 lpm respectively.
I would check the flow of the system at at least four points and then make a correction curve if necessary--and it will probably be necessary.
let me know if you have questions.
Reply to this comment...
Log in to comment
That sounds like a great idea. The flow meter remains the most expensive component so reducing this cost is clutch. This sounds like something that we should experiment with at the barnraising in a couple week's time. Thanks very much for the suggestion!
Reply to this comment...
Log in to comment
Exciting stuff! Do you think this method could work for other pump based tubes like these http://www.buydraegertubes.com/hydrogensulfide02b.aspx
Reply to this comment...
Log in to comment
I think so. Those tubes require one pump on the Draeger Tube proprietary pump. So if one were to rent their proprietary pump for a single day and attach a flow meter to it (preferably one of the higher end ones with a large monitoring range), then you see what the flow rate through the tube is and that could likely be replicated by an inexpensive pump-turned-vacuum.
Their sampling seems to only take 55 seconds, so perhaps the flow rate is much higher than in the method above. If that is the case it, and a cheap aquarium pump could not muster that much pulling power then one could experiment to see if a longer sampling time with a equal total volume pulled through the tube would yield the same results. (when conversing the the lab that made the tubes I used, they were not positive that such a method change would yield precise results but it sounds worth some experimentation!)
Yesterday I was at APHA and heard mention of H2S biomonitoring in urine (but I can't quite remember the metabolite that would be assayed) . Would be interesting if pH like test strips could be made for H2S biomonitoring.
Reply to this comment...
Log in to comment
I just bought the air pump components and a graduated cylinder to try and compare @davidmack's cheapo air meter... can't wait. I'm going to try using this to control airflow to a shinyei dust sensor.
Reply to this comment...
Log in to comment
Hi, Nick - I'm working on some sketches of the kit; do you have any photos of the entire thing, just a bit more zoomed out? Thanks!
Is this a question? Click here to post it to the Questions page.
Reply to this comment...
Log in to comment
On reversing the aquarium pump: Be sure and reverse both diaphragms!
Reply to this comment...
Log in to comment
@danbeavers were you using the whisper pump or another pump? I think the whisper pump can handle one pump and one vacuum if need be
Is this a question? Click here to post it to the Questions page.
Reply to this comment...
Log in to comment
Oh, I was making assumptions. I had not seen a pump that was set up to have 2 different attach points. So never mind about my comment!
Reply to this comment...
Log in to comment
following up on our discussion about trying to calibrate the pump without the flow meter-- could we calibrate the pump at our office, and then have it run on a timer? that would probably make the test easier-- we could do automatic shutoff. I think that makes the process even easier.
While regular wall switch timers are affordable, I can't find one with one-minute accuracy that isn't a wall plate-- so we'd have to wire our own electrical box, which I don't want to do. They're usually in 15 minute increments, which won't be precise enough:
I think the best interface is an analog dial. I have two darkroom timers here, and vintage timers are 10-40 bucks on ebay, but new timers are too expensive. Dunno if we want to deal with the headache of sourcing a bunch of different things.
Is this a question? Click here to post it to the Questions page.
Reply to this comment...
Log in to comment
This is great. The vintage timers are pretty amazing although they add a lot of weight and thus money and are not tamper proof. We could just include one of these 4 dollar timers. as the next best thing. http://restauranttory.com/taylor-58-5842-58-mini-digital-timer-36200-minimum-order.asp?gclid=CJWEj-fTusUCFUwXHwodMU0A-Q
I bet our calibration could last for at least 5 tests. having people pass them along to the next person (for a set batch) as opposed to sending them back and forth would save a ton of money on postage and personal shipping time.
when we use the mini buck to calibrate we can see how many tests each calibration can hold. setting a time/test duration is a pretty standard.
if in the long run we could hardwire our own timer that would be ideal
Is this a question? Click here to post it to the Questions page.
Reply to this comment...
Log in to comment
The vintage timers are probably far too massive. I'm not as worried about tampering as I am about good faith forgetfulness-- I don't always hear the washing machine buzz in my house-- I'm glad when things turn themselves off.
Reply to this comment...
Log in to comment
Gotcha. In my testing in 2011 i did some of the test and mailed test kits to those i couldn't meet in person. altho it wasn't statistically significant the results of the self test were lower, probably meaning that they didn't prepare their homes (close windows and door for 24 hours prior to testing) as thoroughly as they did when someone was showing up or they turned it off too early. So i'm not so worried personally with forgetting the test is happening (leaving it on too long would result in a higher result which didn't appear to be the case), i say "tampering" because our case will be stronger if we can claim it to have an un-mess-with-able sampling time.
thinking speculatively, could we have a system that you call when you start the test and it calls that number back after the allotted time and then they confirm into a voicemail that the test has been stopped?
Is this a question? Click here to post it to the Questions page.
Reply to this comment...
Log in to comment
@danbeavers just sent me a great email about cheap flow meters. he told me I could repost it, so am putting it here:
"I have been thinking/researching a cheap flow meter. I sent a couple of e-mails to vendors that advertise seemingly appropriate meters for under $30 and have not received a reply yet.
I have also been thinking on how to construct a variable volume flow meter with the least amount of tools and cheaply.
Calibration: I don't remember who and can't find the e-mail but someone suggested the bubble in the graduated cylinder method. That seems to me to be the way to go. Use this to calibrate the homemade flow meter. The cheapest way to go here is probably a disposable plastic pipette. I have not priced or sourced any yet but I can't believe that they would be very expensive. They come in lots of sizes so some appropriate size should be easy to obtain. I got a free sample of several sizes at the Pittcon conference in March so I should be able to determine an appropriate size fairly easily.
Flow adjustment: A simple screw clamp or similar device on an aquarium hose should be easy to construct or find.
Flow meter: The most accurate measurement at 0.3 lpm is most likely the variable volume flow meter or rotometer. The problem with constructing such a device is how to make the conical bore. Drawing a melted glass tube is probably not easy enough to accomplish. I attempted a similar process with placing aquarium tube in boiling water and stretching it. That may be a viable solution but more research needs to be done but I don't have much confidence in the process.
My neighbor and I were talking about this and we came up with an idea to make a stepped bore. Since we only want one flow rate (perhaps 2 if measuring a different chemical also) then when obtaining the correct flow rate the ball would be no lower than one step in the bore and no higher than the other step in the bore. To construct this would require a standard ball, a set of drills, and a hunk of clear plastic. Drills may not be accurate enough so I would expect reamers would work in that case.
Determining the correct size of the holes and ball can perhaps be calculated to reduce the amount of experimentation required. I have not researched the formulas involved but expect that they are readily available."
This might be one way of getting our per-unit cost down. any thoughts on this @mathew
Reply to this comment...
Log in to comment
Thanks Nate for posting my thoughts.
I wanted to comment on Mathew's idea of calibrating the pump before shipment. I assume what is meant is that a fixed restriction is attached to the pump to get the proper flow rate for the formaldehyde tube. The problem with this idea appears to be in preparing the measuring tube. When you score and break both ends of the tube the resulting two orifices will be different sizes each time this procedure is done. They will be scored on a different point on the tapered glass seal. Thus the flow restrictions from the tube will vary. I do not know if it will add sufficient enough variation though. Perhaps a way around this is some fixture to use so that a consistent diameter is scored thus resulting in a standard flow thru the tube.
Reply to this comment...
Log in to comment
Another approach to this problem would be essentially what Drager does. We could construct a manual vacuum pump. It would essentially be like a bicycle pump but with the valves reversed and a spring to return the plunger. We know the Kitagawa 710 Formaldehyde tube requires 300ml/min×30min which is a volume of 9,000ml or 9 liters. If the vacuum pump moves 1 liter per stroke then it takes 9 strokes over 30 minutes. The vacuum pump could have an orifice so the spring would slowly push the plunger out. Clear indications that the plunger has been fully pressed and fully returned would be needed. A mechanical counter could be used to count the strokes or a place on the DIY Formaldehyde Test Photo Card could be used to make tick counts. Some big advantages are that both the electrical pump and the flow meter are not needed.
I just found an Instructable that is SIMILAR to what I am describing: http://www.instructables.com/id/Make-a-High-Volume-Manual-Vacuum-Pump/
Reply to this comment...
Log in to comment
@danbeavers hmm... the variability in the break and its effect on flow could be quantified with a more accurate flow meter. I wonder how variable it would be-- they provide that little bauble of glass on the end to try to make it break in the same place.
@davidmack suggested the graduated cylinder method in the first comment of this note.
@nshapiro I wouldn't feel comfortable with a stepped, DIY bore to an air meter- I'd seriously doubt its accuracy. On making the system tamper-proof- we could use a "time delay relay" which is a standard piece of automation/security/HVAC equipment ($8-25). We could then set the timer before the pump leaves our office, and the user would just hit a push button to start the process. Time delay relays generally reset the counter with every button press though-- so we'd probably want to get a two-channel relay and use the second relay for turning off the button as soon as the timer starts EDIT-- a quick search reveals there are also "self-locking" time-delay relays. Someone would have to take the whole monitor apart to reset the pump timing.
Reply to this comment...
Log in to comment
Mathew: Why would you doubt the accuracy of a stepped bore? A reamer will provide very accurate hole size and ball bearings have very accurate dimensions. The combination of the two make a very accurate orifice. But I think I like the manual volumetric vacuum pump best of all. Also, I wonder if there is much variation in the flow restriction from one packing of chemicals in the tube to the next.
Is this a question? Click here to post it to the Questions page.
Reply to this comment...
Log in to comment
+1 to the time relay delay it could be adhered to the belly of the pump.
Digging the flow meter debate!
Reply to this comment...
Log in to comment
@Danbeavers If you ream it you're right-- I was thinking about just a drill hole and that note. Vibrations on either a cheap drill or a poorly secured work piece will introduce significant wobble in drill holes.
I really like the idea of a vacuum pump, but even with sensors watching the pump stroke, someone could still cheat or just miss on the process. I'd like any new hardware we introduce to make the process more fool proof.
Reply to this comment...
Log in to comment
I'm trying to think about how everything might go together for shipping-- I'd like to put the monitor in a plastic suitcase with a top panel cut to give storage spaces for parts, and a folder for all the photo cards on the inside of the lid. It might also be nice to put a standard place for the tube to go:
Reply to this comment...
Log in to comment
I think this looks great!
The air intake is in one end of the tube. so we could have one less inlet to cut in the top panel and we could have it so that the tube can flip up vertically so that it can sample without pulling air over the foam of the packing material or the lid that may be off gassing formaldehyde.
Reply to this comment...
Log in to comment
Mathew: Perhaps I am not understanding some objectives here. Is the idea to be able to use one of our measurements in court? I doubt that that is the purpose. Is it then more about concerns for PL's reputation or is it negligent operators? Accomplishing a "fool" proof system sounds rather expensive to me. Probably the objective is reasonably compromising between cost and automation. This http://www.komyokk.co.jp/kweb/pbtop.do?pbno=1002&je=1 is more like what I am thinking would be best. Has anyone received a quote on this? Would it work with the formaldehyde tube?
Is this a question? Click here to post it to the Questions page.
Reply to this comment...
Log in to comment
Answering my own question: "The KITAGAWA air sampling pump reproducibly draws 100cc of sample air" So that would be 90 pump cycles thus makiing it impractical. If we can accurately design a similar pump with a liter volume then it becomes 9 strokes.
Reply to this comment...
Log in to comment
i actually have three of those pumps on my desk. they have a counter up to 10 and a thermal ring (that doesn't appear to work) for temp and a tube tip breaker (a glass tip is stuck in one of them). I think they work best at high levels. The tubes that go with those pumps have a higher (10x higher than our tubes). I think the larger volumes of air work better for lower levels.
I totally agree that we are looking at a balance of cost an automation. we also want to make sure people are getting the most robust data that we can give them and to make every test as similar to the next test as possible. how to we demonstrate trust in the capacity of non-scientists that the chain of custody system so thoroughly disregards while also encouraging consistency and validity? we could have some kits with the auto shut off and some with just a timer and see how their levels compare?
I think people will be pretty good at unplugging their kit right on time, its something that you don't do everyday (like cooking or running the dishwasher) so I think people are pretty attentive to it. We can also get very bold and underline-y in the instructions about the timing.
Is this a question? Click here to post it to the Questions page.
Reply to this comment...
Log in to comment
@danbeavers I am interested in making our data usable in court, but I'm also trying to be budget-sensitive. we're looking to mail these around from house to house, and over the long-term our biggest costs will be related to logistics, not the upfront costs of hardware. The automation option I'm looking at adds probably ~20 bucks to the finished cost. A solid case will add another $30. While optional, these things potentially make packing, shipping, and operations more seamless.
While a solid case and automation will add about a $50 to the equipment, if it prevents 10 or so mistakes over the pump's lifetime we'll have saved money: Every time someone screws up and decides to either re-run a test with a tube reserved for the next user, or holds onto the pump waiting to re-run an test is going to result in a bunch of logistical rejiggering over here. It is also easy for someone to miss-pack a box and break something, or disconnect stuff that will need to be plugged in, potentially introducing more logistical issues.
I'm not thinking about negligence so much as everyday carelessness-- no matter what we do even the best of users are going to screw up sooner or later and give us a headache, but we can design to minimize the chances of that happening. If it makes our data look more legally admissible, all the better.
Reply to this comment...
Log in to comment
Hey @mathew, do you think the goose neck thing I put together is worth pursuing, or is compatible with the box idea you posted? Just want to know how to proceed on visual design on the video I'm working on.
Is this a question? Click here to post it to the Questions page.
Reply to this comment...
Log in to comment
I think for the neck unit-- we need to have a flow meter in the flow. That is a perfect configuration to use in the buy your own kit, whereas we're trying to design the boxed kit as a thing we'd ship around in a library. very different design considerations between those two.
@Danbeavers this bubble flow meter is super simple
Is this a question? Click here to post it to the Questions page.
Reply to this comment...
Log in to comment
OK, cool. Are there options for the flow meter Nick's used above, in terms of size, etc? It has to be upright, right?
Is this a question? Click here to post it to the Questions page.
Reply to this comment...
Log in to comment
it has to be upright, yes. what other options are you thinking of?
Is this a question? Click here to post it to the Questions page.
Reply to this comment...
Log in to comment
Just size, really. I have to order one of these too so I can use it in the video I'm working on.
Reply to this comment...
Log in to comment
Is that supposed to be 1-10 LPM? Thanks!
Is this a question? Click here to post it to the Questions page.
Reply to this comment...
Log in to comment
.1-1 is correct. I have three right now. i can send you one. but you would need to get the valves. my supplier just ran out.
Reply to this comment...
Log in to comment
Oh I see! I had read it as 2IN. My brains a little slow right now, sorry. I need to be watered.
Reply to this comment...
Log in to comment
I have small plastic valves, had to order 5. I'll send one out.
Reply to this comment...
Log in to comment
Actually that'd be super great. If they'd arrive before next Thursday, Nick and Mathew, could you send them to Propeller?
Propeller c/o Public Lab 4035 Washington New Orleans, LA 70125
Is this a question? Click here to post it to the Questions page.
Reply to this comment...
Log in to comment
Mathew: The "super simple" flow meter you linked to is what DavidMack was describing in the first post comment. That is real good to calibrate a meter or measure a small volume and not so good to control a flow rate by.
Luc L. and I did some brainstorming this evening at the Picayune Make meeting. We went over all the ideas I had and he came up with some more. The least expensive and practical we ended up with was a manometer attached to two tees with a needle valve (or similar) between the two tees. You essentially end up with this configuration: https://en.wikipedia.org/wiki/Flow_measurement#Orifice_plate The way you operate it is to place some colored water in the manometer (U shaped tube) and move the measuring stick so the 0 is on the meniscus. After you prepare and attach the formaldehyde tube you turn on the vacuum pump and adjust the valve so the meniscus is at the previously calibrated 0.3 lpm value. When you are done with the measurement you disconnect the manometer and plug both ends so that the water does not leak in the shipping container.
Reply to this comment...
Log in to comment
The cheapest flow meters in the appropriate range that I could find:
$18.90 http://www.ebay.com/itm/0-1-1-5L-Oxygen-Air-Flow-Meter-Gas-Flow-Meter-With-Copper-Connector-measurement-/331371524139?pt=LH_DefaultDomain_0&hash=item4d2748302b
$27.00 http://www.dwyer-inst.com/configurator/index.cfm?Group_ID=326
Is this a question? Click here to post it to the Questions page.
Reply to this comment...
Log in to comment
I'm arriving tomorrow -- if you could order those I'd buy them off of you when I arrive, or we could just order tomorrow night when I get in. I just need to go to sleep really badly right now :-)
Reply to this comment...
Log in to comment
Perhaps [@Stevie](/profile/Stevie) could order them.
Reply to this comment...
Log in to comment
@Danbeavers what if we put a standardized, small orifice on the broken end of the glass tube that is always smaller than a hole broken into the tube-- then we'd have a standardized airflow (provided the flow through tubes is consistent.
Reply to this comment...
Log in to comment
Here is a photo of the tip breaker that is on some of the analog pumps. We could also pre-score them in a standardized way to create consistent openings.
Reply to this comment...
Log in to comment
Mathew: That sounds like a mechanical engineer (which I am not) question. I SUSPECT that it will be the sum of the restrictions because of the low pressure we need.
Nick: I am also not a glass expert. My thinking is that the breaking of glass should happen soon after scoring. The reason is that glass heals. Aged scores would probably result in breaks that would be either hard to accomplish or not consistent in shape. But again, I am not a glass expert.
Reply to this comment...
Log in to comment
@Mathew The following is from a mechanical engineer friend of mine:
Assuming you could pull a reasonably good vacuum on the orifice, you could get a fairly constant flow. What you would need to do is ensure the flow through the orifice is sonic, or "choked" as it's often called. The rule of thumb for choked flow is that the absolute pressure of the inlet is 2 times that of the outlet. Since atmospheric pressure is about 14.7 psia, the vacuum pump would only need to pull the outlet side down below 7 psia, which I don't think would be much of a task at .3 lpm. The advantage of using choked flow is that once the orifice is flowing sonic velocity, the downstream side of the process no longer affects the upstream side. In other words, you could go from a perfect vacuum to a marginal one and as long as the pressure is below 7 psia, it won't change the flow rate. The bad news from a practical standpoint is that the required orifice size for .3 lpm at 14.7 psia is down below .01" according to my calculations (using two different tools), which is about as small a hole as you can drill. You could probably find some kind of laser-cut orifice smaller than that. As far as the upstream flow resistance, you would have to have some extreme restrictions to give you much effect at .3 lpm - the hose ends shape would be negligible. If extreme accuracy is not an issue and the orifice size is obtainable, I think the vacuum method is reasonable. In that case, you'd also want to use some kind of filter with a smaller rating than the orifice size to preclude clogging such a small hole, which would give you a false negative reading due to lack of flow.
Reply to this comment...
Log in to comment
Another observation: It would be good to have a check list for the measurement. For example:
This is just an example.
Is this a question? Click here to post it to the Questions page.
Reply to this comment...
Log in to comment
Our portland office has .026ppm (26ppb) of formaldehyde when measured over by our packing and shipping area. That's over 3 times the chronic danger level. fun!
Reply to this comment...
Log in to comment
I ran a formaldehyde test over by our shipping station, now that the flow on our lending kit is calibrated. We got 26ppb, or about 3.5x the chronic exposure safety level. Fun!
beginning:
end:
Reply to this comment...
Log in to comment
Just repeated this test today at 26 degrees, and temperature corrected we got 25ppb. So good news: consistency. Bad news: consistently hazardous conditions in our office!
Reply to this comment...
Log in to comment
It appears you need some more ventilation or perhaps start using the remediation process. http://publiclab.org/notes/nshapiro/10-20-2014/diy-indoor-air-quality-remediation It would be interesting to see how much reduction you can get.
Reply to this comment...
Log in to comment
Any thoughts on using a smaller pump? If you're only trying to draw 0.3 SLPM, there are a couple of pumps (see the attached datasheet and catalog) used for a similar application that may be able to draw enough air through the draeger tube. There are probably more out there like these as well.
I'm unsure of the cost of these, but I can request a quote and find out. If they perform as well as the larger aquarium pumps, it may be good for reducing the overall footprint of the device (the smallest for air is the SP 200 EC-LC, at 33 x 25 x 16 mm) and significantly reducing shipping costs. A handheld formaldehyde monitor would be really cool.
SP_PUMPS_DataSheet_ClassEC_Series200_Type200-250-270EC.pdf
SP_PUMPS_ProductBrochure.pdf
Is this a question? Click here to post it to the Questions page.
Reply to this comment...
Log in to comment
@kkoerner Hi Karl! Great find! It would be fantastic if you could request a quote on these. We are planning on have a lending library of these tools that would be shipped around between people needing formaldehyde testing so over time the shipping costs will really add up and weight saving would save the community a good amount of money.
@mathew might also be interested in Karl's pumps as he has really taken the lead on the lending kits.
Reply to this comment...
Log in to comment
@kkoerner, I tried a similar pump when I was researching this and it created too much turbulent/pulsed of the air stream to get a good measurement when restricted to low flow levels. I ended up using a 3 diaphragm low voltage 12VDC pump, I did a writeup with low voltage DC pumps that work: http://lukeskaff.com/diy-formaldehyde-testing
Reply to this comment...
Log in to comment
Great writeup, Luke! cool work.
Reply to this comment...
Log in to comment
LukeS good to know, thanks for testing out those pumps and posting your results!
Reply to this comment...
Log in to comment
Thanks, @Dave-O ! We did some side by side testing of this method next to an EPA approved method and we found these tubes to be cross contaminated by acetone and acetaldehyde, and these Draeger tubes may as well. Here's the note: https://publiclab.org/notes/gretchengehrke/10-07-2015/formaldehyde-measurement-testing-public-lab-s-kit-with-doh-s-equipment and since then we've started development on a new system https://publiclab.org/notes/nshapiro/10-17-2016/public-lab-awarded-nsf-funding-to-help-develop-low-cost-community-formaldehyde-monitoring-technique Jeff just wrote up a new study design for HCHO if you've got some HCHO that you're interested in assessing https://publiclab.org/notes/nshapiro/10-17-2016/public-lab-awarded-nsf-funding-to-help-develop-low-cost-community-formaldehyde-monitoring-technique
Reply to this comment...
Log in to comment
You're welcome, @nshapiro ! Is this the same EPA approved method that you used? https://www3.epa.gov/ttnamti1/files/ambient/airtox/to-11ar.pdf And I do have some HCHO
Is this a question? Click here to post it to the Questions page.
Reply to this comment...
Log in to comment
Oh, also just for ref, the idea i posted is here: https://publiclab.org/notes/warren/02-09-2017/a-kit-to-design-your-own-formaldehyde-experiment
Reply to this comment...
Log in to comment
Hi, my search for formaldehyde testing brought me to this article. I'm wondering if you could help me with some advice - I'd appreciate it. I'm very suspicious of the floor we got installed over a year ago in our house - suspicion triggered by health issues. Just after we got it installed, I heard about the scandal involving Lumber Liquidators. I asked the installing person about his product but never got a proper answer. I asked about laboratory tests but I was quoted over $600 which I'm not able to pay. Please let me know what would be the best way to test our flooring and air quality. Also, is it too late to test this? The floor was installed 1.5 years ago. Thank you very much
Is this a question? Click here to post it to the Questions page.
Reply to this comment...
Log in to comment
Hi @indy if you're based in Indiana, as your name hints, you can report your symptoms to the stat DOH and they might come out and test for free. Indiana is the only state in the country that does that! Otherwise, you could try: http://homeaircheck.com/products/ or http://www.acsbadge.com/formaldehyde.shtml if the results are high we can talk about how to put together a low-cost formaldehyde remediation kit https://publiclab.org/notes/nshapiro/09-26-2016/build-a-plant-based-air-purifier (sorry for the delay!)
Reply to this comment...
Log in to comment
Login to comment.