Revisions for T-bracket Dual Camera Rig
| 10 CURRENT | mathew |
September 19, 2012 23:31
| about 12 years ago
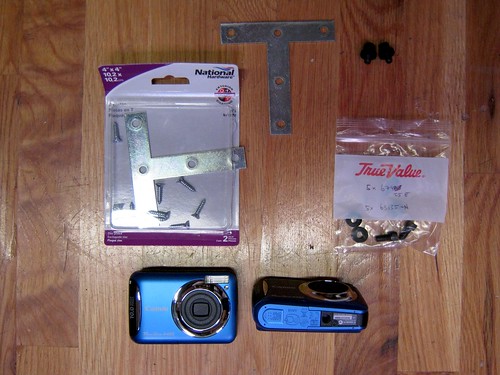
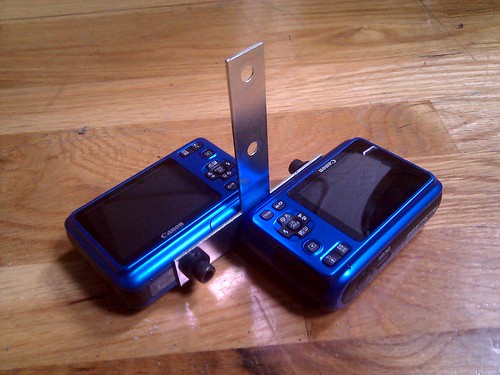
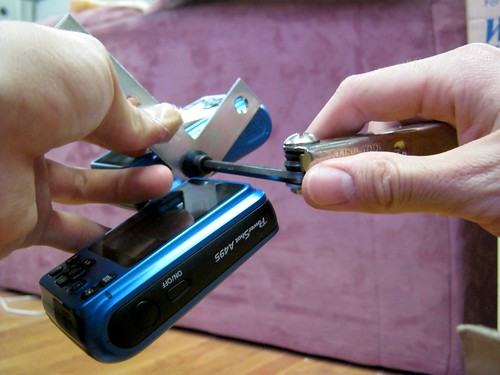
Step-by-step guideThis design for a dual camera rig (see Dual Camera Rig for why you'd want to do this) is based on a T-shaped or L-shaped bracket, washers, and two bolts which fit into the camera mounting holes on most cameras. You'll need:
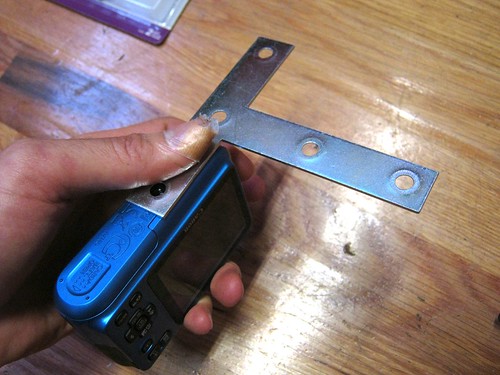
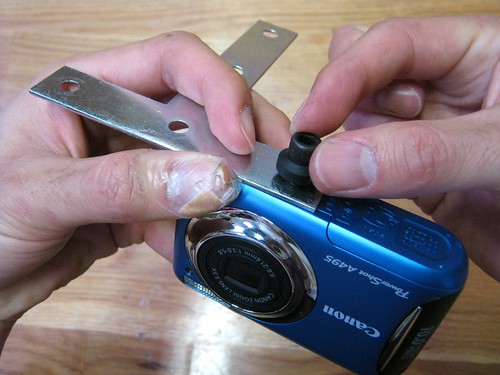
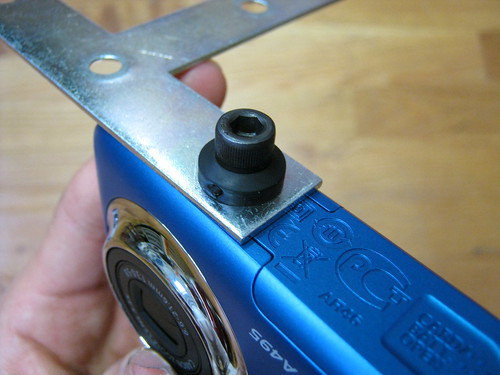
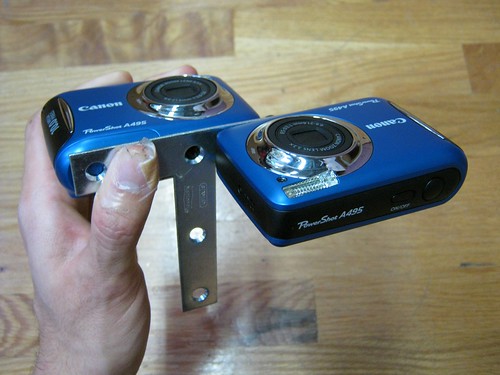
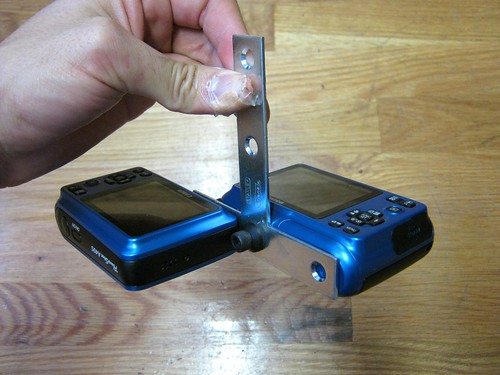
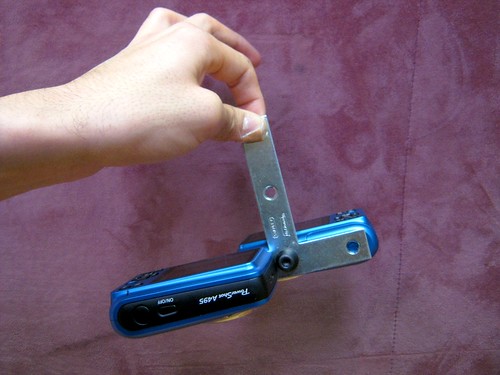
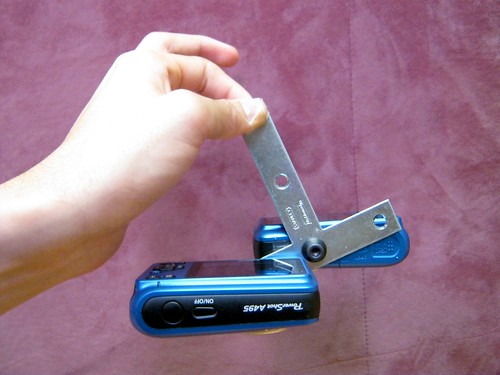
Basically follow the steps in the images below: Be sure the camera is facing "down", such that it will be hung by the base of the upside-down T. I did it wrong at first. If you have the "camera savers" AKA "knurled bolts" yours will look more like this:
BalanceSee how the cameras don't face downward in the following image? In the subsequent image I've tilted them so they actually face down. Do this before tightening the bolts. Alternative mountingIf you are OK with the lenses being a little further apart, you can mount them symmetrically, and avoid the balance issue: TighteningBecause of the rubber washers, you can really crank down on the bolts. I'm not completely sold on it -- it's not 100% solid but I like that the rubber kind of pads things and means you don't have to have completely precise bolt lengths and stuff. But go ahead and try something else and prove me wrong. The only danger is that the cameras may move under a lot of pressure; they won't fall off. TriggeringFrom here, you can just use a rubber band on each camera to trigger them without synchronizing -- it works pretty well. But if you're interested, I'll be posting soon on how to connect synchronized electronic triggers... Aligning camerasChris Fastie has posted a great video where he looked at how closely aligned 2 cameras of his were:
(Jeff:) I wonder if the mismatch could also be due to different image processing circuits/software in the two different models of camera. I'm curious to try this myself with 2 A495s. |
Revert | |
| 9 | warren |
April 27, 2012 21:26
| over 12 years ago
Step-by-step guideThis design for a dual camera rig (see Dual Camera Rig for why you'd want to do this) is based on a T-shaped or L-shaped bracket, washers, and two bolts which fit into the camera mounting holes on most cameras. You'll need:
Basically follow the steps in the images below: Be sure the camera is facing "down", such that it will be hung by the base of the upside-down T. I did it wrong at first. If you have the "camera savers" AKA "knurled bolts" yours will look more like this:
BalanceSee how the cameras don't face downward in the following image? In the subsequent image I've tilted them so they actually face down. Do this before tightening the bolts. Alternative mountingIf you are OK with the lenses being a little further apart, you can mount them symmetrically, and avoid the balance issue: TighteningBecause of the rubber washers, you can really crank down on the bolts. I'm not completely sold on it -- it's not 100% solid but I like that the rubber kind of pads things and means you don't have to have completely precise bolt lengths and stuff. But go ahead and try something else and prove me wrong. The only danger is that the cameras may move under a lot of pressure; they won't fall off. TriggeringFrom here, you can just use a rubber band on each camera to trigger them without synchronizing -- it works pretty well. But if you're interested, I'll be posting soon on how to connect synchronized electronic triggers... Aligning camerasChris Fastie has posted a great video where he looked at how closely aligned 2 cameras of his were:
(Jeff:) I wonder if the mismatch could also be due to different image processing circuits/software in the two different models of camera. I'm curious to try this myself with 2 A495s. |
Revert | |
| 8 | warren |
April 27, 2012 21:25
| over 12 years ago
Step-by-step guideThis design for a dual camera rig (see Dual Camera Rig for why you'd want to do this) is based on a T-shaped or L-shaped bracket, washers, and two bolts which fit into the camera mounting holes on most cameras. You'll need:
Basically follow the steps in the images below: Be sure the camera is facing "down", such that it will be hung by the base of the upside-down T. I did it wrong at first. If you have the "camera savers" AKA "knurled bolts" yours will look more like this:
BalanceSee how the cameras don't face downward in the following image? In the subsequent image I've tilted them so they actually face down. Do this before tightening the bolts. Alternative mountingIf you are OK with the lenses being a little further apart, you can mount them symmetrically, and avoid the balance issue: TighteningBecause of the rubber washers, you can really crank down on the bolts. I'm not completely sold on it -- it's not 100% solid but I like that the rubber kind of pads things and means you don't have to have completely precise bolt lengths and stuff. But go ahead and try something else and prove me wrong. The only danger is that the cameras may move under a lot of pressure; they won't fall off. TriggeringFrom here, you can just use a rubber band on each camera to trigger them without synchronizing -- it works pretty well. But if you're interested, I'll be posting soon on how to connect synchronized electronic triggers... Aligning camerasChris Fastie has posted a great video where he looked at how closely aligned 2 cameras of his were:
(Jeff:) I wonder if the mismatch could also be due to different image processing circuits/software in the two different models of camera. I'm curious to try this myself with 2 A495s. |
Revert | |
| 7 | warren |
March 01, 2012 21:28
| over 12 years ago
Step-by-step guideThis design for a dual camera rig (see Dual Camera Rig for why you'd want to do this) is based on a T-shaped or L-shaped bracket, washers, and two bolts which fit into the camera mounting holes on most cameras. You'll need:
Basically follow the steps in the images below: Be sure the camera is facing "down", such that it will be hung by the base of the upside-down T. I did it wrong at first. BalanceSee how the cameras don't face downward in the following image? In the subsequent image I've tilted them so they actually face down. Do this before tightening the bolts. Alternative mountingIf you are OK with the lenses being a little further apart, you can mount them symmetrically, and avoid the balance issue: TighteningBecause of the rubber washers, you can really crank down on the bolts. I'm not completely sold on it -- it's not 100% solid but I like that the rubber kind of pads things and means you don't have to have completely precise bolt lengths and stuff. But go ahead and try something else and prove me wrong. The only danger is that the cameras may move under a lot of pressure; they won't fall off. TriggeringFrom here, you can just use a rubber band on each camera to trigger them without synchronizing -- it works pretty well. But if you're interested, I'll be posting soon on how to connect synchronized electronic triggers... Aligning camerasChris Fastie has posted a great video where he looked at how closely aligned 2 cameras of his were:
(Jeff:) I wonder if the mismatch could also be due to different image processing circuits/software in the two different models of camera. I'm curious to try this myself with 2 A495s. |
Revert | |
| 6 | warren |
February 27, 2012 21:19
| over 12 years ago
Step-by-step guideThis design for a dual camera rig (see Dual Camera Rig for why you'd want to do this) is based on a T-shaped or L-shaped bracket, washers, and two bolts which fit into the camera mounting holes on most cameras. You'll need:
Basically follow the steps in the images below: Be sure the camera is facing "down", such that it will be hung by the base of the upside-down T. I did it wrong at first. BalanceSee how the cameras don't face downward in the following image? In the subsequent image I've tilted them so they actually face down. Do this before tightening the bolts. Alternative mountingIf you are OK with the lenses being a little further apart, you can mount them symmetrically, and avoid the balance issue: TighteningBecause of the rubber washers, you can really crank down on the bolts. I'm not completely sold on it -- it's not 100% solid but I like that the rubber kind of pads things and means you don't have to have completely precise bolt lengths and stuff. But go ahead and try something else and prove me wrong. The only danger is that the cameras may move under a lot of pressure; they won't fall off. TriggeringFrom here, you can just use a rubber band on each camera to trigger them without synchronizing -- it works pretty well. But if you're interested, I'll be posting soon on how to connect synchronized electronic triggers... Aligning camerasChris Fastie has posted a great video where he looked at how closely aligned 2 cameras of his were:
(Jeff:) I wonder if the mismatch could also be due to different image processing circuits/software in the two different models of camera. I'm curious to try this myself with 2 A495s. |
Revert | |
| 5 | warren |
February 27, 2012 18:20
| over 12 years ago
Step-by-step guideThis design for a dual camera rig (see Dual Camera Rig for why you'd want to do this) is based on a T-shaped or L-shaped bracket, washers, and two bolts which fit into the camera mounting holes on most cameras. You'll need:
Basically follow the steps in the images below: Be sure the camera is facing "down", such that it will be hung by the base of the upside-down T. I did it wrong at first. BalanceSee how the cameras don't face downward in the following image? In the subsequent image I've tilted them so they actually face down. Do this before tightening the bolts. TighteningBecause of the rubber washers, you can really crank down on the bolts. I'm not completely sold on it -- it's not 100% solid but I like that the rubber kind of pads things and means you don't have to have completely precise bolt lengths and stuff. But go ahead and try something else and prove me wrong. The only danger is that the cameras may move under a lot of pressure; they won't fall off. TriggeringFrom here, you can just use a rubber band on each camera to trigger them without synchronizing -- it works pretty well. But if you're interested, I'll be posting soon on how to connect synchronized electronic triggers... Aligning camerasChris Fastie has posted a great video where he looked at how closely aligned 2 cameras of his were:
(Jeff:) I wonder if the mismatch could also be due to different image processing circuits/software in the two different models of camera. I'm curious to try this myself with 2 A495s. |
Revert | |
| 4 | warren |
February 27, 2012 18:19
| over 12 years ago
Step-by-step guideThis design for a dual camera rig (see Dual Camera Rig for why you'd want to do this) is based on a T-shaped or L-shaped bracket, washers, and two bolts which fit into the camera mounting holes on most cameras. You'll need:
Basically follow the steps in the images below: Be sure the camera is facing "down", such that it will be hung by the base of the upside-down T. I did it wrong at first. BalanceSee how the cameras don't face downward in the following image? In the subsequent image I've tilted them so they actually face down. Do this before tightening the bolts. TighteningBecause of the rubber washers, you can really crank down on the bolts. I'm not completely sold on it -- it's not 100% solid but I like that the rubber kind of pads things and means you don't have to have completely precise bolt lengths and stuff. But go ahead and try something else and prove me wrong. The only danger is that the cameras may move under a lot of pressure; they won't fall off. TriggeringFrom here, you can just use a rubber band on each camera to trigger them without synchronizing -- it works pretty well. But if you're interested, I'll be posting soon on how to connect synchronized electronic triggers... Aligning camerasChris Fastie has posted a great video where he looked at how closely aligned 2 cameras of his were:
(Jeff:) I wonder if the mismatch could also be due to different image processing circuits/software in the two different models of camera. I'm curious to try this myself with 2 A495s. |
Revert | |
| 3 | warren |
February 27, 2012 18:18
| over 12 years ago
This design for a dual camera rig (see Dual Camera Rig for why you'd want to do this) is based on a T-shaped or L-shaped bracket, washers, and two bolts which fit into the camera mounting holes on most cameras. You'll need:
Basically follow the steps in the images below: Be sure the camera is facing "down", such that it will be hung by the base of the upside-down T. I did it wrong at first. BalanceSee how the cameras don't face downward in the following image? In the subsequent image I've tilted them so they actually face down. Do this before tightening the bolts. TighteningBecause of the rubber washers, you can really crank down on the bolts. I'm not completely sold on it -- it's not 100% solid but I like that the rubber kind of pads things and means you don't have to have completely precise bolt lengths and stuff. But go ahead and try something else and prove me wrong. The only danger is that the cameras may move under a lot of pressure; they won't fall off. TriggeringFrom here, you can just use a rubber band on each camera to trigger them without synchronizing -- it works pretty well. But if you're interested, I'll be posting soon on how to connect synchronized electronic triggers... Aligning camerasChris Fastie has posted a great video where he looked at how closely aligned 2 cameras of his were:
(Jeff:) I wonder if the mismatch could also be due to different image processing circuits/software in the two different models of camera. I'm curious to try this myself with 2 A495s. |
Revert | |
| 2 | warren |
February 22, 2012 22:52
| almost 13 years ago
This design for a dual camera rig (see Dual Camera Rig for why you'd want to do this) is based on a T-shaped or L-shaped bracket, washers, and two bolts which fit into the camera mounting holes on most cameras. You'll need:
Basically follow the steps in the images below: Be sure the camera is facing "down", such that it will be hung by the base of the upside-down T. I did it wrong at first. BalanceSee how the cameras don't face downward in the following image? In the subsequent image I've tilted them so they actually face down. Do this before tightening the bolts. TighteningBecause of the rubber washers, you can really crank down on the bolts. I'm not completely sold on it -- it's not 100% solid but I like that the rubber kind of pads things and means you don't have to have completely precise bolt lengths and stuff. But go ahead and try something else and prove me wrong. The only danger is that the cameras may move under a lot of pressure; they won't fall off. TriggeringFrom here, you can just use a rubber band on each camera to trigger them without synchronizing -- it works pretty well. But if you're interested, I'll be posting soon on how to connect synchronized electronic triggers... |
Revert | |
| 1 | warren |
February 22, 2012 22:50
| almost 13 years ago
This design for a dual camera rig (see Dual Camera Rig for why you'd want to do this) is based on a T-shaped or L-shaped bracket, washers, and two bolts which fit into the camera mounting holes on most cameras. You'll need:
Basically follow the steps in the images below: Be sure the camera is facing "down", such that it will be hung by the base of the upside-down T. I did it wrong at first. BalanceSee how the cameras don't face downward in the following image? In the subsequent image I've tilted them so they actually face down. Do this before tightening the bolts. TriggeringFrom here, you can just use a rubber band on each camera to trigger them without synchronizing -- it works pretty well. But if you're interested, I'll be posting soon on how to connect synchronized electronic triggers... |
Revert | |
| 0 | warren |
February 22, 2012 22:30
| almost 13 years ago
This design for a dual camera rig (see Dual Camera Rig for why you'd want to do this) is based on a T-shaped or L-shaped bracket, washers, and two bolts which fit into the camera mounting holes on most cameras. You'll need:
Basically follow the steps in the images below: More coming soon... hang on! |
Revert |
