|
33
CURRENT
|
rjstatic |
December 22, 2011 22:19
| over 12 years ago
Insert pictures from Flickr
Find the Flickr image you want to insert, click on the "Share" button, select "Grab the HTML/BBCode", select the "Medium 500" option, and copy the text in the text box.
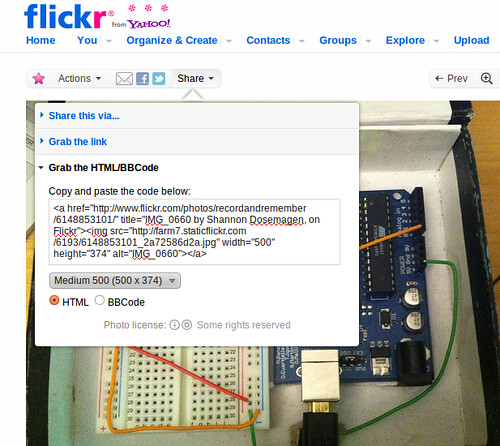
Then paste that text into the Body of your post.

Insert pictures from image files attached to the Wiki/Note/Tool page you are working on.
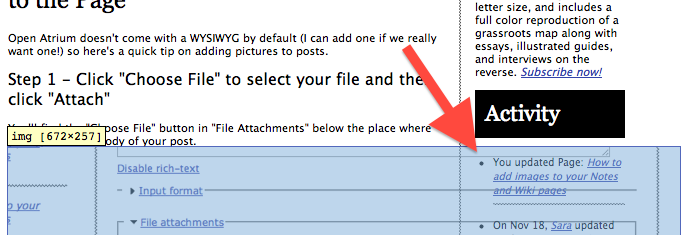
Step 1 - Click "Choose File" to select your file and then click "Attach"
You'll find the "Choose File" button in "File Attachments" below the place where you type out the Body of your post.

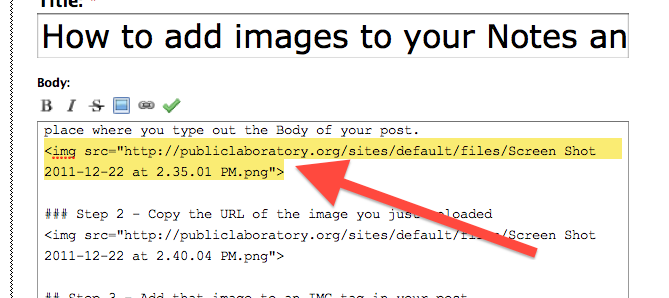
Step 2 - Copy the URL of the image you just uploaded
Step 3 - Add that image URL to an IMG tag in your post
Formatting your image
Step 1 - Correct Width - Make sure the maximum width of your images are 500 pixels wide
Here is an image that is so wide that it's running into the right side bar. Eek!
Step 2 - Add class class class!
Add a class to the image tags to format them.
- class='floatright'
The "floatright" class will push the image to the right and let text flow around it. Here's the floatright class being used in an Anchor tag (a link) that wraps our image.
 The result.

- class='frame'
The frame class will add margin and two subtle borders to your image. Below is a picture of the code to do this while it is itself using the frame class.

|
Revert |
|
|
32
|
rjstatic |
December 22, 2011 22:16
| over 12 years ago
Insert pictures from Flickr
Find the Flickr image you want to insert, click on the "Share" button, select "Grab the HTML/BBCode", select the "Medium 500" option, and copy the text in the text box.
Then paste that text into the Body of your post.
Insert pictures from image files attached to the Wiki/Note/Tool page you are working on.
Step 1 - Click "Choose File" to select your file and then click "Attach"
You'll find the "Choose File" button in "File Attachments" below the place where you type out the Body of your post.
Step 2 - Copy the URL of the image you just uploaded
Step 3 - Add that image URL to an IMG tag in your post
Formatting your image
Step 1 - Correct Width - Make sure the maximum width of your images are 500 pixels wide
Here is an image that is so wide that it's running into the right side bar. Eek!
Step 2 - Add class class class!
Add a class to the image tags to format them.
- class='floatright'
The "floatright" class will push the image to the right and let text flow around it. Here's the floatright class being used in an Anchor tag (a link) that wraps our image.
The result.
- class='frame'
The frame class will add margin and two subtle borders to your image. Below is a picture of the code to do this while it is itself using the frame class.
|
Revert |
|
|
31
|
rjstatic |
December 22, 2011 22:15
| over 12 years ago
Insert pictures from Flickr
Find the Flickr image you want to insert, click on the "Share" button, select "Grab the HTML/BBCode", select the "Medium 500" option, and copy the text in the text box.
Then paste that text into the Body of your post.
Insert pictures from image files attached to the Wiki/Note/Tool page you are working on.
Step 1 - Click "Choose File" to select your file and then click "Attach"
You'll find the "Choose File" button in "File Attachments" below the place where you type out the Body of your post.
Step 2 - Copy the URL of the image you just uploaded

Step 3 - Add that image URL to an IMG tag in your post
Formatting your image
Step 1 - Correct Width - Make sure the maximum width of your images are 500 pixels wide
Here is an image that is so wide that it's running into the right side bar. Eek!
Step 2 - Add class class class!
Add a class to the image tags to format them.
- class='floatright'
The "floatright" class will push the image to the right and let text flow around it. Here's the floatright class being used in an Anchor tag (a link) that wraps our image.
The result.
- class='frame'
The frame class will add margin and two subtle borders to your image. Below is a picture of the code to do this while it is itself using the frame class.
|
Revert |
|
|
30
|
rjstatic |
December 22, 2011 22:10
| over 12 years ago
Insert pictures from Flickr
Insert pictures from image files attached to the Wiki/Note/Tool page you are working on.
Step 1 - Click "Choose File" to select your file and then click "Attach"
You'll find the "Choose File" button in "File Attachments" below the place where you type out the Body of your post.
Step 2 - Copy the URL of the image you just uploaded
Step 3 - Add that image URL to an IMG tag in your post
Formatting your image
Step 1 - Correct Width - Make sure the maximum width of your images are 500 pixels wide
Here is an image that is so wide that it's running into the right side bar. Eek!
Step 2 - Add class class class!
Add a class to the image tags to format them.
- class='floatright'
The "floatright" class will push the image to the right and let text flow around it. Here's the floatright class being used in an Anchor tag (a link) that wraps our image.
The result.
- class='frame'
The frame class will add margin and two subtle borders to your image. Below is a picture of the code to do this while it is itself using the frame class.
|
Revert |
|
|
29
|
rjstatic |
December 22, 2011 21:59
| over 12 years ago
Insert pictures from image files attached to the Wiki/Note/Tool page you are working on.
Step 1 - Click "Choose File" to select your file and then click "Attach"
You'll find the "Choose File" button in "File Attachments" below the place where you type out the Body of your post.
Step 2 - Copy the URL of the image you just uploaded
Step 3 - Add that image URL to an IMG tag in your post
Formatting your image
Step 1 - Correct Width - Make sure the maximum width of your images are 500 pixels wide
Here is an image that is so wide that it's running into the right side bar. Eek!
Step 2 - Add class class class!
Add a class to the image tags to format them.
- class='floatright'
The "floatright" class will push the image to the right and let text flow around it. Here's the floatright class being used in an Anchor tag (a link) that wraps our image.
The result.
- class='frame'
The frame class will add margin and two subtle borders to your image. Below is a picture of the code to do this while it is itself using the frame class.
|
Revert |
|
|
28
|
rjstatic |
December 22, 2011 21:49
| over 12 years ago
Insert pictures from image files attached to the Page
Step 1 - Click "Choose File" to select your file and then click "Attach"
You'll find the "Choose File" button in "File Attachments" below the place where you type out the Body of your post.
Step 2 - Copy the URL of the image you just uploaded
Step 3 - Add that image URL to an IMG tag in your post
Formatting your image
Step 1 - Correct Width - Make sure the maximum width of your images are 500 pixels wide
Here is an image that is so wide that it's running into the right side bar. Eek!
Step 2 - Add class class class!
Add a class to the image tags to format them.
- class='floatright'
The "floatright" class will push the image to the right and let text flow around it. Here's the floatright class being used in an Anchor tag (a link) that wraps our image.
The result.
- class='frame'
The frame class will add margin and two subtle borders to your image. Below is a picture of the code to do this while it is itself using the frame class.
|
Revert |
|
|
27
|
rjstatic |
December 22, 2011 21:48
| over 12 years ago
Insert pictures from image files attached to the Page
Step 1 - Click "Choose File" to select your file and then click "Attach"
You'll find the "Choose File" button in "File Attachments" below the place where you type out the Body of your post.
Step 2 - Copy the URL of the image you just uploaded
Step 3 - Add that image URL to an IMG tag in your post
Formatting your image
Step 1 - Correct Width - Make sure the maximum width of your images are 500 pixels wide
Here is an image that is so wide that it's running into the right side bar. Eek!
Step 2 - Add class class class!
Add a class to the image tags to format them.
- class='floatright'
The "floatright" class will push the image to the right and let text flow around it. Here's the floatright class being used in an Anchor tag (a link) that wraps our image.
The result.
- class='frame'
The frame class will add margin and two subtle borders to your image. Below is a picture of the code to do this while it is itself using the frame class.
|
Revert |
|
|
26
|
rjstatic |
December 22, 2011 21:38
| over 12 years ago
Insert pictures from image files attached to the Page
Step 1 - Click "Choose File" to select your file and then click "Attach"
You'll find the "Choose File" button in "File Attachments" below the place where you type out the Body of your post.
Step 2 - Copy the URL of the image you just uploaded
Step 3 - Add that image URL to an IMG tag in your post
Formatting your image
Step 1 - Correct Width - Make sure the maximum width of your images are 500 pixels wide
Here is an image that is so wide that it's running into the right side bar. Eek!
Step 2 - Add class class class!
Add a class to the image tags to format them. The "floatright" class will push the image to the right and let text flow around it. Here's the floatright class being used in an Anchor tag (a link) that wraps our image.
The result.
|
Revert |
|
|
25
|
rjstatic |
December 22, 2011 21:37
| over 12 years ago
Insert pictures from image files attached to the Page
Step 1 - Click "Choose File" to select your file and then click "Attach"
You'll find the "Choose File" button in "File Attachments" below the place where you type out the Body of your post.
Step 2 - Copy the URL of the image you just uploaded
Step 3 - Add that image URL to an IMG tag in your post
Formatting your image
Step 1 - Correct Width - Make sure the maximum width of your images are 500 pixels wide
Here is an image that is so wide that it's running into the right side bar. Eek!
Step 2 - Add class class class!
Add a class to the image tags to format them. The "floatright" class will push the image to the right and let text flow around it. Here's the floatright class being used in an Anchor tag (a link) that wraps our image.
The result.
|
Revert |
|
|
24
|
rjstatic |
December 22, 2011 21:36
| over 12 years ago
Insert pictures from image files attached to the Page
Step 1 - Click "Choose File" to select your file and then click "Attach"
You'll find the "Choose File" button in "File Attachments" below the place where you type out the Body of your post.
Step 2 - Copy the URL of the image you just uploaded
Step 3 - Add that image URL to an IMG tag in your post
Formatting your image
Step 1 - Correct Width - Make sure the maximum width of your images are 500 pixels wide
Here is an image that is so wide that it's running into the right side bar. Eek!
Step 2 - Add class class class!
Add a class to the image tags to format them. The "floatright" class will push the image to the right and let text flow around it. Here's the floatright class being used in an Anchor tag (a link) that wraps our image.
The result.
|
Revert |
|
|
23
|
rjstatic |
December 22, 2011 21:34
| over 12 years ago
Insert pictures from image files attached to the Page
Step 1 - Click "Choose File" to select your file and then click "Attach"
You'll find the "Choose File" button in "File Attachments" below the place where you type out the Body of your post.
Step 2 - Copy the URL of the image you just uploaded
Step 3 - Add that image URL to an IMG tag in your post
Formatting your image
Step 1 - Correct Width - Make sure the maximum width of your images are 500 pixels wide
Here is an image that is so wide that it's running into the right side bar. Eek!
Step 2 - Add class class class!
Add a class to the image tags to format them. The "floatright" class will push the image to the right and let text flow around it. Here's the floatright class being used in an Anchor tag (a link) that wraps our image.
The result.
|
Revert |
|
|
22
|
rjstatic |
December 22, 2011 21:33
| over 12 years ago
Insert pictures from image files attached to the Page
Step 1 - Click "Choose File" to select your file and then click "Attach"
You'll find the "Choose File" button in "File Attachments" below the place where you type out the Body of your post.
Step 2 - Copy the URL of the image you just uploaded
Step 3 - Add that image URL to an IMG tag in your post
Formatting your image
Step 1 - Correct Width - Make sure the maximum width of your images are 500 pixels wide
Here is an image that is so wide that it's running into the right side bar. Eek!
Step 2 - Add class class class!
Add a class to the image tags to format them. The "floatright" class will push the image to the right and let text flow around it. Here's the floatright class being used in an Anchor tag (a link) that wraps our image.
The result.
|
Revert |
|
|
21
|
rjstatic-authenticated |
December 22, 2011 21:16
| over 12 years ago
Insert pictures from image files attached to the Page
Step 1 - Click "Choose File" to select your file and then click "Attach"
You'll find the "Choose File" button in "File Attachments" below the place where you type out the Body of your post.
Step 2 - Copy the URL of the image you just uploaded
Step 3 - Add that image URL to an IMG tag in your post
Formatting your image
Step 1 - Correct Width - Make sure the maximum width of your images are 500 pixels wide
Here is an image that is so wide that it's running into the right side bar. Eek!
Step 2 - Add class class class!
Add a class to the image tags to format them. The "floatright" class will push the image to the right and let text flow around it. Here's the floatright class being used in an Anchor tag (a link) that wraps our image.
The result.
|
Revert |
|
|
20
|
rjstatic |
December 22, 2011 21:14
| over 12 years ago
Insert pictures from image files attached to the Page
Step 1 - Click "Choose File" to select your file and then click "Attach"
You'll find the "Choose File" button in "File Attachments" below the place where you type out the Body of your post.
Step 2 - Copy the URL of the image you just uploaded
Step 3 - Add that image URL to an IMG tag in your post
Formatting your image
Step 1 - Correct Width - Make sure the maximum width of your images are 500 pixels wide
Here is an image that is so wide that it's running into the right side bar. Eek!
Step 2 - Add class class class!
Add a class to the image tags to format them. The "floatright" class will push the image to the right and let text flow around it. Here's the floatright class being used in an Anchor tag (a link) that wraps our image.
The result.
|
Revert |
|
|
19
|
rjstatic-authenticated |
December 22, 2011 21:13
| over 12 years ago
Insert pictures from image files attached to the Page
Step 1 - Click "Choose File" to select your file and then click "Attach"
You'll find the "Choose File" button in "File Attachments" below the place where you type out the Body of your post.
Step 2 - Copy the URL of the image you just uploaded
Step 3 - Add that image URL to an IMG tag in your post
Formatting your image
Step 1 - Correct Width - Make sure the maximum width of your images are 500 pixels wide
Here is an image that is so wide that it's running into the right side bar. Eek!
Step 2 - Add class class class!
Add a class to the image tags to format them. The "floatright" class will push the image to the right and let text flow around it. Here's the floatright class being used in an Anchor tag (a link) that wraps our image.
The result.
|
Revert |
|
|
18
|
rjstatic |
December 22, 2011 20:52
| over 12 years ago
Insert pictures from image files attached to the Page
Step 1 - Click "Choose File" to select your file and then click "Attach"
You'll find the "Choose File" button in "File Attachments" below the place where you type out the Body of your post.
Step 2 - Copy the URL of the image you just uploaded
Step 3 - Add that image URL to an IMG tag in your post
Formatting your image
Step 1 - Correct Width - Make sure the maximum width of your images are 500 pixels wide
Here is an image that is so wide that it's running into the right side bar. Eek!
Step 2 - Add class class class!
Add a class to the image tags to format them. The "floatright" class will push the image to the right and let text flow around it. Here's the floatright class being used in an Anchor tag (a link) that wraps our image.
The result.
|
Revert |
|
|
17
|
rjstatic |
December 22, 2011 20:52
| over 12 years ago
Insert pictures from image files attached to the Page
Step 1 - Click "Choose File" to select your file and then click "Attach"
You'll find the "Choose File" button in "File Attachments" below the place where you type out the Body of your post.
Step 2 - Copy the URL of the image you just uploaded
Step 3 - Add that image URL to an IMG tag in your post
Formatting your image
Step 1 - Correct Width - Make sure the maximum width of your images are 500 pixels wide
Here is an image that is so wide that it's running into the right side bar. Eek!
Step 2 - Add class class class!
Add a class to the image tags to format them. The "floatright" class will push the image to the right and let text flow around it. Here's the floatright class being used in an Anchor tag (a link) that wraps our image.
The result.
|
Revert |
|
|
16
|
rjstatic |
December 22, 2011 20:51
| over 12 years ago
Insert pictures from image files attached to the Page
Step 1 - Click "Choose File" to select your file and then click "Attach"
You'll find the "Choose File" button in "File Attachments" below the place where you type out the Body of your post.
Step 2 - Copy the URL of the image you just uploaded
Step 3 - Add that image URL to an IMG tag in your post
Formatting your image
Step 1 - Correct Width - Make sure the maximum width of your images are 500 pixels wide
Here is an image that is so wide that it's running into the right side bar. Eek!
Step 2 - Add class class class!
Add a class to the image tags to format them. The "floatright" class will push the image to the right and let text flow around it. Here's the floatright class being used in an Anchor tag (a link) that wraps our image.
The result.
|
Revert |
|
|
15
|
rjstatic |
December 22, 2011 20:50
| over 12 years ago
Insert pictures from image files attached to the Page
Open Atrium doesn't come with a WYSIWYG by default (I can add one if we really want one!) so here's a quick tip on adding pictures to posts.
Step 1 - Click "Choose File" to select your file and then click "Attach"
You'll find the "Choose File" button in "File Attachments" below the place where you type out the Body of your post.
Step 2 - Copy the URL of the image you just uploaded
Step 3 - Add that image URL to an IMG tag in your post
Formatting your image
Step 1 - Correct Width - Make sure the maximum width of your images are 500 pixels wide
Here is an image that is so wide that it's running into the right side bar. Eek!
Step 2 - Add class class class!
Add a class to the image tags to format them. The "floatright" class will push the image to the right and let text flow around it. Here's the floatright class being used in an Anchor tag (a link) that wraps our image.
The result.
|
Revert |
|
|
14
|
rjstatic |
December 22, 2011 20:49
| over 12 years ago
Insert pictures from image files attached to the Page
Open Atrium doesn't come with a WYSIWYG by default (I can add one if we really want one!) so here's a quick tip on adding pictures to posts.
Step 1 - Click "Choose File" to select your file and then click "Attach"
You'll find the "Choose File" button in "File Attachments" below the place where you type out the Body of your post.
Step 2 - Copy the URL of the image you just uploaded
Step 3 - Add that image URL to an IMG tag in your post
Formatting your image
Step 1 - Correct Width - Make sure the maximum width of your images are 500 pixels wide
Here is an image that is so wide that it's running into the right side bar. Eek!
Step 2 - Add class class class!
Add a class to the image tags to format them. The "floatright" class will push the image to the right and let text flow around it. Here's the floatright class being used in an Anchor tag (a link) that wraps our image.
The result.
|
Revert |
|