This software is no longer supported.
The offline version is no longer in active development, pending an [offline-cacheable](https://github.com/jywarren/spectral-workbench/issues/74) [version](https://github.com/jywarren/spectral-workbench/issues/73) of the website and a possible offline-runnable version using Bitnami or another solution. Stay tuned on the [plots-spectrometry list](https://groups.google.com/group/plots-spectrometry) to hear updates.
Instead, try the web-based [SpectralWorkbench.org](https://spectralworkbench.org) application
* Download the program here: https://github.com/jywarren/spectral-workbench
###Launching the application###
Once you have [downloaded the software](/wiki/spectral-workbench-download), you should be able to open the "application.macosx" folder and double click **spectral_workbench**.
**Mac:** First you will be prompted to select a camera. Choose the webcam associated with your spectrometer, which may be "Creative Webcam Live ..." if you bought the [video spectrometer kit](/wiki/video-spectrometer). Select "None" under __Compression__.
**Linux:** Linux users may experience trouble if they do not have a built-in webcam; if you are comfortable coding you can change the line "new Video(x,x,x,1);" to "new Video(x,x,x,0);" which will select the first camera, not the second one.
####Windows Installation Instructions
These instructions assume that you will be installing Java, QuickTime and WinVDIG (see below) in the default locations. If you install them somewhere else, then be sure to change the file locations as required.
**Install Apple QuickTime**
* Go to [Apple's QuickTime page](http://www.apple.com/quicktime/download/) and follow the instructions from there.
* You can use the default settings during installation.
**Move QuickTime for Java**
* There should be a file called 'QTJava.zip' at C:\Program Files (x86)\QuickTime\QTSystem\
* Copy the file to C:\Program Files (x86)\Java\jre6\lib\ext\
* The file might already be there. If so, there's no need to copy it again.
**Install WinVDIG**
* Download [WinVDIG Version 1.01](http://www.eden.net.nz/7/20071008/WinVDIG_101.exe) (note that only version 1.01 works, not newer versions)
* Save the file and run it. You can accept all the defaults during installation.
* After it's installed and you click 'Finish', a window should open called 'QTCap' and it will show you a black box or your webcam stream, if it's plugged in.
* If you don't see your webcame stream, then choose 'Monitor' from the menu, then 'Video Settings'.
* Change the drop-down box to 'Source' and choose your webcam from the list.
* On the right-hand side, change the dropdown box labelled 'Preview' from 'None' to 'Compressed'.
* You should see your webcam feed displayed in the box.
* Click 'OK'.
* Close the QTCap window.
**Run Spectral Workbench**
* Go to the folder in which you unzipped Spectral Workbench
* From there, change to the folder called \spectrometry_kit\application.windows
* Run spectrometry_kit.exe
**You should see a grey screen and the QTCap window again**
* Click 'None' from the 'Compression Type' drop-down box.
* Click 'OK'.
* In a few seconds, spectral workbench should start analysing your webcam data.
The above instructions were transcribed from [these instructions](https://github.com/jywarren/spectral-workbench/issues/56). You might find more information there if your installation still doesn't work!
###Basics###
The software has 3 "modes" -- **Setup**, **Analyze**, and **Heatmap**. Setup lets you properly configure your spectrometer before using it. Analyze is the main mode you'll be using when testing samples. Heatmap uses a color gradient to display finer differences in your spectra, and is otherwise the same as Analyze.
###Setup###
Click the "Setup" tab at the top. You will see a small "preview" window indicating the height of the sampling row. You can drag to select the area you'd like to sample from, which will be averaged to produce your spectral data.
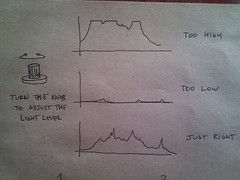
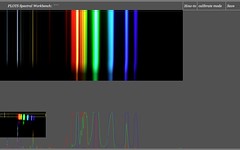 This is a chance to adjust the amount of light you're using as your source. If you have a dimmer, turn the dial until the red, green, and blue intensity curves are full height, but not "hitting the ceiling" -- which would mean you were losing data due to overexposure.
 (see [plans for improvement](https://github.com/jywarren/spectral-workbench/issues/23))
###Store a baseline reading###
Now that your spectrometer is set up correctly, you can store a "baseline" reading of just your sample container with no sample material. Place your sample container between the light and your spectrometer and press the spacebar. The spectrum you were seeing should be "saved" as a red line which persists even if you remove the sample container.
(see [plans for improvement](https://github.com/jywarren/spectral-workbench/issues/23))
###Store a baseline reading###
Now that your spectrometer is set up correctly, you can store a "baseline" reading of just your sample container with no sample material. Place your sample container between the light and your spectrometer and press the spacebar. The spectrum you were seeing should be "saved" as a red line which persists even if you remove the sample container.
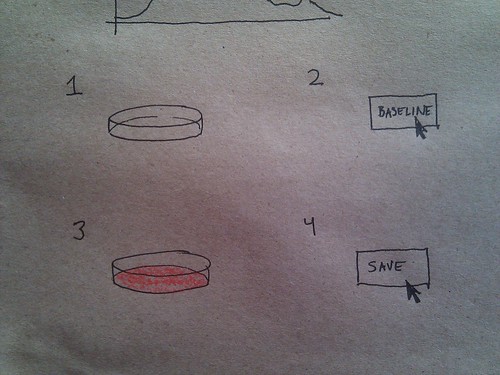 ###Measuring a sample###
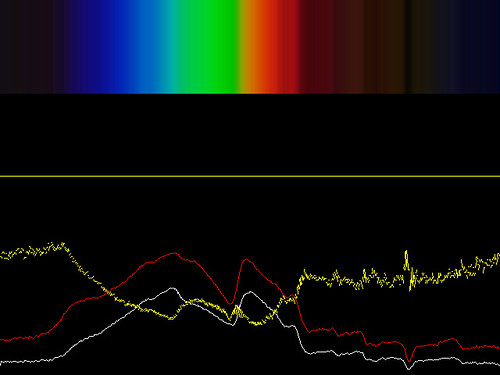
Now place the sample in its container in front of the spectrometer. You should see the white line drop below the red line - this is because your sample is absorbing some of the light. A new, yellow line will appear, representing the **amount of absorption**.
###Measuring a sample###
Now place the sample in its container in front of the spectrometer. You should see the white line drop below the red line - this is because your sample is absorbing some of the light. A new, yellow line will appear, representing the **amount of absorption**.
 ###Saving a spectrum###
Before saving, name your spectra by typing a name. It will appear in the top bar. Press "Save" and the SpectralWorkbench.org website will open in a window and prompt you to log in and save your data.
For some, the "Save" function is not working properly, and although the data is uploaded, it is not attached to your account. To get around this, you can open the "spectra" folder which you will find in the same folder as your application. There you will find any spectra which you have saved, which you can upload directly at [SpectralWorkbench.org](https://spectralworkbench.org). ([read about this bug here](https://github.com/jywarren/spectral-workbench/issues/81))
##Software issues:
**Linux app wont boot** - this may be due to the absence of the GSVideo library. Copy the folder called "libraries" from your /spectral_workbench/ directory into your Processing "sketchbook". It should contain the GSVideo library and the ControlP5 library. Now restart Processing or reopen the app.
##In your request, consider:##
* Did you launch the platform-specific version in the Mac OS X or Windows folders, or run it from within Processing (http://processing.org)?
* If you're having trouble, please try the Processing version, as it generates more useful error output.
* If you run it in Processing (processing.org) can you copy and paste the debug output from the Processing window and post/send it? That's much easier to diagnose.
* Do you have a webcam and does it work normally in Photo Booth (mac), Cheese (linux), VLC (windows and linux) or whatever webcam app Windows has?
* Did you close other webcam-using applications and free up your webcam before launching Spectral Workbench?
###Mac OS X###
* What version of Mac OS X are you using?
* If you see a grey screen, does a your webcam light up for a moment? There is a bug where a popup window asks you to choose a camera, but it can't come to the front because the app is fullscreen. You might try apple-tab once you see the green light come on.
###Saving a spectrum###
Before saving, name your spectra by typing a name. It will appear in the top bar. Press "Save" and the SpectralWorkbench.org website will open in a window and prompt you to log in and save your data.
For some, the "Save" function is not working properly, and although the data is uploaded, it is not attached to your account. To get around this, you can open the "spectra" folder which you will find in the same folder as your application. There you will find any spectra which you have saved, which you can upload directly at [SpectralWorkbench.org](https://spectralworkbench.org). ([read about this bug here](https://github.com/jywarren/spectral-workbench/issues/81))
##Software issues:
**Linux app wont boot** - this may be due to the absence of the GSVideo library. Copy the folder called "libraries" from your /spectral_workbench/ directory into your Processing "sketchbook". It should contain the GSVideo library and the ControlP5 library. Now restart Processing or reopen the app.
##In your request, consider:##
* Did you launch the platform-specific version in the Mac OS X or Windows folders, or run it from within Processing (http://processing.org)?
* If you're having trouble, please try the Processing version, as it generates more useful error output.
* If you run it in Processing (processing.org) can you copy and paste the debug output from the Processing window and post/send it? That's much easier to diagnose.
* Do you have a webcam and does it work normally in Photo Booth (mac), Cheese (linux), VLC (windows and linux) or whatever webcam app Windows has?
* Did you close other webcam-using applications and free up your webcam before launching Spectral Workbench?
###Mac OS X###
* What version of Mac OS X are you using?
* If you see a grey screen, does a your webcam light up for a moment? There is a bug where a popup window asks you to choose a camera, but it can't come to the front because the app is fullscreen. You might try apple-tab once you see the green light come on.