##Basics##
SpectralWorkbench.org is a web-based software suite for collecting spectra, using your [Public Lab DIY spectrometer](/tool/spectrometer). Once you have an [assembled spectrometer](/wiki/spectrometer-construction) connected to your computer or smartphone, go to https://spectralworkbench.org and click **Capture**.
_To use the full functionality, and especially on iOS, you should first [log in using your PublicLaboratory.org username](https://spectralworkbench.org/login)._
You'll then be able to connect to your spectrometer (desktop or [Opera Mobile](https://play.google.com/store/apps/details?id=com.opera.browser)) or [upload a spectrum](https://spectralworkbench.org/upload). Give it a title, tags, and description.
###Calibration
You'll notice that many other spectra on the site have a scale showing "nm" or nanometer units on the horizontal axis. To get scaled data, you must calibrate your spectrometer. There are several kinds of calibration but here we're talking about wavelength calibration, which allows your spectrometer to display a wavelength value for any color of light it sees. Luckily, this is easy.
1) Find a **fluorescent light bulb** -- preferably a compact fluorescent bulb you can put your spectrometer very close to. Point your spectrometer at the bulb -- if it's too bright, point it at a piece of white paper or wall which is brightly illuminated by the bulb.
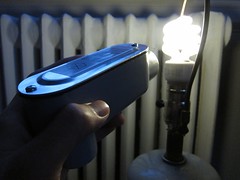 
2) You'll see an image like the above example; if you're on a computer, it may appear horizontally. The lines you see are from mercury in the bulb, and since we know what wavelengths they **should** be, we can use this to calibrate your device.
Save this spectrum, and tag it "fluorescent". Now you'll need to use the analysis tool to calibrate; it will walk you through the process. Read more and watch a short intro video here:
**[Spectral Workbench calibration](/wiki/spectral-workbench-calibration)**
###Analysis
**Once your spectrometer is calibrated, what do you do next?** This is the central question of our open spectrometry community. People are building and using these spectrometers for many reasons and there are different approaches being actively developed. For the time being, try browsing recent [contributed open spectrometry research](/notes/spectrometer), and look over [our growing list of applications and resources](/wiki/spectral-analysis)
We are planning to add details and next steps for:
* setting up a light source (a laser, halogen, or UV light) to illuminate your sample
* preparing samples of liquids or solids
* analysis and interpretation of the data you collect
However, exploring exactly how these things work & how to do them is exactly what we hope to better understand by working together. Join now and take these next steps with us!
##Videos##
A brief intro to [Spectral Workbench](https://spectralworkbench.org)'s new web-based capture interface, including absorption spectroscopy:
##Calibration##
Learn to calibrate your spectrometer with a compact fluorescent light (CFL):
See [Spectral Workbench Help](/wiki/spectral-workbench-help) if you have trouble.
##Advanced use
###Getting good data
Many things can go wrong (or right) when collecting spectra. Here are a few to look out for:
**Overexposure:** If there's too much light, the camera's sensors can't compensate and will be maxed out. On your graph, this looks like it's "hitting the ceiling" and you get a section with only 100% brightness. (Sometimes this happens in only one channel and you can't see until you enable RGB mode, as in the below image.)
There are a few things you can do:
* dim the source light
* move it further away
* use a diffuser (milky plastic, a sheet of paper), although this may affect your spectrum
* reflect light off of a piece of white paper or a wall (or, for something with a very clean white spectrum, try Teflon)
* use more sample (if you have, say, a colored liquid)
**Light leakage:** If your spectrometer is not sealed well, light may enter the imaging chamber and mess up your readings. The below image has some white light leaking in -- just seal up your spectrometer well with dark tape, especially where your camera attaches to it.

**Timing:** Sometimes, when using the "waterfall" interface in live capture, you don't quite catch that moment when a flare of light is _just perfect_. You can use **Set sample row** under "More tools" on the Analyze page to choose the best cross-section of the image, or use **Auto-detect brightest spectrum** and the website will try to do it for you.

###Webcam configuration
Most webcams have auto exposure and color "correction" so that in dim light, you can still see. This will unfortunately change the exposure between readings, so for quantitative work, it must be disabled. On Linux, you can use the "uvcdynctl" utility [as outlined here](https://github.com/jywarren/spectral-workbench/issues/2).
On a Mac, you can download this utility: http://www.phoboslab.org/log/2009/07/uvc-camera-control-for-mac-os-x
If you find a comparable utility for Windows, please post it here.
###Offline use
The offline-usable Java version of Spectral Workbench is **no longer actively developed or supported**, but you can read about it here: [Spectral Workbench Offline](/wiki/spectral-workbench-offline)
A new browser-based offline version is in development; ask [on the mailing list](/wiki/mailing-lists).
