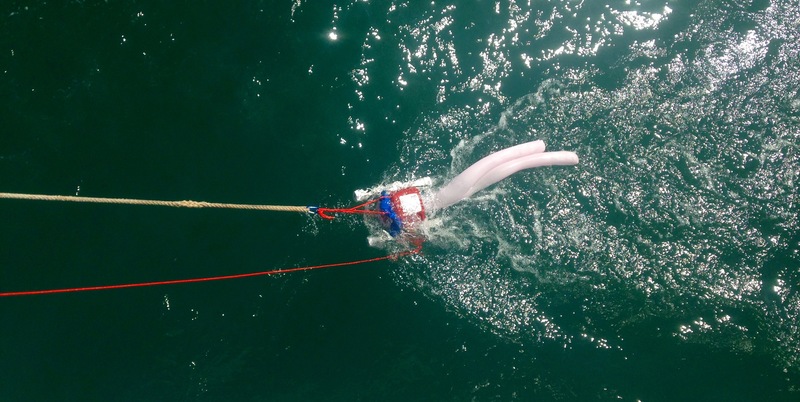
BabyLegs is a research trawl (net system) for monitoring plastic pollution, especially microplastics, in surface water.
[](/i/25545)
## Design goals
Created with baby’s tights, soda pop bottles, and other inexpensive and easy to find materials that cost ~$15, Babylegs can be used to trawl for floating microplastics from the surface of the water. She can be used with a boat (motorized going as fast as 5 knots in calm water, or human-propelled such as a canoe or paddle board), or by being tied off on a bridge or pier for passive sampling. BabyLegs mimics the type of samples collected by the more expensive [Manta Trawl](https://en.wikipedia.org/wiki/Manta_trawl): floating [microplastics](https://en.wikipedia.org/wiki/Microplastics) between 5mm-1mm in size.
Originally designed by [Max Liboiron at the activist science laboratory CLEAR](https://civiclaboratory.nl/2015/05/31/babylegs/) for sampling in Newfoundland and Labrador, Canada, BabyLegs is specifically built with items that are easy to come by in northern, rural communities. But the design supports hacks, replacements, and innovations that suit local needs.
Community and NGO groups have had success using BabyLegs to gather samples. The main expertise bottleneck is not in building or using BabyLegs, but in interpreting the samples. Microplastics are very hard to visually identify, since many things like rocks, bones, and organics look like plastics, and tiny plastics can be hard to see at all. The guide below is divided into sections on building and using BabyLegs and analyzing the samples for this reason.
[](/i/25546)
The image above shows some of the microplastics BabyLegs captured in the Hudson River, New York City.
## Questions
Q: Can I change materials on the trawl, or change the design?
A: Of course! The only thing you have to make sure of is that the mouth of the trawl is always half in the water and half out. It cannot dive or skip over the water. Also beware of any materials that might put more plastic into the ocean or into the sample (plastic 3D printing, fleece, and plastic thread are particularly bad for this). Also, the design outlined here has been tested in a variety of waters. New designs might not behave as well in choppy water, at higher speeds, or in wind.
Q: What sort of data does a sample from BabyLegs yield?
A: Things you can know from a sample:
● The types of plastics (fragments, films, beads, threads, etc) that are in a body of water.
● The relative frequency of each type of plastic compared to others (perhaps you have a lot of fishing gear, but not many microbeads compared to other places)
● The relative hotspots for plastics if you do sample strategically in different areas.
● Whether there are more or fewer plastics after rainfall events if you trawl before and immediately after rainfalls. This can include other temporal events that you think are adding plastics to your water (storms, tourist festivals, seasons).
You will not know:
● Where the plastics come from. They might be local, or they might have come from far away.
● How long plastics have been in the water. Some things can get tossed around in strong waves and look beat up after short periods of time, while plastics that sink can look pristine after years.
● About plastics that are smaller than 1mm. You might be able to see some, but research has shown that 1mm is the smallest cut off size that human eyes can reliably identify a plastic.
Q: Has BabyLegs been validated? Does she collect the same kind of sample as instruments like the manta trawl?
A. BabyLegs has not been validated yet, but we are working on it. Stay tuned-- we should have it done by the end of fall 2019. In the meantime, you can use BabyLegs to understand types of plastics, relative proportions of types of plastics, and hotspots. Validation will additionally let us calculate the density of plastic pollution.
Other questions are answered in the guides below.
[questions:tagname]
## Activities
Building BabyLegs
A full, illustrated guide is here:
BabyLegs_Build___Use_Guide-SM.pdf
Materials
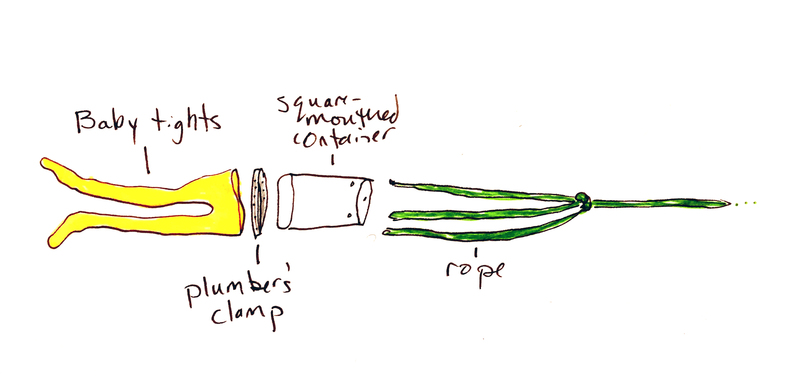
- square mouthed waterproof container with a mouth at least 6 inches wide (we recommend an empty plastic juice jug)
- plumber’s clamp that will fit around the container
- nylon baby or toddler’s tights (we recommend pink or red for contamination control)
- rope (we recommend a bright colour in case threads contaminate your sample)
- scissors or utility knife
- screwdriver or nutdriver to open and close the plumber’s clamp
- drill or grommet punch (optional, but useful)
- file or sandpaper (optional, but useful)
[](/i/25542)
Step 1: Cut the bottom off a waterproof container to use as BabyLeg’s body. Ideally, there will be a place to crimp the plumber’s clamp later (see below). We recommend containers with openings 6 inches and larger to get adequate samples. Square-mouthed containers will give you a better idea of how much water passes through if you want to calculate the volume of water sampled, but if you are just sampling for the presence of plastics, a round-mouthed container will be fine. Any container will work. We’ve used bulk ketchup containers, kitty litter containers, small buckets, and even a cardboard milk carton. Use what works best in your environment based on what you have available.
Step 2: Cut, punch, or drill three holes around the edges of the mouth of BabyLegs. The mouth should be the side with the smallest opening (otherwise it creates drag). Put holes above where you are going to put the tights. There should be two holes at the top and one at the bottom, as this configuration gives the trawler the most control over maneuvering BabyLegs with role while in the water.
Step 3: Trim, file, or sand the holes so they don’t have sharp edges that might snag the tights. Do this for the cut edges at the top and bottom of the container as well. We don’t want runs in our tights–it’s bad for science because the snags might let samples escape.
[](/i/25536)
Step 4: Open a plumber’s clamp wide enough to put over BabyLeg’s body. If your clamp isn’t big enough, you can join two clamps together. Put the baby tights between the container and the clamp. The strongest part of the tights—the waist band—should be where the clamp attaches. You may have to crimp your clamp if your container is square (see image below).
Step 4b: If possible, wind the tights around the clamp for added strength. If you clamp the thinner material, it may create holes.
Step 5: Close the clamp security, but not too tightly that it stresses the container. If your container is square, you may have to keep crimping the corners so the clamp tightens evenly. Test by tugging on the tights.
Step 6: Attach a rope to the three holes you’ve created around the mouth of the trawl. Tie them so that they evenly attach at one central point. If it is uneven, BabyLegs can spin in the water and snag up the lines. Melt or otherwise tie off ends of the rope so threads do not contaminate your sample. If you can’t melt them or are concerned that they might contaminate your sample, tie them so the ends are on the outside of the trawl rather than the inside.
Step 7: There are other additions to can add to BabyLegs depending on the type of water and vessel you are using. You can add “water wings,” soda pop bottle pontoons, manta wings, and other stabilization or flotation devices for very calm and slow water, or choppy water.
[](/i/25544)
For instructions to delploy BabyLegs, see BabyLegs_Build___Use_Guide-SM.pdf
For instructions on how to analyze samples, see:
DIY_lab_work_for_trawls-SM.pdf
Spotter’s_Guide_to_Plastic_Pollution-_trawls-SM.pdf
A template BabyLegs_Build___Use_Guide-SM.pdf
Blank_plastic_analysis_sheet.xlsx
spreadsheet for analysis of samples is here:
[activities:tagname]