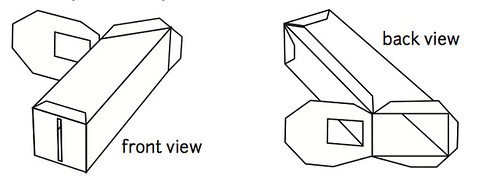
New to [spectrometry](/wiki/spectrometry)? On a budget? Looking for something to introduce a group to spectrometry? You might like to try the **Papercraft Spectrometry Starter Kit**, a simple foldable paper spectrometer which you can attach to a smartphone or webcam. It’s made of paper to reduce cost and complexity, and is mainly intended as a low cost “introductory” or educational kit.
## Specs / Statement of function / Purpose of design or device
The resolution and stability (ability to hold a [wavelength calibration](/wiki/spectral-workbench-calibration)) of the spectrometer depend on how carefully you construct and store it. This kit is designed to be easy to assemble, and is not focused on extreme precision or super consistent measurements; it’s made of paper, and will crush if you put it in your pocket -- but it can be made out of easy-to-find materials and assembled in ~15 minutes. To improve it, see the related [hardware mods](/wiki/spectrometry#Hardware+Mods). For a more rigid, robust device intended for more advanced work, check out the [Desktop Spectrometry Starter Kit]().
Most digital cameras can record light in the visible range, ~400-700 nanometers, so this determines the range of your device. The resolution is mainly limited by the resolution of the camera (and it’s focus!) and by the narrowness of the slit -- but measurements should be possible at better than 3 nanometers per pixel. See [limitations and goals]() for more.
## Plans, materials, and what it takes to make one:
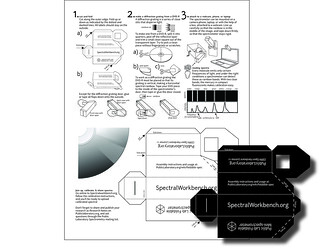 ### Instructions
* print and/or trace [this letter-sized PDF pattern](https://publiclab.org/sites/default/files/8.5x11mini-spec3.8.pdf) onto black paper
* cut out with scissors, no other special equipment required
* fold the paper along the lines to form a rectangular tube (takes about 15 minutes)
[See assembly photos here](#Assembly+Photos)
This [starter kit](http://store.publiclab.org/products/foldable-mini-spectrometer) includes these materials:
* a piece of pre-printed paper (dimensions) with a hole for the camera
* a DVD-R
* a narrow slit printed onto plastic film (see image - and [how to make one of these](/wiki/slits))
The kit uses, but does not include, a smartphone with a camera (or a webcam) to capture images of spectra through the spectrometer you construct. It works with free web software https://spectralworkbench.org.
To scan things, you will probably also need a light source, and [some sample containers](/wiki/spectrometry-sampling).
****
## Limitations and Goals
This starter kit is a great way to begin learning about spectroscopy by building a simple one, but is not meant for quantitative research. Once you’ve mastered it, you can improve it with some of the [hardware mods](/wiki/spectrometry#Hardware+Mods) listed here, or to take it to the next level, see the [Desktop Spectrometry Starter Kit]() for a more robust platform to build on.
Though it is specifically designed to be an “introductory” kit, there are a number of goals to work towards, and limitations which you can help to overcome in the current design. Intro-level kits play an important role in helping people build the skills they need to join in the project and improve these methods -- in building a large collaborative community around this project.
Some of the goals and challenges we’re still working on with this kit include:
[ these could be listed as “requested mods”? ]
* the alignment between the foldable spectrometer and a smartphone or webcam is hard to keep consistent with soft materials like paper
* assembly relies on careful gluing or taping -- could we make a glue-less tab-based version that’s still light tight?
* the film-printed slit in the starter kit is really nice, but can be hard for someone to make on their own -- some tips on making your own slits would be helpful
* a wider spectrometer would make a wider spectrum, which would be easier to capture a picture of
* comparing spectra with different light sources, or between different devices, is not well explored; learn more this challenge here
## Get involved in the next revision
OOH (coming soon)
****
## Assembly Photos
Cut out along the outer edge if not already cut out.
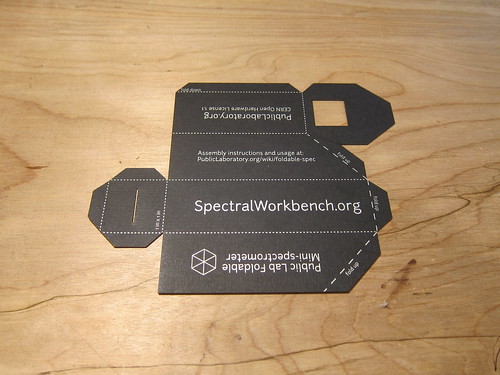 Fold as indicated by the lines. Thinly dotted lines are folded down, dashed lines folded up.
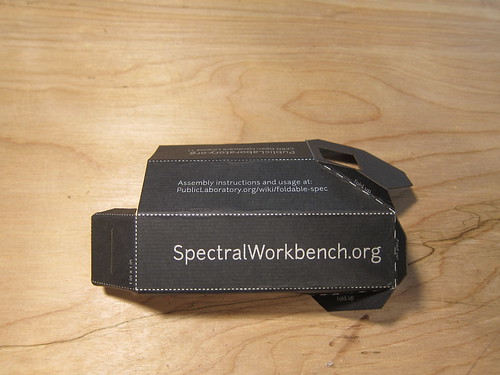 Glue or tape together. Start with the top flap and make sure the edges are aligned.
 Except for the Diffraction grating on door, glue or tape all flaps down to the outside.
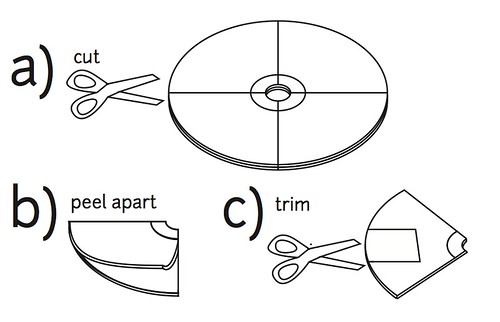
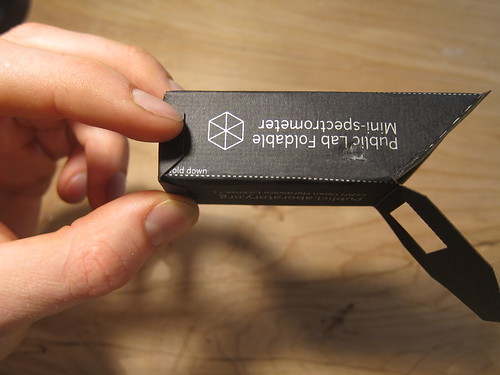 To make a diffraction grating from a DVD-R, peel back the reflective layer, and cut a small square out of the transparent layer. See also: Preparing a DVD-R to act as a diffraction grating for more information on the _optional_ removal of the residual aluminium and dye layers.

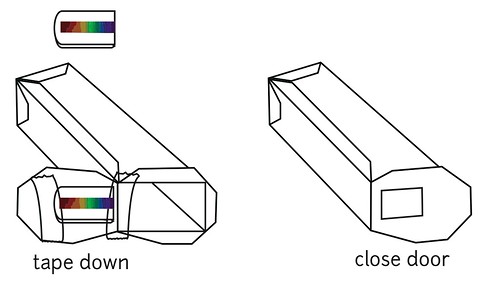
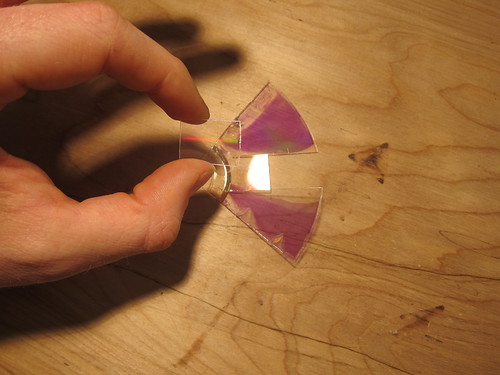 Tape or glue down the DVD-R diffraction grating to the inside of the spectrometer so that the diffraction grating is vertical, producing a horizontal spectral rainbow. Then glue the door closed.
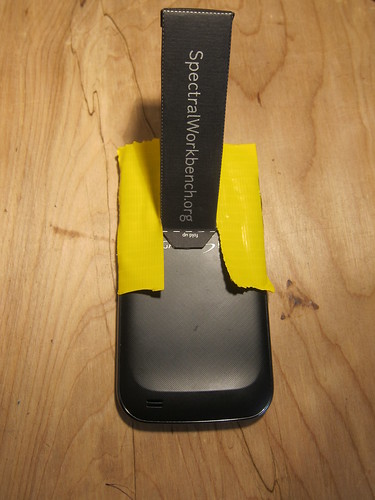
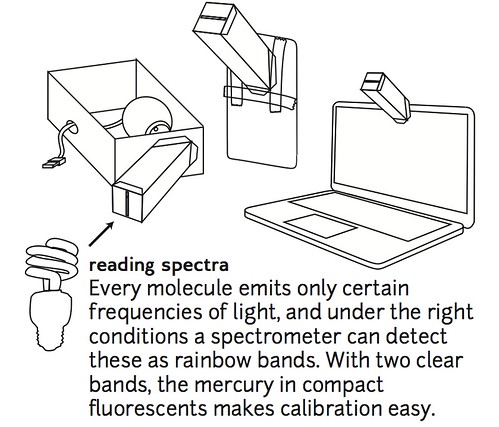
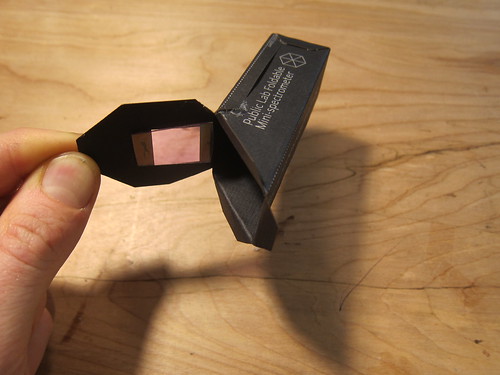 Attach The spectrometer to a webcam with the aid of a box, to a phone, or to a computer.
 ## Illustrated Assembly Guide
Cut out along the outer edge if not already cut out.
 Fold as indicated by the lines. Thinly dotted lines are folded down, dashed lines folded up.
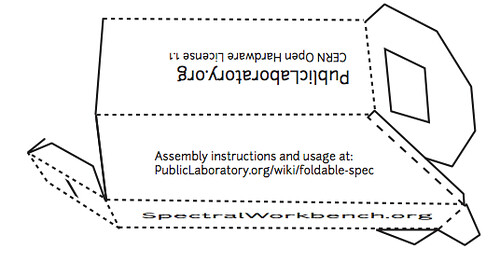 Except for the Diffraction grating on door, glue or tape all flaps down to the outside.
 To make a diffraction grating from a DVD-R, cu a square from the outer edge. The DVD has is two layers of plastic. Peel back the reflective layer, and cut a small square out of the transparent layer.
 Tape or glue down the DVD-R diffraction grating to the inside of the spectrometer so that the diffraction grating is vertical, producing a horizontal spectral rainbow. Then glue the door closed.
 Attach The spectrometer to a webcam with the aid of a box, to a phone, or to a computer.
 ### Instructions
* print and/or trace [this letter-sized PDF pattern](https://publiclab.org/sites/default/files/8.5x11mini-spec3.8.pdf) onto black paper
* cut out with scissors, no other special equipment required
* fold the paper along the lines to form a rectangular tube (takes about 15 minutes)
[See assembly photos here](#Assembly+Photos)
This [starter kit](http://store.publiclab.org/products/foldable-mini-spectrometer) includes these materials:
* a piece of pre-printed paper (dimensions) with a hole for the camera
* a DVD-R
* a narrow slit printed onto plastic film (see image - and [how to make one of these](/wiki/slits))
The kit uses, but does not include, a smartphone with a camera (or a webcam) to capture images of spectra through the spectrometer you construct. It works with free web software https://spectralworkbench.org.
To scan things, you will probably also need a light source, and [some sample containers](/wiki/spectrometry-sampling).
****
## Limitations and Goals
This starter kit is a great way to begin learning about spectroscopy by building a simple one, but is not meant for quantitative research. Once you’ve mastered it, you can improve it with some of the [hardware mods](/wiki/spectrometry#Hardware+Mods) listed here, or to take it to the next level, see the [Desktop Spectrometry Starter Kit]() for a more robust platform to build on.
Though it is specifically designed to be an “introductory” kit, there are a number of goals to work towards, and limitations which you can help to overcome in the current design. Intro-level kits play an important role in helping people build the skills they need to join in the project and improve these methods -- in building a large collaborative community around this project.
Some of the goals and challenges we’re still working on with this kit include:
[ these could be listed as “requested mods”? ]
* the alignment between the foldable spectrometer and a smartphone or webcam is hard to keep consistent with soft materials like paper
* assembly relies on careful gluing or taping -- could we make a glue-less tab-based version that’s still light tight?
* the film-printed slit in the starter kit is really nice, but can be hard for someone to make on their own -- some tips on making your own slits would be helpful
* a wider spectrometer would make a wider spectrum, which would be easier to capture a picture of
* comparing spectra with different light sources, or between different devices, is not well explored; learn more this challenge here
## Get involved in the next revision
OOH (coming soon)
****
## Assembly Photos
Cut out along the outer edge if not already cut out.
 Fold as indicated by the lines. Thinly dotted lines are folded down, dashed lines folded up.
 Glue or tape together. Start with the top flap and make sure the edges are aligned.
 Except for the Diffraction grating on door, glue or tape all flaps down to the outside.
 To make a diffraction grating from a DVD-R, peel back the reflective layer, and cut a small square out of the transparent layer. See also: Preparing a DVD-R to act as a diffraction grating for more information on the _optional_ removal of the residual aluminium and dye layers.

 Tape or glue down the DVD-R diffraction grating to the inside of the spectrometer so that the diffraction grating is vertical, producing a horizontal spectral rainbow. Then glue the door closed.
 Attach The spectrometer to a webcam with the aid of a box, to a phone, or to a computer.
 ## Illustrated Assembly Guide
Cut out along the outer edge if not already cut out.
 Fold as indicated by the lines. Thinly dotted lines are folded down, dashed lines folded up.
 Except for the Diffraction grating on door, glue or tape all flaps down to the outside.
 To make a diffraction grating from a DVD-R, cu a square from the outer edge. The DVD has is two layers of plastic. Peel back the reflective layer, and cut a small square out of the transparent layer.
 Tape or glue down the DVD-R diffraction grating to the inside of the spectrometer so that the diffraction grating is vertical, producing a horizontal spectral rainbow. Then glue the door closed.
 Attach The spectrometer to a webcam with the aid of a box, to a phone, or to a computer.
