About me
Name: Vibhor Gupta
Email: vibhordelgupta@gmail.com
Github: VibhorCodecianGupta
Gitter handle: VibhorCodecianGupta
Affiliation: BE at Delhi Technological University (Formerly Delhi College of Engineering), class of 2020.
Location: New Delhi, India
Project description:
Image Sequencer is a general purpose, step-by-step image processing library in pure JavaScript, built to support a range of image-processing tasks across Public Lab and beyond. It has the capability of outputting the processed image at each step as well as a CLI tool for ease of use right from the terminal.
Abstract/summary:
Launching Image Sequencer into performance overdrive, leveraging its modules for real-world use cases and setting up a testing harness for the user interface.
Problem & Deliverables:
This project has the following deliverables:
- Implementation of web workers for both Node and Browser context.
- Churning out Web assembly code for Pixel Manipulation method.
- Implementation of WebGL in Node context to allow GL-based modules to run in Node.
- Writing tests for user interface and untested parts of the code.
- Colour differentiation and quantification on colorimetry strips.
Ideas & Implementation:
1. WEB WORKERS :
Using web workers allows asynchronous processing of CPU intensive tasks in Javascript by moving them out of Node event loop and running them in parallel in the background on the available CPU cores. Unlike forking new processes, threads can share memory, which saves resources.
This approach shall be employed on Run.js for the sequencer's run function, enabling processing on alternate threads.
MOCK IMPLEMENTATION:
This implementation uses the threads module for spawning alternate threads. It boasts of using web workers in browser context and child process in node context and hence tailor-made for this use case.
Image Sequencer has a function ImageSequencer which returns an object of functions, one of them being the run() function. The run() function requires the Run.js module for its utility functions. The ImageSequencer object can, in turn, be instantiated and used to call its member functions.
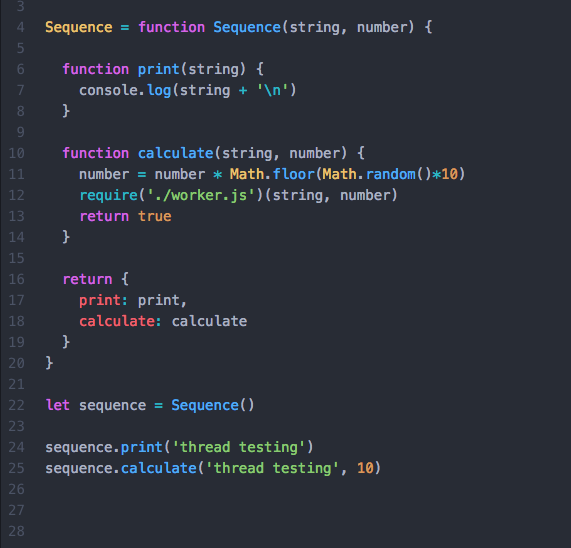
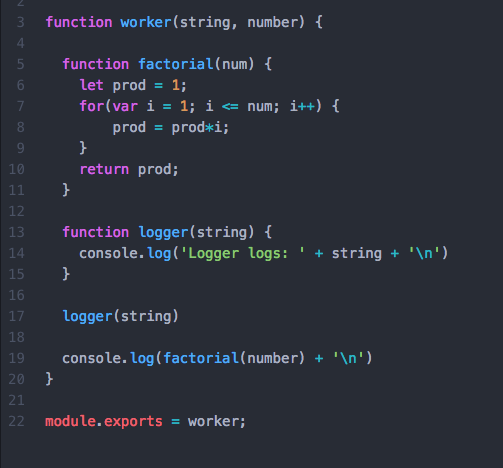
A very similar mock has been simulated here with the function Sequence() having members print() and calculate(). The calculate() function imports a module worker.js for its CPU intensive processing, in this case, a simple factorial function.
To draw analogies, Sequence is analogous to ImageSequencer, calculate() to run() and factorial() to, say, filter() function inside Run.js.
Worker.js module (imported into the calculate() function):
The output of the aforementioned program after being invoked in the script is as follows:

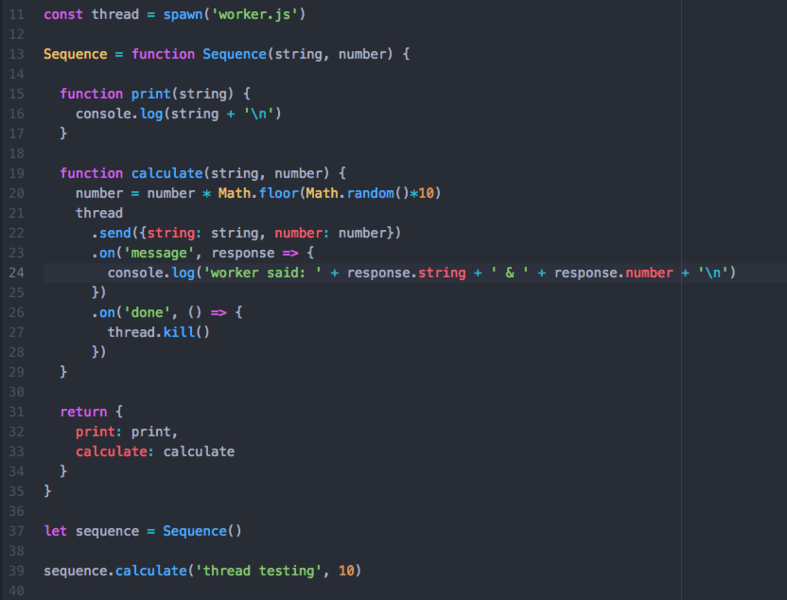
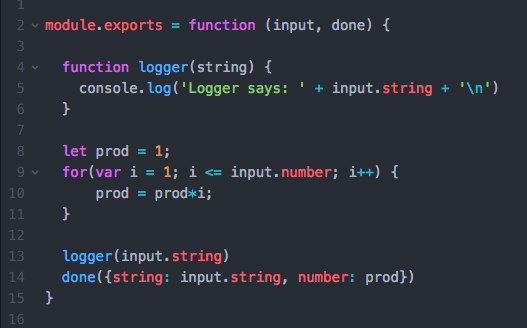
To enable alternate threading and running the calculate() function, a new thread is spawned and the path to worker.js module is passed as an argument. The instantiated thread is then sent the functional parameters required and will return a promise of completion or unexpected termination. The response object transferred from the alternate to the main thread is then received.
Following is the thread instantiation in the script:
The worker.js module is exported as a function to be run inside the thread and returns a callback with the response like so:
The generated output verifies with the original output:

Since threads run the functions passed to them in their own context, no surrounding code can be directly invoked. This is a roadblock to the flow of importing getStep.js module for all the helper functions into Run.js. The library supports passing of node modules into thread pools as an argument to pool.run() but not to thread.run() (in the node context). The thread.run() method uses importScripts in the browser context. A reliable workaround to this problem is to either use importScripts directly in the browser context or to pass the file path of the module to be imported via the thread.send method as an argument, like so:
const thread = spawn(function(input, done) {
                 var someModule = require(input.__dirname + ‘/util.js’);
                 // import util functions for thread context
               });
          thread.send({__dirname: __dirname})
This allows us to maintain the modularity of the code and steer clear from rewriting utils inside the thread context.
A very similar architecture shall be implemented for the Sequencer and run functions. An important note here would be to consider the use, but not an overuse of worker threads. The reason being the overhead required to spin up a thread is significant, and spawning threads for say, every function inside the run module would overcompensate for the performance optimisation. The most efficient approach in this case could be to either run the entire module on a single parallel worker or a thread pool with a predefined number of workers (for which the thread library provides ample support).
Following code snippets specify how the run() function and Run.js module will have to be modified:
function run(config, t_image, t_from) {

    // logic of the run function

    var json_q = formatInput.call(this_, args, "r");

    thread
      .send({this: this_, q: json_q, cb: callback, index: index, obj: progressObj})
      .on('message', response => {
            //some action here
        })
      .on('done', () => { thread.kill() })

    return true;
  }<br>
And accordingly, the input object and the done() callback will be passed into the module running in the thread context.
function Run(input, done) {

  // function logic
  // all the parameters accessed via input object

}<br>
2. WEB ASSEMBLY:
Web assembly is a low-level assembly-like language with a compact binary which can run on near-native performance and provides languages like C with a compilation target to run in web browsers. This proposal employs wasm for speeding up pixel-to-pixel manipulations.
MOCK IMPLEMENTATION:
This implementation utilises the Web Assembly Javascript API which compiles and instantiates the source files with .wasm extension. A gulp task uses @wasm/studio-utils to compile native C code to a wasm file which can be used by the Javascript API.

Next, the generated wasm file is to be imported in the Javascript file. The response exported by the wasm is received and caught in a buffer. Next, the DOM is manipulated to obtain the canvas element and the context, like so:
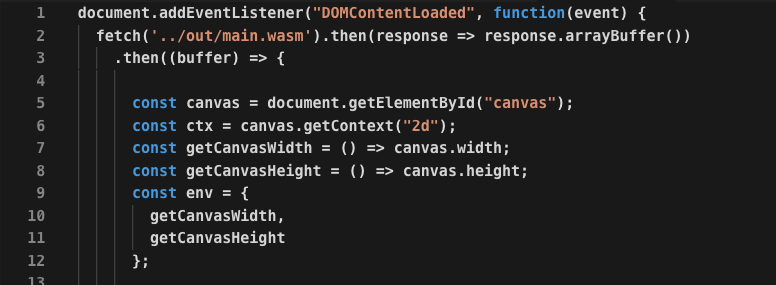
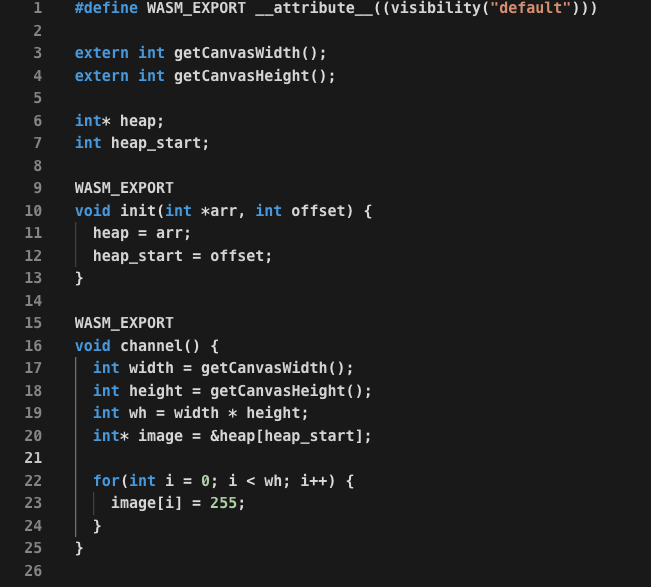
The main C code that churns the pixel manipulation is as follows. The WASM_EXPORT indicates the function declarations to be exported by the wasm file generated after the build process. The init() function initiates a memory buffer for handling the image data. The channel() function contains the entire logic (which in this case is very minimal for the purpose of being a mock) of iterating through the array of size width*height (of the canvas) which stores the information of the image, with each element having 4 bits representing the 4 channels. The program sets the very first bit of each pixel to the value 255, hence making all the pixels red in colour.
This code, once compiled to the wasm binary is then injected into Javascript which can then utilise the functions exported by the code written in C. In the following mock, after specifying the memory allocation, the channel() function is called and the result is stored in a Uint8ClampedArray and transformed into image data understandable by the Javascript DOM. This array can be used to write to a canvas, which would then render a red coloured picture.
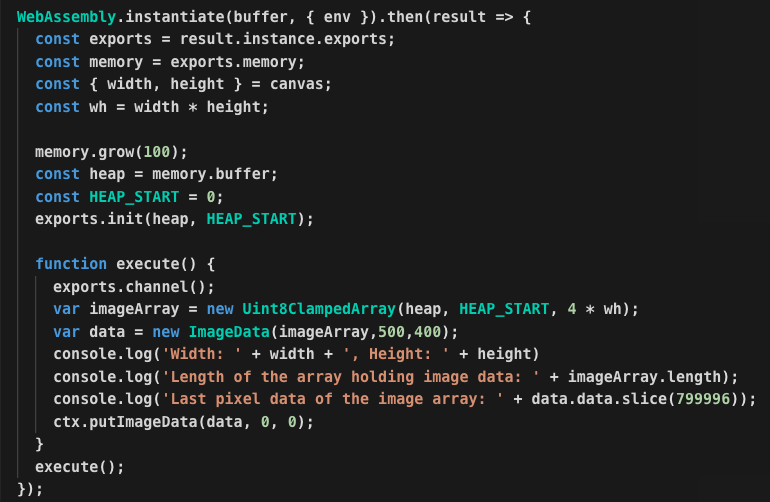
The console logs are as follows:
- Width and Height of the DOM canvas. Expected to be 500 & 400.
- The length of the array that holds the pixel data for the image. Expected to be 4*height*width (4*500*400 = 800,000 here)
- Sliced data of the last pixel of the array. All the pixels hold the same data. Expected to be (255, 0, 0, 0)

The above C code can be conveniently translated to a walt code, owing to its highly Javascript inspired semantics. This provides a good alternative to writing C code in case the code complexity and legibility gets inconvenient. Emscripten would be the desirable compiler for the job, which converts LLVM bytecode (generated from C or C++) to Javascript which can be run in the browser.
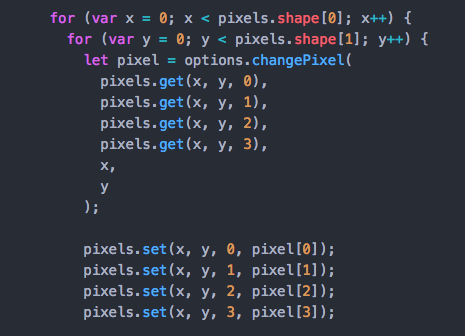
Pixel Manipulation deals with pixel-to-pixel handlings in the following snippet. This piece of the code shall be replaced by web assembly compiled code primarily to achieve performance boost, gradually moving on to completely transforming the entire utility.
3. WebGL FOR NODE CONTEXT :
WebGL support is available for the browser environment accessible with a WebGL context. The task is to translate the same functionality in the Node environment to enable seamless integration of the FisheyeGL module and the webgl-distort module into Image Sequencer. The approach here could be two-fold.
- Using a headless browser service and running the modules in that context.
- Using the
glimported into the node environment (which would lead to separate programs for browser and node environments) or combining it withjsdomto make a DOM in node context.
Using the headless browser is a more feasible solution owing to the ready-made support for headless environment provided by puppeteer. The callback from the instantiation can be used to manipulate the WebGL API.
MOCK IMPLEMENTATION:
This implementation uses puppeteer for the headless browser environment. Inside the puppeteer callback, webgl methods can be utilised just like in the native Javascript API. A webgl texture is created which is used to load the image into for further manipulation. To access the pixel data from a texture, the texture is rendered into a frame buffer and the pixel data is extracted from this buffer into a Uint8 array.
Below is the instantiation of puppeteer:
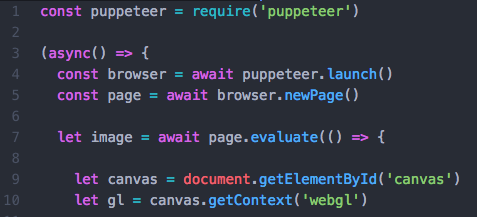
This implements the texture and uses the texImage2D method to encode pixels and defines a Uint8 array to store that data. Following this, a frame buffer is created as a render object and the texture data is written into it, from where the pixel data can be extracted into the Uint8 array.
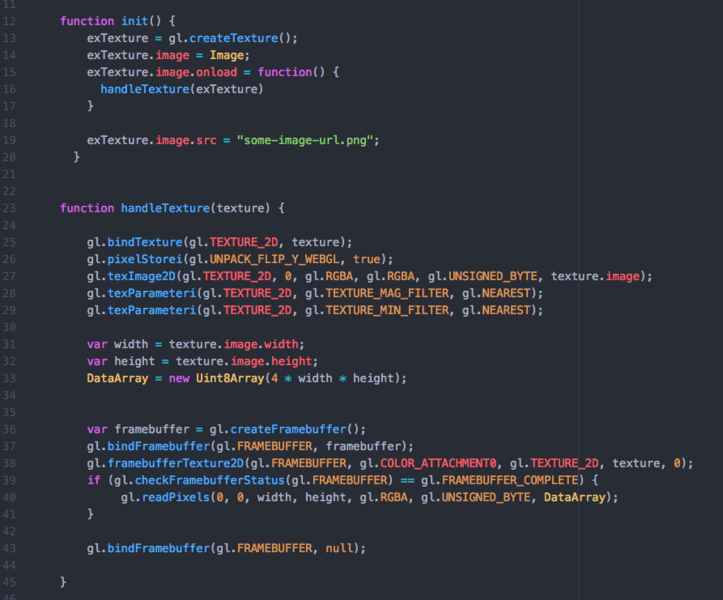
The aim of this exercise is twofold. To demonstrate the extensive flexibility of being able to use web-gl APIs within a headless environment and to demonstrate boilerplate code of writing images to a texture and extracting pixel information which implies that more complex code can be translated as well, especially the webgl-distort module, with a little research and trial.
A similar flow shall be followed for the aforementioned modules, running them inside puppeteer and obtaining the results in the callback. In webgl-distort, for example, The code for creating a webgl canvas and working on it can be enclosed in puppeteer promise.
4. COLORIMETRY TOOL :
As a image processing tool, it is only natural that Image Sequencer has a use case such as this one, an important one, which has practical relevance. Given the abundance of modules already implemented, the project is absolutely ripe for being leveraged in comparing images before and after colour based chemistry tests and quantifying the results.
Let the test image be as follows:
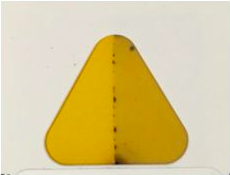
The left half of the image is the natural colour while the darker right half is the test for formaldehyde. Sequencer shall extract the pixel values of the channel and find the distance of the same between the natural image and the coloured image.
- New instance of Image Sequencer
- Applying the crop module on this instance with the left half of the image (test image) as the input, in encoded form or by passing in the data URI.
- Applying average module on the cropped output to produce a uniform colour and take care of unwanted exposure inconsistencies while taking the picture or any undesired coloured spots on the test image.
- Repeating the above steps for the right half of the image.
- Comparing the channel values for a pixel for both the outputs and quantifying it in the form of either a difference in pixel values or their ratio.
This requires urgent fixing of the crop module, namely issues #987 and #213, and any others should they pop up while testing the module.
MOCK IMPLEMENTATION: The following implementation takes in new instances of the IS and inputs two separate images and works on them, just as the aforementioned flow, like so:
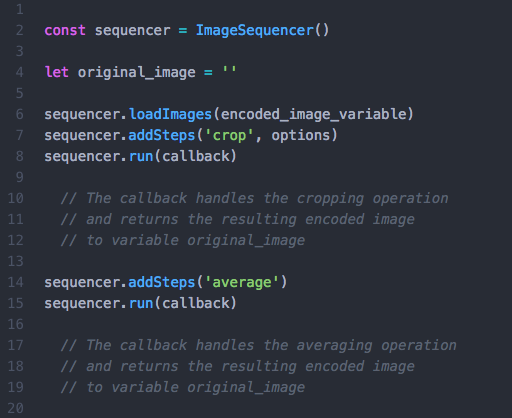
The distance between the images can be found out by using a change detection module, with the purpose of taking two averaged out images as input and calculating the distance or the ratio between their pixel values. This would be straight forward to do, by accessing the pixels of the two images and drawing the comparison.
The change detection module simply takes two images as arguments (Data URI or encoded images), access their pixels using get-pixels and calculates the difference between pixels of both the images in each channel. It has to be ensured, however, that the images are already averaged. Following is a simple flow of the module.

Another problem image could be the one as follows:
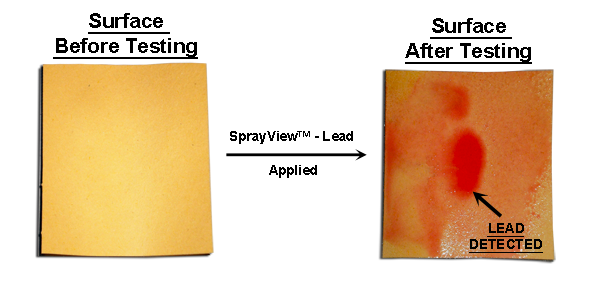
This is a more natural representation of the colorimetry tests carried out by humans using testing agents, where the coloration is never uniform over the test strip. In such cases, it might be difficult to look for a section to crop the image from which clearly provides shows a large enough area which changed in colour. As shown above, tiny patches of the coloured strip may show coloured images, but they might not be distinct enough to be handled by the crop module, such as during drop tests.
In such input images, the blob detection or particle identification approach could be seamlessly integrated into this use case (described here). Detecting the edges of small patches of colours, creating a bitmap and returning the detected section of the image, which can be further processed by cropping and averaging similar to the algorithm described before.
5. TESTING FOR USER INTERFACE :
This is one of the most essential deliverables for the summer, for maintaining the code quality and coverage. The boilerplate testing harness for the UI is already in place, more meaningful tests remain to be written. They mainly include the following:
- Testing for various peripheral DOM elements, whether they render by asserting their correct and incorrect invocation.
- Testing for the main DOM elements, that of sequencer input and outputs, and whether they correctly render on running the sequencer.
- Testing for the proper functioning of buttons and other event listeners.
- Adding dangerbot to the project (#780)
- Adding unit tests wherever necessary.
These tests shall be written side by side throughout the summer, as and when new UI updates keep popping up. To avoid piling up and missing out on important steps, regular testing suites will be implemented.
6. IMAGE SEQUENCER LOGO :
This is something I'd love to implement as a trivia to my proposal. It is only fitting to make a minimalistic logo for the project seeing as it has evolved exponentially and would be tackling real world use cases post summer.
The design would be done on Adobe Photoshop or Illustrator.
Current issues on Github which will be closed:
- https://github.com/publiclab/image-sequencer/issues/400
- https://github.com/publiclab/image-sequencer/issues/829
- https://github.com/publiclab/image-sequencer/issues/216
- https://github.com/publiclab/image-sequencer/issues/979
- https://github.com/publiclab/image-sequencer/issues/1000
- https://github.com/publiclab/image-sequencer/issues/780
Code maintainability
As important as it is to implement the deliverables, it is equally important to document the same comprehensively. Writing commented code would be a priority and adding comments in certain modules which I feel are not intuitive enough for new comers to understand, would be documented as well. A Wiki page explaining the obscure parameters of the run files and image sequencer arguments could also be on the table.
Standard code linting will be followed while writing good, ES5 Javascript.
Timeline/milestones
Owing to the general elections this year on May 12th in India, my end semester examinations would end around the 18th of May, following which the planning and approach along with discussion with organisation mentors and admins would commence over Gitter channels and issue trackers.
Pre-GSoC and community bonding period
Very urgent and important deliverables to be completed during this period, such as:
- Managing dist files to eliminate conflict resolving (https://github.com/publiclab/image-sequencer/issues/773)
- White balance module (https://github.com/publiclab/image-sequencer/issues/488)
- Refactoring string helper methods (https://github.com/publiclab/image-sequencer/pull/667)
- Fixing Crop module bugs
- Other sporadic bug fixes
- Closing all pending pull requests
Planning the advent of summer, discussions on approaches and the packages to be used.
Weeks 1, 2 (May 27 - June 9):
Translating pixel manipulation code snippets into native C code and compiling using Emscripten. This shall take time and research to completely and accurately make the communication between the C and Javascript and hence using the web assembly Javascript API in a way that it doesn't affect the project structure.
Week 3 (June 10 - June 16):
Writing tests for the newly written C code, exploring options like walt to check for easier implementation and integration and planning phase for expanding the web assembly approach to other parts of the code. Also writing speed benchmarking scripts for the webassembly code.
Week 4, 5 (June 17 - June 29):
Implementing web workers for browser (and node) environment for the sequencer run function. Includes exploiting the threads.js library, managing context, creating a smooth flow of methods in and out of the alternate threads and writing benchmarking tests on CPU-heavy modules.
Week 6, 7 (June 30 - July 14):
Exploring and implementing WebGL for node environment. This includes exploiting the puppeteer library to conform it to our use case and hence writing the webgl code in its context, making necessary changes in the fisheyeGL module to make it work in the node environment.
Week 8 (July 15 - July 21):
Integrating the webgl-module in Image Sequencer on the same lines as the fisheyeGL module. Having already implemented the webGL for node environment, this task is expected to be smoothly completed. Unit tests will be added for the fisheyeGL and webgl-distort modules.
Week 9 (July 22 - July 29):
Implementing the colorimetry use case. This involves resolving any remaining issues with the crop module, and developing a micro service with image sequencer as a dependancy to compare the normal and tested images. Also looking into the blob detection approach as a follow up for a better coverage of real world cases.
Week 10, 11 (July 30 - August 12):
Making a simplistic and minimal UI for the colorimetry use case. Writing extensive UI tests for DOM elements, event listeners and clickables.
Week 12 (August 12 - August 19):
Primer period, to be utilised for any of the above tasks in case they require more than the anticipated time. Extensive documentations of the work done in the summer.
Final Evaluation (August 19 - August 26):
I would like to design a logo for the project during this period. Having grown to be such a mature codebase with increasing use cases, its only fitting to represent the same with a sleek logo!
Post GSoC:
I plan to document the 3 months of summer with Public Lab in a blog post, and also write detailed accounts of the application of worker threads and web assembly into projects with heavy CPU bound tasks. I plan to keep contributing to Image Sequencer and become more and more involved with the planning and action of taking this project forward.
Why PublicLab?
My reasons for contributing to PublicLab are twofold.
- Projects: The projects at publiclab are arguably some of the most interesting ones I've ever come across. Image Sequencer was one project I navigated to, and instantly knew I had to stick to. I never looked at other repositories because I was positive no other project could catch my eye like this one. It has taught me a lot about Javascript in the past 3 months.
- Community: The community at publiclab is the best open source community I've discovered. Not only is everyone extremely experienced, they are just as energetic. Never have I come across an incident of dissent going in the direction of unhealthy arguments. It's all driven by constructive brainstorming. This kind of an environment is conducive to good work being done and personally, having substantive conversations with contributors.
I intend to keep contributing to Public Lab beyond the summer as well, the vibe of the community keeps making me come back to it!
Needs
All the code mentioned above will be implemented within the timeline specified, however, assistance from peers and mentors is always appreciated and rewarding.
Contributions:
I have been consistently contributing to Image Sequencer for a while now, and have been accepted into the PublicLab reviewers team. Below is a list of my contributions to the project over the past several weeks.
Module contributions:
- Colour Temperature module (https://github.com/publiclab/image-sequencer/pull/585) merged
- Exposure module (https://github.com/publiclab/image-sequencer/pull/721) merged
Bug fixes:
- Enable Travis to run UI tests (https://github.com/publiclab/image-sequencer/pull/791) merged
- Remove remnant DOM div in Crop module (https://github.com/publiclab/image-sequencer/pull/623) merged
- Fix import bug of parse corner coordinates utility (https://github.com/publiclab/image-sequencer/pull/608) merged
Test suites:
- Testing module outputs by comparing them with input images (https://github.com/publiclab/image-sequencer/pull/748/files) merged
- Setup testing harness for the UI. Building on the same is a part of the proposal (https://github.com/publiclab/image-sequencer/pull/720) merged
UI improvements:
- Add media query to make buttons responsive (https://github.com/publiclab/image-sequencer/pull/583) merged
- Update module dropdown text to default after adding module (https://github.com/publiclab/image-sequencer/pull/574) merged
CLI & refactoring:
- Refactored CLI code to prevent cluttering in a single module (https://github.com/publiclab/image-sequencer/pull/665) merged
Utilities and helpers:
- Detect and parse any input type (https://github.com/publiclab/image-sequencer/pull/787) WIP
- Refactor string helper methods (https://github.com/publiclab/image-sequencer/pull/667) WIP
- Parenthesis fix in dynamic module (https://github.com/publiclab/image-sequencer/pull/580) WIP
- Coordinates for custom resizing (https://github.com/publiclab/image-sequencer/pull/571) WIP
Experience
I am a budding software developer proficient in Node.js and Javascript and expanding my horizons with Flask and Python. I have been an active open source contributor for a better part of about 2 years. I have been a part of the core software lead of my university's IEEE chapter for about 2 years, mentoring younger developers and collaborating on open source projects.
I interned at Coding Blocks, an open source academic institution driving the vision of imparting university students with the knowledge of computer science. My contributions there were primarily on Javascript and Typescript projects being used by the few hundred mentees of their educational courses.
Oneauth:
A one stop registration and login service to all of Coding Block's open source products and services, much like Google accounts is integrated into all of Google's service. Utilises OAuth 2.0 standard authentication via passport packages for authentication strategies and to connect one's social media accounts to the portal. The project has scaled to satisfy a variety of use cases. It is built on Node.js and handlebars with a RESTful protocol.
Contributions:
- https://github.com/coding-blocks/oneauth/pull/431
- https://github.com/coding-blocks/oneauth/pull/430
- https://github.com/coding-blocks/oneauth/pull/427
- https://github.com/coding-blocks/oneauth/pull/422
- https://github.com/coding-blocks/oneauth/pull/413
- https://github.com/coding-blocks/oneauth/pull/412
- https://github.com/coding-blocks/oneauth/pull/360
- https://github.com/coding-blocks/oneauth/pull/349
- https://github.com/coding-blocks/oneauth/pull/313
- https://github.com/coding-blocks/oneauth/pull/292
- https://github.com/coding-blocks/oneauth/pull/275
- https://github.com/coding-blocks/oneauth/pull/270
- https://github.com/coding-blocks/oneauth/pull/184
- https://github.com/coding-blocks/oneauth/pull/171
Judge Workers and API:
An online code judge backend by Coding Blocks utilising RabbitMQ as a queueing service to manage code submissions and docker images of various programming languages for language support. The API loads the code submission class into the RabbitMQ instantiated job queue which passes it to workers, a collection docker images for various languages. After evaluation, the result class is loaded into success queue to which the API listens and serves to the frontend. Built with Typescript and docker and shell scripting.
Contributions:
- https://github.com/coding-blocks/judge-workers/pull/35
- https://github.com/coding-blocks/judge-workers/pull/27
- https://github.com/coding-blocks/judge-workers/pull/23
- https://github.com/coding-blocks/judge-workers/pull/20
- https://github.com/coding-blocks/judge-workers/pull/39
- https://github.com/coding-blocks/judge-workers/pull/31
- https://github.com/coding-blocks/judge-workers/pull/25
- https://github.com/coding-blocks/judge-workers/pull/19
Codingblocks online:
An online portal serving the video content of the academic lectures provided by coding blocks. Every user has a cart f purchased courses having a curriculum and timeline for accessing the vide content, which streams on the platform. uilt with EmberJS.
Contributions:
- https://github.com/coding-blocks/codingblocks.online.projectx/pull/228
- https://github.com/coding-blocks/codingblocks.online.projectx/pull/100
- https://github.com/coding-blocks/codingblocks.online.projectx/pull/85
Bulls and Bears:
A virtual stock market simulation developed for university chapter of IEEE. Employs Node.js and express for the backend, Angular for the frontend and MongoDB for the database service. Cron jobs ensured uniform fluctuations in stock prices which were weighted by the incoming news score, determining the rise or fall of the stock.
List of contributions to project: https://bit.ly/2FLhz2T
Teamwork
Being a part of the core software team of an IEEE university chapter, I met several peers and juniors with a diverse skill set or the will to acquire them and had the opportunity to collaborate with them on various projects for the technical festival of the university. Interning at Coding Blocks was an especially refreshing experience owing to the dynamic workplace and a driven team of technology enthusiasts helping each other out. The work environment there promoted both an online and a physical presence alike, hence an office environment was just as conducive as an open source environment. From meeting deadlines to brainstorming for ideas, everything was a collaborative effort.
I believe that a team, rather than an individual, is the smallest unit of change in the world.
Passion
I am a Javascript developer at heart and Image Sequencer is one project that has resonated with me from the day I discovered it. The code and its use case was a pleasant surprise to me from day one, and I saw the opportunity to learn and contribute back to the community, all through the same project. The idea of plugins and modules for image processing was something I had not seen before IS, and so my curiosity got the better of me. The publiclab community was what made me stay, with all the support and energy flowing over from issue trackers and Gitter channels. The project, I feel, is really a leap into genius Javascript development, and this proposal aims to further that leap.
Audience
The best part of Image Sequencer is that it is not meant for a niche of users. The use case, just like the potential audience, is huge for this project. A university student sitting at home trying to manipulate images is just as likely to use this as are some mobile laboratory workers who do not have high grade technology at their disposal, and will resort to this light and powerful tool for, say, gauging the size of pollutants in the air using particle analysis or confirming colorimetry tests. A sophisticated enough solution which employs Image Sequencer, like an IoT device or a simple android app could be hugely useful to small scale farmers and workers for home testing their produce for anomalies (like soil pH, mineral concentration etc).
Commitment
I understand the commitment required for the project and the huge ask from the candidate and assure the project mentors of honest and committed contribution. I have no prior engagements this summer and summer of code overlaps with my summer break and I will dedicate anywhere between 6-8 hours daily for the project.
2 Comments
Hi Vibhor! Sorry we've been slow getting responses in to this. Thanks for the proposal! One thing that I wanted to ask a bit more about was how the increasing complexity of the system could be better supported by tests, to become more stable -- i think this is a key to building and maintaining many of these more complex and exciting use cases!
I see you have a number of UI tests planned. How could we distinguish between tests that ALL UI implementations should fulfill, vs. those that our default UI must fulfill?
Second, could we do more to standardize our CLI tests, and to run module tests in the CLI and/or node context as well, so as to ensure that they run in a node environment?
Thirdly, I was thinking there are a number of things that could be done to improve performance in the UI, for example optimizing the preview "resize" operation. I think there's an issue open for this, just FYI.
Finally, we still have substantial UI code in the /examples/lib/ folder. Perhaps consolidating that code could be part of the UI testing work as well.
Thanks for a great proposal!
Is this a question? Click here to post it to the Questions page.
@jywarren Thanks a ton for the substantive feedback!
About the changes, here is what I have in mind:
Regarding the UI testing harness, I had the following in mind:
Specific tests: Providing custom input (to test suite) and checking the output image against a benchmark and also that it should render inside the step div, probably a test for loading images from device (whether it is too large/small - re: image preview optimisation discussed later), saving sequences triggers appropriate modals etc.
General tests: Buttons are rendered and are active/inactive based on events, fields are displayed, basic step UI is rendered correctly, menus are displayed correctly etc.
About standardised CLI testing, we could refactor them inside
test/coreinto three folders:modules(already exists),cliandbrowserAs of now, there is just one test for cli (that too a unit test for a utility cli employs, not an actual cli test) in an independent file and all other tests inside modules folder. I am thinking, individual module tests (which exist as js files with the module as their name eg.
brightness.js). The idea is to move all such files inside modules, which takes care of individual module tests in the node environment.Next, a cli folder to actually test the CLI commands; their error fallbacks and success responses. All this, along with tests for CLI utils, goes inside this folder. https://bit.ly/2Zoft0C is a great resource and a reference point for writing CLI tests for node. This will take care of testing CLI behaviour (since modules are already being tested in node environment).
Lastly, a browser folder which contains all the current tests which are browserified, like the image-sequencer and benchmark suites which test for performance in a browser environment.
For optimisations of preview generations:
. For starters, we could display a warning sign (like you suggested in #922 )
. We could set a limit of the image resolution/size and make it known to the user. If the image exceeds, we could compress it for preview generation purposes, and the single compressed image could be served to all the quick-add steps.
. We could probably employ Javascript web workers for the aforementioned implementation, wherein the entire compression is working in another thread to prevent stalling of the app. Although, any actual improvement in performance would have to be experimented upon by hit and trial.
. Lastly, we could look into resize module optimisations. (Hopefully webassembly on pixel manipulation will already be optimised enough)
For UI refactoring, I came up with the following architecture: A folder called UI in the root of the project having folder like so -
a. Dom: Contains all the html templates that are now written inside default step UI files and returns them. This can be required where ever required. Keeps the javascript and html separate. Also contains preview functionality, and probably functions for initialising different types of input (range, number etc) to be called whenever a step is initialised.

b. Sequencer: Contains `defaultHtmlSequencerUi.js` code (all the JS, no HTML; it will be required from the Dom folder), the `gifshot` code, the `saveSequence` code and the url hashing utils.

c. Step: Contains the default and intermediate HTML step UI code (the JS part).
Apologies for the delayed response, my exams are catching up :D Also, since the webgl-distort and fisheyegl part is up and running, might I take the liberty to go ahead and modify my deliverables a bit? I think I will have a couple of spare weeks now which can be utilised for all the above suggestions and including webpack in the project. Thanks, once again, for the feedback! cc @tech4gt
Is this a question? Click here to post it to the Questions page.
Reply to this comment...
Log in to comment
Login to comment.