
Image above: Taking good photos of the spectra produced by the Public Laboratory fold-up paper spectrometer.
Seeing Mathew's note about taking delivery on 2000 fold-up spectrometers put me over the top and I finally made one. I printed it on black construction paper, super-glued it together, and tried two different gratings: a piece of DVD-R and a piece of 1000 lines/mm diffraction grating film that I bought from (Edmund) Scientifics several years ago (it took me an hour to find it). I tried it with the only webcam I have (Microsoft LifeCam VX-6000) with acceptable results, but then I tried to figure out how each component contributes to the quality of the spectra. So I eliminated the webcam and took really good photos of the spectra with a DSLR and Micro-NIKKOR 55mm 1:3.5 lens. I tried three different entrance slits and both gratings and recorded spectra of my compact fluorescent desk lamp. The photos were uploaded to Spectral Workbench to make spectrographs (search for "clf_cfl").
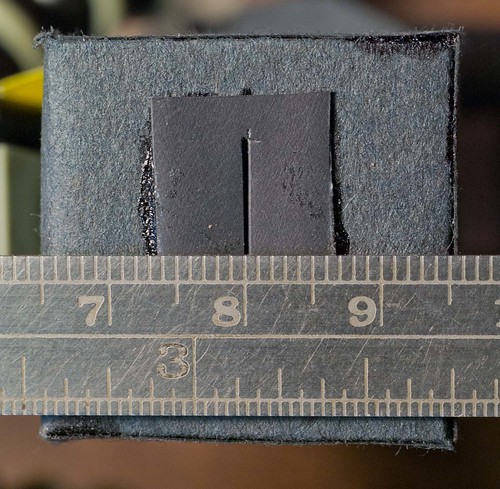
The conclusion of the entrance slit trials is that narrower is better. The narrowest slit I made was about 0.2 mm wide. The 0.5 mm slit blurred the peaks quite a bit. The slit below is cut in black heat-shrink tubing material (not a great choice for flame spectroscopy).
The conclusion of the grating trials is that the DVD-R is almost as good as the grating film. I bought a square foot of the film for less than $10 (similar to this), so I have enough for 100-200 spectrometers. The spectrum displayed by the film is brighter than the DVD spectra, and I had trouble finding the first mercury line (404.7 nm) in the DVD spectra. But almost all the standard peaks below 650 nm are distinguishable with either material.
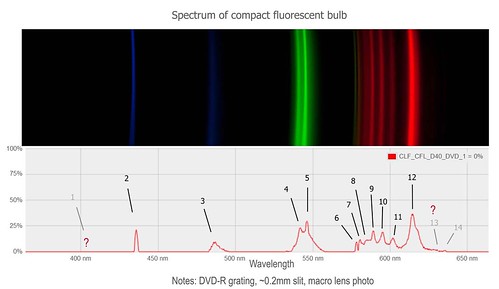
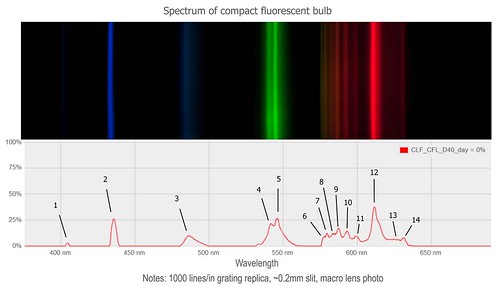
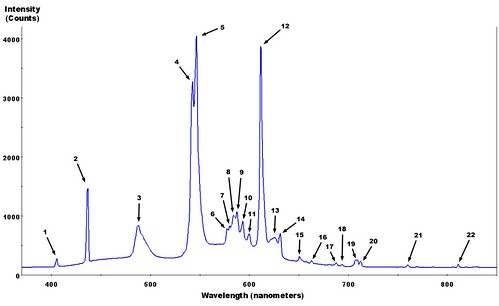
The spectrum below was made with an Ocean Optics HR2000 spectrometer that costs $4200. All of the peaks to the left of 650 nm are more or less distinguishable in the spectrum I made with the 1000 lines per mm grating film (peaks above 700 nm are in the infrared and are invisible to my DSLR). Only a couple of the peaks are missing only in the DVD spectrum. The calibration of the two spectra above differs by up to 5-10 nm (I guess because Spectral Workbench does a linear calibration and uses peaks 2 and 5).
Numbered Peaks above
| Peak number | Species producing peak | Correct wavelength (nm) |
|---|---|---|
| 1 | mercury | 404.656 |
| 2 | mercury | 435.833 |
| 3 | terbium from Tb3+ | ~485 to 490 |
| 4 | terbium from Tb3+ | ~543 to 544 |
| 5 | mercury | 546.074 |
| 6 | likely terbium from Tb3+ or mercury | 576.960 for Hg or ~578 for Tb |
| 7 | mercury or terbium from Tb3+ | 579.066 for Hg or ~580 for Tb |
| 8 | possibly terbium from Tb3+ or europium in Eu+3:Y2O3 | ~580 |
| 9 | likely europium in Eu+3:Y2O3 | ~587 |
| 10 | likely europium in Eu+3:Y2O3 | ~593 |
| 11 | likely europium in Eu+3:Y2O3 | ~598 |
| 12 | europium in Eu+3:Y2O3 | ~611 |
| 13 | likely terbium from Tb3+ | ~625 |
| 14 | likely europium in Eu+3:Y2O3 | ~630 |
| 15 | likely europium in Eu+3:Y2O3 | ~650 |
| 16 | likely europium in Eu+3:Y2O3 | ~661 |
| 17 | likely europium in Eu+3:Y2O3 | ~687-688 |
| 18 | likely europium in Eu+3:Y2O3 | ~693 |
| 19 | likely europium in Eu+3:Y2O3 | ~707 and ~709 |
| 20 | likely europium in Eu+3:Y2O3 | ~712 |
| 21 | likely argon | 758.9315 or 763.5106 (??) |
| 22 | likely argon | 811.531 |
11 Comments
Hi Chris,
In your opinion, what single item improves most the results of the spectrometer? Better camera? The grating? The spectrometer case? In other words, if I want to be able to mimic as much as possible the results off the $4,200 unit, which single improvement will get me closer to its results? Is there anything else that can be added to the DIY unit to make it better?
Thanks for your posts, I've been fiddling myself with my own unit I built a month ago and been having fun since!
Alex
Is this a question? Click here to post it to the Questions page.
Reply to this comment...
Log in to comment
Hi Alex,
I haven't experimented much with webcams yet, so I don't know the answer. I do know that a narrow slit is critical for precisely identifying peaks. And I know that a grating made from a DVD-R produces very good results which can be marginally improved by substituting cheap grating replica film. Then all you have to do is capture an image of the spectrum with a camera. The resolution of an HD webcam is plenty adequate (if you can use the whole sensor), so the critical issues are probably focus and exposure. A crisply focused image is an obvious requirement for resolving peaks. Exposure seems to be tricky because overexposure obscures the peaks by truncating them, and underexposure obscures peaks by not recording them at all. I guess most webcams work in auto exposure mode, but might not perform well when confronted with a black field and a few bright lines. Some webcams probably have better dynamic range (ability to record both bright and dim subjects) than others. So camera choice and setup will be important for good results. I will be interested to learn if a webcam can produce results similar to those above.
Chris
Reply to this comment...
Log in to comment
Chris
Thanks for sharing your views. I believe the exposure issue can be fixed by using High Dynamic Range or HDR technique. I'm not a photography expert but I understand that what this technique does is take one image with "normal" exposure, one with underexposure and another with overexposure, then merges the three images into a single one. I know my iPhone has that feature and my DSLR camera can also do it to a more sophisticated level allowing you to set how many levels of under and over exposure you want. I don't know of any webcam software that can do this (I haven't checked thoroughly) but ill try with my iPhone first to see if the merged image is better than a normal photo. I need to tweak the spectrometer to use it with my phone but that shouldn't be an issue. I'll keep you posted. As for the slit width, I don't have the tools to make one that improves the one I made out of black cardboard. I've thought about making an adjustable slit by using two blades (razor blades painted black) and closing them together somehow (still have to figure how that will work.)
Alex
Reply to this comment...
Log in to comment
I'm very impressed that the foldable spectrometer can get such good resolution. Partially, of course, that's the DSLR, but I'm glad that folks with good cameraphones will be able to get this kind of detail. Basic iOS functionality is actually in the works now, though not via a native app yet.
Reply to this comment...
Log in to comment
Alex - That's an good point that some smart phones do HDR. To improve the chances of great results, users of the smart phone spectrometer could take multiple exposures of each sample. This might require using a "tripod" or something to ensure that the camera does not move between exposures. I guess you are correct that HDR is probably not an option for spectrometers that use a webcam. Instead of making an adjustable slit, I might just make two or three different ones until I figure out which is best. Jeff - Does an iOS user need anything special in order to take photos of spectra and upload them to Spectral Workbench? Or are you working on a video feed from iOS phones to Spectral Workbench?
Is this a question? Click here to post it to the Questions page.
Reply to this comment...
Log in to comment
For the short term, it will prompt you to take a photo, and will allow you to upload it. Once we start on the native app, it will work just like the desktop/Android versions, with a live video feed.
Reply to this comment...
Log in to comment
Chris-- When I was doing the spectrometer tests I found that 2mm was too dim to reliably read the spectra with a cell phone camera and settled on 4mm. these were laser cut though, so they're a little sharper than hand-cut slits. I had better results with thinner slits when hand cut.
Reply to this comment...
Log in to comment
I think maybe you mean 0.2mm and 0.4mm, mathew? Good to know, both of you -- i'm getting the desktop kit slits cut today!! Thanks.
Is this a question? Click here to post it to the Questions page.
Reply to this comment...
Log in to comment
That's a challenge if smartphone cameras are not very sensitive to low light. More tests are called for, but I think the cheap diffraction grating film that I used transmitted about five times more light than the DVD-R. So upgrading to a $4.50 piece of grating film might be smart for smartphone spectrometer users. A half square foot of it costs < $10.
Reply to this comment...
Log in to comment
wow, what a useful research note, thanks for taking the time to post it and explain what you did.
Interesting to be able to compare the ocean optics scope.
great spectra too, awesome work.
The main problem I'm having with my rig is getting enough light in to capture the lines on a cheap webcam. Flame spectroscopy doesn't produce a lot of light and I think the autoexposure on the webcam is fighting me. Moving to a decent camera looks to be the way to go.
thanks again
stu
Reply to this comment...
Log in to comment
Thank you so much for the idea on using heatshrink material as a material for making the slit. This is better than paper or cardboard because it did not leave any fibers behind. To cut the slit I just used an exacto knife and then slightly widened it but shaving away small slivers from the inside. So it is hard to create a specific width but it is possible to keep the slit width very narrow. You can check for the quality of the cut by holding up in the light.
Reply to this comment...
Log in to comment
Login to comment.